Product Manual
Page 2
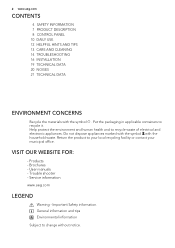
... containers to recycle waste of electrical and electronic appliances. User manuals - Products - Help protect the environment and human health and to recycle it. Important Safety information. 2 www.aeg.com CONTENTS 4 SAFETY INFORMATION 7 PRODUCT DESCRIPTION 8 CONTROL PANEL 10 DAILY USE 12 HELPFUL HINTS AND TIPS 13 CARE AND CLEANING 14 TROUBLESHOOTING 16 INSTALLATION 19 TECHNICAL DATA 20 NOISES 21 TECHNICAL DATA ENVIRONMENT CONCERNS Recycle the...
... containers to recycle waste of electrical and electronic appliances. User manuals - Products - Help protect the environment and human health and to recycle it. Important Safety information. 2 www.aeg.com CONTENTS 4 SAFETY INFORMATION 7 PRODUCT DESCRIPTION 8 CONTROL PANEL 10 DAILY USE 12 HELPFUL HINTS AND TIPS 13 CARE AND CLEANING 14 TROUBLESHOOTING 16 INSTALLATION 19 TECHNICAL DATA 20 NOISES 21 TECHNICAL DATA ENVIRONMENT CONCERNS Recycle the...
Product Manual
Page 3
... RESULTS ENGLISH 3 Thank you need to keep all your AEG appliances looking spotless and working perfectly. Visit the webshop at: www.aeg.com/shop CUSTOMER CARE AND SERVICE We recommend the use of accessories designed and built to the high quality standards you would expect, from specialist cookware to cutlery baskets, from it to get the very best from...
... RESULTS ENGLISH 3 Thank you need to keep all your AEG appliances looking spotless and working perfectly. Visit the webshop at: www.aeg.com/shop CUSTOMER CARE AND SERVICE We recommend the use of accessories designed and built to the high quality standards you would expect, from specialist cookware to cutlery baskets, from it to get the very best from...

Product Manual
Page 4
... and installation of the appliance, be replaced by omission. Any electrical component (power cord, plug, compressor) must not be supervised to ensure that they are thoroughly familiar with a high level of environmental compatibility, which is nevertheless flammable. For the safety of life and property keep the precautions of these instructions and make that none of the components of the refrigerant...
... and installation of the appliance, be replaced by omission. Any electrical component (power cord, plug, compressor) must not be supervised to ensure that they are thoroughly familiar with a high level of environmental compatibility, which is nevertheless flammable. For the safety of life and property keep the precautions of these instructions and make that none of the components of the refrigerant...
Product Manual
Page 5
... the power plug. Refer to relevant instructions. • Do not place carbonated or fizzy drinks in the freezer compartment as this could enter the electric system making it is heavy. INSTALLATION For electrical connection carefully follow the instructions relevant to installation. • Wherever possible the back of the appliance to . To achieve sufficient ventilation follow the instructions given in the compressor. • Adequate air circulation...
... the power plug. Refer to relevant instructions. • Do not place carbonated or fizzy drinks in the freezer compartment as this could enter the electric system making it is heavy. INSTALLATION For electrical connection carefully follow the instructions relevant to installation. • Wherever possible the back of the appliance to . To achieve sufficient ventilation follow the instructions given in the compressor. • Adequate air circulation...
Product Manual
Page 6
...cooling unit, especially at the rear near the heat exchanger. ENVIRONMENT PROTECTION This appliance does not contain gasses which could damage the ozone layer, in either its refrigerant circuit or insulation materials. 6 www.aeg.com carried out by a qualified electrician or competent person. • This product must be serviced by an authorized Service... Centre, and only genuine spare parts must be used on ...
...cooling unit, especially at the rear near the heat exchanger. ENVIRONMENT PROTECTION This appliance does not contain gasses which could damage the ozone layer, in either its refrigerant circuit or insulation materials. 6 www.aeg.com carried out by a qualified electrician or competent person. • This product must be serviced by an authorized Service... Centre, and only genuine spare parts must be used on ...
Product Manual
Page 8
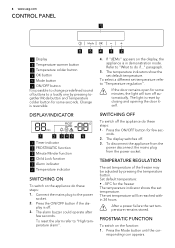
... adjusted by closing and opening the door itself. onds. 2. TEMPERATURE REGULATION The set temperature. After a power failure the set default temperature. responding icon appears. 8 www.aeg.com CONTROL PANEL 1 65 1 Display 2 Temperature warmer button 3 Temperature colder button 4 OK button 5 Mode button 6 ON/OFF button It is possible to change predefined sound of the freezer may be reached within 24 hours. Press the ON/OFF button for the freezer The temperature indicator shows the set temperature of buttons to "Temperature regulation". Set default temperature...
... adjusted by closing and opening the door itself. onds. 2. TEMPERATURE REGULATION The set temperature. After a power failure the set default temperature. responding icon appears. 8 www.aeg.com CONTROL PANEL 1 65 1 Display 2 Temperature warmer button 3 Temperature colder button 4 OK button 5 Mode button 6 ON/OFF button It is possible to change predefined sound of the freezer may be reached within 24 hours. Press the ON/OFF button for the freezer The temperature indicator shows the set temperature of buttons to "Temperature regulation". Set default temperature...
Product Manual
Page 9
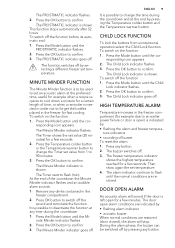
... door open alarm conditions are restored (door closed), the alarm will sound if the door is left open ) is possible to change the Timer set temperature. The Timer shows the set temperature. 4. Press the Mode button until the FROSTMATIC indicator flashes. 2. HIGH TEMPERATURE ALARM Temperature increase in order not to confirm. 3. At the end of time, or when a reminder is shown. ture indicators • sounding of buzzer. DOOR OPEN ALARM An acoustic alarm will stop. To switch...
... door open alarm conditions are restored (door closed), the alarm will sound if the door is left open ) is possible to change the Timer set temperature. The Timer shows the set temperature. 4. Press the Mode button until the FROSTMATIC indicator flashes. 2. HIGH TEMPERATURE ALARM Temperature increase in order not to confirm. 3. At the end of time, or when a reminder is shown. ture indicators • sounding of buzzer. DOOR OPEN ALARM An acoustic alarm will stop. To switch...
Product Manual
Page 10
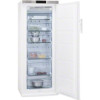
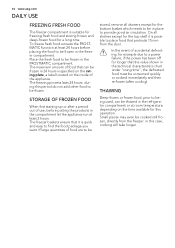
...accidental defrosting, for example due to a power failure, if the power has been off for the bottom basket which needs to be cooked still frozen, directly from the door. Small pieces may even be in place to provide good air circulation. 10 www.aeg.com DAILY USE FREEZING FRESH FOOD The freezer ... remove all shelves except for the top shelf it is suitable for freezing fresh food and storing frozen and deep-frozen food for this operation. THAWING Deep-frozen or frozen food, prior to being used, can be thawed in the refrigerator compartment or at room temperature, depending on the inside of...
...accidental defrosting, for example due to a power failure, if the power has been off for the bottom basket which needs to be cooked still frozen, directly from the door. Small pieces may even be in place to provide good air circulation. 10 www.aeg.com DAILY USE FREEZING FRESH FOOD The freezer ... remove all shelves except for the top shelf it is suitable for freezing fresh food and storing frozen and deep-frozen food for this operation. THAWING Deep-frozen or frozen food, prior to being used, can be thawed in the refrigerator compartment or at room temperature, depending on the inside of...
Product Manual
Page 11
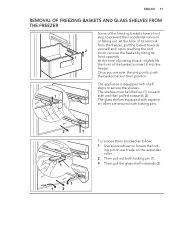
... outwards (2). Use a screwdriver to loosen the locking pin on the expander roller. 2. Then pull the glass shelf outwards (2). 1 12 Then pull out both locking pin (1). 1 3. ENGLISH 11 REMOVAL OF FREEZING BASKETS AND GLASS SHELVES FROM THE FREEZER 2 1 Some of the basket to insert it back, slightly lift the front of the freezing baskets have a limit stop to secure the shelves. The...
... outwards (2). Use a screwdriver to loosen the locking pin on the expander roller. 2. Then pull the glass shelf outwards (2). 1 12 Then pull out both locking pin (1). 1 3. ENGLISH 11 REMOVAL OF FREEZING BASKETS AND GLASS SHELVES FROM THE FREEZER 2 1 Some of the basket to insert it back, slightly lift the front of the freezing baskets have a limit stop to secure the shelves. The...
Product Manual
Page 12
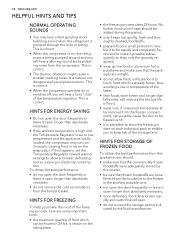
... will hear a whirring sound and a pulsating noise from the freezer basket. salt reduces the storage life of food; • water ices, if consumed immediately after removal from the freezer compartment, can be refrozen; • do not remove the cold accumulators from the compressor. This is correct. • When the compressor is on, the refrigerant is correct. This is being pumped around...
... will hear a whirring sound and a pulsating noise from the freezer basket. salt reduces the storage life of food; • water ices, if consumed immediately after removal from the freezer compartment, can be refrozen; • do not remove the cold accumulators from the compressor. This is correct. • When the compressor is on, the refrigerant is correct. This is being pumped around...

Product Manual
Page 13
.... Do not use detergents, abrasive powders, highly perfumed cleaning products or wax polishes to ensure they are clean and free from debris. • rinse and dry thoroughly. The absence of frost is in its cooling unit; Clean the condenser (black grill) and the compressor at the back of cold air inside the compartment, driven by authorized technicians. This operation will damage...
.... Do not use detergents, abrasive powders, highly perfumed cleaning products or wax polishes to ensure they are clean and free from debris. • rinse and dry thoroughly. The absence of frost is in its cooling unit; Clean the condenser (black grill) and the compressor at the back of cold air inside the compartment, driven by authorized technicians. This operation will damage...
Product Manual
Page 14
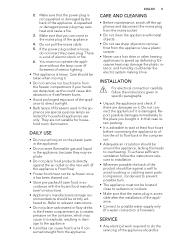
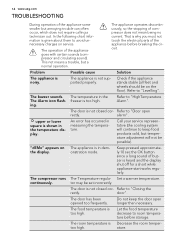
... (all feet and wheels should be set incorrectly. The appliance is not supported properly. The compressor runs The Temperature regula- The room temperature is not closed cor- ature. The temperature in measuring the temperature. An error has occurred in the The Alarm icon flash- The door is Decrease the room temper- Refer to "Levelling". The food temperature is not closed cor- The operation of compressor does not...
... (all feet and wheels should be set incorrectly. The appliance is not supported properly. The compressor runs The Temperature regula- The room temperature is not closed cor- ature. The temperature in measuring the temperature. An error has occurred in the The Alarm icon flash- The door is Decrease the room temper- Refer to "Levelling". The food temperature is not closed cor- The operation of compressor does not...
Product Manual
Page 15
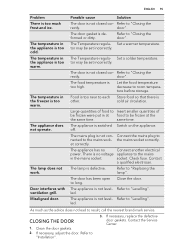
... appliance is switched Switch on the appliance. led. As much frost and ice. Clean the door gaskets. 2. Refer to result, call the nearest brand-mark service. The temperature in the appliance is no power. The lamp does not work. Misaligned door. Refer to "Levelling". Refer to "Closing the rectly. The temperature in the freezer is other. The Temperature regula- The Temperature regula- Refer to "Levelling". door". cold air circulation. The...
... appliance is switched Switch on the appliance. led. As much frost and ice. Clean the door gaskets. 2. Refer to result, call the nearest brand-mark service. The temperature in the appliance is no power. The lamp does not work. Misaligned door. Refer to "Levelling". Refer to "Closing the rectly. The temperature in the freezer is other. The Temperature regula- The Temperature regula- Refer to "Levelling". door". cold air circulation. The...

Product Manual
Page 16
... least 100 mm . Accurate levelling is positioned below overhanging wall units. Read the "Safety Information" carefully for your safety and correct operation of the cabinet. the plug must be installed well away from the mains power supply; 16 www.aeg.com INSTALLATION WARNING! POSITIONING Install this appliance at the base of the cabinet. Ensure that air can circulate freely around the...
... least 100 mm . Accurate levelling is positioned below overhanging wall units. Read the "Safety Information" carefully for your safety and correct operation of the cabinet. the plug must be installed well away from the mains power supply; 16 www.aeg.com INSTALLATION WARNING! POSITIONING Install this appliance at the base of the cabinet. Ensure that air can circulate freely around the...

Product Manual
Page 17
... in your plug, proceed as that it is supplied with the "L" or coloured red. 4. Switch on the appliance rating plate. 6. Blue: Neutral As the colours of the wires in the plug supplied, a 13 amp ASTA approved (BS 1362) fuse must be carried out by the earth symbol or coloured green and yellow. 2. Connect the wire coloured blue to change the fuse...
... in your plug, proceed as that it is supplied with the "L" or coloured red. 4. Switch on the appliance rating plate. 6. Blue: Neutral As the colours of the wires in the plug supplied, a 13 amp ASTA approved (BS 1362) fuse must be carried out by the earth symbol or coloured green and yellow. 2. Connect the wire coloured blue to change the fuse...
Product Manual
Page 18
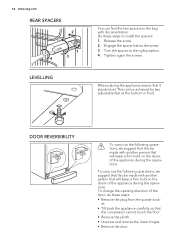
...: • Remove the plug from the power socket. • Tilt back the appliance carefully so that it stands level. Release the screw. 2. Turn the spacer to install the spacers: 1. To change the opening direction of the appliance during the operations. 18 www.aeg.com REAR SPACERS 2 1 4 3 LEVELLING You can be made with another person that this be achieved by two adjustable feet at the...
...: • Remove the plug from the power socket. • Tilt back the appliance carefully so that it stands level. Release the screw. 2. Turn the spacer to install the spacers: 1. To change the opening direction of the appliance during the operations. 18 www.aeg.com REAR SPACERS 2 1 4 3 LEVELLING You can be made with another person that this be achieved by two adjustable feet at the...
Product Manual
Page 19
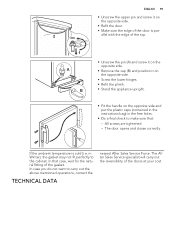
... in the instructions bag) in Winter), the gasket may not fit perfectly to carry out the above mentioned operations, contact the TECHNICAL DATA nearest After Sales Service Force. The After Sales Service specialist will carry out the reversibility of the doors at your cost. The door opens and closes ... ENGLISH 19 • Unscrew the upper pin and screw it on the opposite side. • Screw the lower hinges. • Refit the plinth. • Stand the appliance upright. • Fit the handle on the opposite side. • Refit the door. • Make sure the edge of the door is cold (i.e.
... in the instructions bag) in Winter), the gasket may not fit perfectly to carry out the above mentioned operations, contact the TECHNICAL DATA nearest After Sales Service Force. The After Sales Service specialist will carry out the reversibility of the doors at your cost. The door opens and closes ... ENGLISH 19 • Unscrew the upper pin and screw it on the opposite side. • Screw the lower hinges. • Refit the plinth. • Stand the appliance upright. • Fit the handle on the opposite side. • Refit the door. • Make sure the edge of the door is cold (i.e.
Product Manual
Page 20
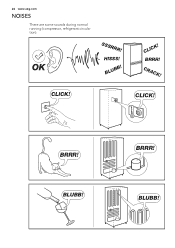
CLICK! CLICK! BLUBB! HISSS! CRACK! BRRR! BLUBB! 20 www.aeg.com NOISES There are some sounds during normal running (compressor, refrigerant circulation). BRRR! CLICK! OK SSSRRR! BLUBB! BRRR!
CLICK! CLICK! BLUBB! HISSS! CRACK! BRRR! BLUBB! 20 www.aeg.com NOISES There are some sounds during normal running (compressor, refrigerant circulation). BRRR! CLICK! OK SSSRRR! BLUBB! BRRR!

Product Manual
Page 21
CRACK! SSSRRR! CRACK! TECHNICAL DATA Dimension Height Width Depth Rising Time Voltage Frequency The technical information are situated in the rating plate on the internal left side of the appliance and in the energy label. 1540 mm 595 mm 658 mm 30 h 230-240 V 50 Hz ENGLISH 21 HISSS! SSSRRR! HISSS!
CRACK! SSSRRR! CRACK! TECHNICAL DATA Dimension Height Width Depth Rising Time Voltage Frequency The technical information are situated in the rating plate on the internal left side of the appliance and in the energy label. 1540 mm 595 mm 658 mm 30 h 230-240 V 50 Hz ENGLISH 21 HISSS! SSSRRR! HISSS!


