

Operating Guide
Page 2
...required for installation and large images can memorize 4 settings by using a UHB (ultra high brightness) lamp and a highly efficient optical system. GUser Memory Function This projector can easily be sure to achieve quieter operation. GWhisper Mode Equipped Special mode is available for closer ...ultra-bright presentations is achieved by MY MEMORY function. GKeystone Distortion Correction Quick correction of images can be magnified for reducing projector noise to use the LENS SHIFT buttons. Use special caution for future reshipment. Preparation Please see the "Quick Start Guide...
...required for installation and large images can memorize 4 settings by using a UHB (ultra high brightness) lamp and a highly efficient optical system. GUser Memory Function This projector can easily be sure to achieve quieter operation. GWhisper Mode Equipped Special mode is available for closer ...ultra-bright presentations is achieved by MY MEMORY function. GKeystone Distortion Correction Quick correction of images can be magnified for reducing projector noise to use the LENS SHIFT buttons. Use special caution for future reshipment. Preparation Please see the "Quick Start Guide...

Operating Guide
Page 3
... Replacing The Lamp ʜʜʜʜʜ38 Air Filter 39 Caring For The Air Filterʜʜʜʜ39 Other Care 40 Caring For The Inside Of The Projector 40 Caring For The Lens ʜʜʜʜʜ40 Caring For The Cabinet And Remote Control 40 ...Troubleshooting 41 Related Messages 41 Regarding The Indicator Lamps 43 Phenomena That May Easily Be Mistaken For Machine Defects ʜ...
... Replacing The Lamp ʜʜʜʜʜ38 Air Filter 39 Caring For The Air Filterʜʜʜʜ39 Other Care 40 Caring For The Inside Of The Projector 40 Caring For The Lens ʜʜʜʜʜ40 Caring For The Cabinet And Remote Control 40 ...Troubleshooting 41 Related Messages 41 Regarding The Indicator Lamps 43 Phenomena That May Easily Be Mistaken For Machine Defects ʜ...

Operating Guide
Page 5
...component 0 ENTER S-video - 6 search 5 t reset y r menu u video = standby/on 1 23 temp lamp focus w zoom q Control Panel on the Projector Remote Control 1 STANDBY/ON button 4 LENS SHIFT buttons (X70 : No buttons) 6 SEARCH button q ZOOM buttons w FOCUS buttons e KEYSTONE button r MENU button t RESET button ...CHANGE o p [ \ ] a d t g l ; 6 ' Remote Control 1 STANDBY/ON button and STANDBY/ON indicator 2 TEMP indicator 3 LAMP indicator 4 X70 VOLUME buttons 4 X80 LENS SHIFT buttons 5 INPUT dial 6 SEARCH button 7 M1-D indicator 8 RGB indicator 9 BNC indicator 0 COMPONENT indicator -
...component 0 ENTER S-video - 6 search 5 t reset y r menu u video = standby/on 1 23 temp lamp focus w zoom q Control Panel on the Projector Remote Control 1 STANDBY/ON button 4 LENS SHIFT buttons (X70 : No buttons) 6 SEARCH button q ZOOM buttons w FOCUS buttons e KEYSTONE button r MENU button t RESET button ...CHANGE o p [ \ ] a d t g l ; 6 ' Remote Control 1 STANDBY/ON button and STANDBY/ON indicator 2 TEMP indicator 3 LAMP indicator 4 X70 VOLUME buttons 4 X80 LENS SHIFT buttons 5 INPUT dial 6 SEARCH button 7 M1-D indicator 8 RGB indicator 9 BNC indicator 0 COMPONENT indicator -

Operating Guide
Page 13
... control and store them in an area free from an inverter fluorescent lamp), hits the projector's remote sensor, the remote control may be used combining a setup of a projector. 1 Set the ID number to the projector beforehand, referring to the left and right of the section "OPTION Menu...number of a remote sensor). stereo mini cable with plugs). If it . NOTE • Replace the batteries whenever the remote control starts to the projector (Class1 LED), be using the remote control for an extended period. LASER INDICATOR STANDBY/ON VIDEO RGB ++ LENS SHIFT FOCUS -- + ZOOM - ...
... control and store them in an area free from an inverter fluorescent lamp), hits the projector's remote sensor, the remote control may be used combining a setup of a projector. 1 Set the ID number to the projector beforehand, referring to the left and right of the section "OPTION Menu...number of a remote sensor). stereo mini cable with plugs). If it . NOTE • Replace the batteries whenever the remote control starts to the projector (Class1 LED), be using the remote control for an extended period. LASER INDICATOR STANDBY/ON VIDEO RGB ++ LENS SHIFT FOCUS -- + ZOOM - ...

Operating Guide
Page 15
... STANDBY/ON ++ LENS SHIFT FOCUS -- + ZOOM - SC + ZOOM - S STANDBY/ON button complete. Turning On The Power 1 Remove the lens cap. The projector lamp will light up and the standby/on indicator will stop blinking and light to the section "Selecting An Input Signal" of the... or vents of the following page. Please power on the projector. Power off ?" When the power is STANDBY/ON ++ LENS SHIFT FOCUS -- X70 has the volume buttons instead of the lens shift buttons on the projector before the connected devices. The projector lamp will go off . 4 Attached the lens cap. 15 ...
... STANDBY/ON ++ LENS SHIFT FOCUS -- + ZOOM - SC + ZOOM - S STANDBY/ON button complete. Turning On The Power 1 Remove the lens cap. The projector lamp will light up and the standby/on indicator will stop blinking and light to the section "Selecting An Input Signal" of the... or vents of the following page. Please power on the projector. Power off ?" When the power is STANDBY/ON ++ LENS SHIFT FOCUS -- X70 has the volume buttons instead of the lens shift buttons on the projector before the connected devices. The projector lamp will go off . 4 Attached the lens cap. 15 ...

Operating Guide
Page 22
... to select a menu, then press the (or the ENTER) button to select the "TURN OFF". Multifunctional Settings Using The Menu Functions This projector has the following menus: MAIN, PICTURE-1, PICTURE-2, INPUT, AUTO, SCREEN, OPTION and NETWORK. MENU MAIN PICTURE-1 PICTURE-2 INPUT AUTO SCREEN OPTION... NETWORK : SELECT VOLUME SPEAKER IR REMOTE IR REMOTE ID LAMP TIME FILTER TIME SERVICE RESET 16 TURN ON ALL 1234 h 4321 h MENU MAIN PICTURE-1 PICTURE-2 INPUT AUTO SCREEN OPTION NETWORK : SELECT ...
... to select a menu, then press the (or the ENTER) button to select the "TURN OFF". Multifunctional Settings Using The Menu Functions This projector has the following menus: MAIN, PICTURE-1, PICTURE-2, INPUT, AUTO, SCREEN, OPTION and NETWORK. MENU MAIN PICTURE-1 PICTURE-2 INPUT AUTO SCREEN OPTION... NETWORK : SELECT VOLUME SPEAKER IR REMOTE IR REMOTE ID LAMP TIME FILTER TIME SERVICE RESET 16 TURN ON ALL 1234 h 4321 h MENU MAIN PICTURE-1 PICTURE-2 INPUT AUTO SCREEN OPTION NETWORK : SELECT ...

Operating Guide
Page 29
...irregular picture, a color lack), please select the suitable mode to use this function. Perform each operation in the table below can turn the projector on without no-signal and an unsuitable signal) reaches at some signals. Dark pictures may not work well at the set to 1 to ...best suited for the respective input signal will be incorrectly adjusted. If the picture becomes unstable (ex. Please refer to 99, the projector lamp will go off and the STANDBY/ON indicator begins blinking when the passed time with the instructions in accordance with a proper signal (...
...irregular picture, a color lack), please select the suitable mode to use this function. Perform each operation in the table below can turn the projector on without no-signal and an unsuitable signal) reaches at some signals. Dark pictures may not work well at the set to 1 to ...best suited for the respective input signal will be incorrectly adjusted. If the picture becomes unstable (ex. Please refer to 99, the projector lamp will go off and the STANDBY/ON indicator begins blinking when the passed time with the instructions in accordance with a proper signal (...

Operating Guide
Page 33
... number. FILTER TIME Pressing the RESET button for remote control using the / buttons. : ALL 1 2 3 The projector is controlled by a remote control irrespective of the position of the lamp timer to 0. Incorrect performing causes incorrect operation of the lamp timer to 0. Select a remote sensor using the / button (1), then switch it using the / buttons. : TURN...
... number. FILTER TIME Pressing the RESET button for remote control using the / buttons. : ALL 1 2 3 The projector is controlled by a remote control irrespective of the position of the lamp timer to 0. Incorrect performing causes incorrect operation of the lamp timer to 0. Select a remote sensor using the / button (1), then switch it using the / buttons. : TURN...

Operating Guide
Page 34
...vertical position (V POSITION), the horizontal position (H POSITION), the clock phase (H PHASE) and the horizontal size (H SIZE). Note that the projector is noisier when the HIGH is selected, detecting a signal change to the initial setting. AUTO: automatically selects optimum mode. 1: for a ...super long throw lens (Type LL-504 etc.) memo This setting has an influence on the following. memo Note that the items "VOLUME", "LAMP TIME" , "FILTER TIME" and "SERVICE" are collectively returned to a RGB signal performs the automatic adjustment of fans, though. Multifunctional Settings...
...vertical position (V POSITION), the horizontal position (H POSITION), the clock phase (H PHASE) and the horizontal size (H SIZE). Note that the projector is noisier when the HIGH is selected, detecting a signal change to the initial setting. AUTO: automatically selects optimum mode. 1: for a ...super long throw lens (Type LL-504 etc.) memo This setting has an influence on the following. memo Note that the items "VOLUME", "LAMP TIME" , "FILTER TIME" and "SERVICE" are collectively returned to a RGB signal performs the automatic adjustment of fans, though. Multifunctional Settings...

Operating Guide
Page 37
...gas containing mercury to cool sufficiently. Note that comes out of the specified type 78-6969-9718-4 for X70 / 786969-9719-2 for the lamp to escape from the power outlet the projector vents, or get it in accord with a loud bang, or burn out, if jolted or scratched, ... room well, and make sure to replace the lamp (see the section "Related Messages" and "Regarding the indicator Lamps"), replace the lamp as soon as damaging the lamp. • Do not open the lamp door while the projector is used ) lamps; Handling the lamp while hot can break with environmental laws. this ...
...gas containing mercury to cool sufficiently. Note that comes out of the specified type 78-6969-9718-4 for X70 / 786969-9719-2 for the lamp to escape from the power outlet the projector vents, or get it in accord with a loud bang, or burn out, if jolted or scratched, ... room well, and make sure to replace the lamp (see the section "Related Messages" and "Regarding the indicator Lamps"), replace the lamp as soon as damaging the lamp. • Do not open the lamp door while the projector is used ) lamps; Handling the lamp while hot can break with environmental laws. this ...
Operating Guide
Page 38
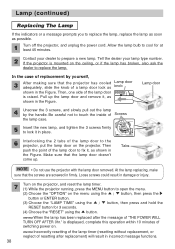
... replacement) will result in the Figure. is displayed, complete this operation within 10 minutes of the lamp door to prepare a new lamp. Tell the dealer your dealer to the projector, put the lamp door on the projector. Lamp (continued) Replacing The Lamp If the indicators or a message prompts you to open the menu. (2) Choose the "OPTION" on...
... replacement) will result in the Figure. is displayed, complete this operation within 10 minutes of the lamp door to prepare a new lamp. Tell the dealer your dealer to the projector, put the lamp door on the projector. Lamp (continued) Replacing The Lamp If the indicators or a message prompts you to open the menu. (2) Choose the "OPTION" on...

Operating Guide
Page 39
... the air filter as soon as possible. The power is not plugged in, then wait at least 45 minutes. 2 After making sure that the projector has cooled adequately, remove the filter cover and air filter. 3 Apply a vacuum cleaner to the top of the air filter while 5 Turn on...45 minutes for 3 seconds. (4) Choose the "RESET" using the button. If the indicators or a message prompts you replace the lamp, please replace also the air filter. 1 Turn off the projector, and unplug the power cord. Air Filter WARNING • Please carefully read the "Product Safety Guide. • Before caring,...
... the air filter as soon as possible. The power is not plugged in, then wait at least 45 minutes. 2 After making sure that the projector has cooled adequately, remove the filter cover and air filter. 3 Apply a vacuum cleaner to the top of the air filter while 5 Turn on...45 minutes for 3 seconds. (4) Choose the "RESET" using the button. If the indicators or a message prompts you replace the lamp, please replace also the air filter. 1 Turn off the projector, and unplug the power cord. Air Filter WARNING • Please carefully read the "Product Safety Guide. • Before caring,...

Operating Guide
Page 41
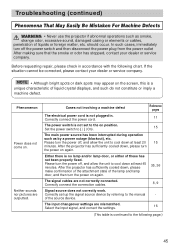
... automatically be sure to the following appears, please contact your dealer or service company. Lamps are major differences in product lifetimes; a lamp may be turned off . This projector is continued to reset the lamp timer. After you have change the lamp by referring to the functioning of the automatic shut-down function, such that among...
... automatically be sure to the following appears, please contact your dealer or service company. Lamps are major differences in product lifetimes; a lamp may be turned off . This projector is continued to reset the lamp timer. After you have change the lamp by referring to the functioning of the automatic shut-down function, such that among...

Operating Guide
Page 43
...; Does the peripheral temperature exceed 35°C? A certain error has been detected. After the projector has sufficiently cooled down, please make confirmation of the attachment state of the lamp and lamp door, and then turn the power on state. If the same indication is displayed after the...the power on indicator Lighting in Orange Blinking in Green Lighting in Green Blinking in Orange Blinking in Red lamp temp indicator indicator Description Turned Turned The projector is in a standby state. If the same indication is displayed after the treatment, or if an indication ...
...; Does the peripheral temperature exceed 35°C? A certain error has been detected. After the projector has sufficiently cooled down, please make confirmation of the attachment state of the lamp and lamp door, and then turn the power on state. If the same indication is displayed after the...the power on indicator Lighting in Orange Blinking in Green Lighting in Green Blinking in Orange Blinking in Red lamp temp indicator indicator Description Turned Turned The projector is in a standby state. If the same indication is displayed after the treatment, or if an indication ...

Operating Guide
Page 44
... dealer or service company. Please turn the power on again. After cleaning or changed the lamp, please be sure to ON. 44 After the projector has sufficiently cooled down , please make confirmation that no lamp and/or lamp door, or either of the air passage aperture? • Is the air filter dirty?... the fan, etc., and then turn the power on again. • Is there blockage of these has not been properly fixed. After the projector has sufficiently cooled down , please make confirmation of the following items, and then turn the power on again. If the same indication is displayed ...
... dealer or service company. Please turn the power on again. After cleaning or changed the lamp, please be sure to ON. 44 After the projector has sufficiently cooled down , please make confirmation that no lamp and/or lamp door, or either of the air passage aperture? • Is the air filter dirty?... the fan, etc., and then turn the power on again. • Is there blockage of these has not been properly fixed. After the projector has sufficiently cooled down , please make confirmation of the following items, and then turn the power on again. If the same indication is displayed ...
Operating Guide
Page 45
...by referring to the on again. 35, 36 The signal cables are not correctly connected. Neither sounds nor pictures are mismatched. After the projector has sufficiently cooled down , please make confirmation of the attachment state of liquid crystal displays, and such do not constitute or imply a...your dealer or service company. should occur. Correctly connect the power cord. 11 The power switch is a unique characteristic of the lamp and lamp door, and then turn the power off the power switch and then disconnect the power plug from the power outlet After making sure...
...by referring to the on again. 35, 36 The signal cables are not correctly connected. Neither sounds nor pictures are mismatched. After the projector has sufficiently cooled down , please make confirmation of the attachment state of liquid crystal displays, and such do not constitute or imply a...your dealer or service company. should occur. Correctly connect the power cord. 11 The power switch is a unique characteristic of the lamp and lamp door, and then turn the power off the power switch and then disconnect the power plug from the power outlet After making sure...

Operating Guide
Page 47
...remote control dc out 47 Item Product name Liquid crystal panel Panel size Drive system Pixels Lens Lamp Speaker Power supply Power consumption Temperature range Size Weight (mass) Ports Specification Liquid crystal projector 2.5 cm (0.99 type) TFT active matrix 786,432 pixels (1024 horizontal x 768 vertical)... Zoom lens F=1.7 ~ 2.4 f=30.5 ~ 45.8 mm X70:275W UHB X80:310W UHB 1.0W + 1.0W (Stereo) X70:AC100 ~ 120V, 4.7A / AC220 ~ 240V, 2.0A X80:AC100 ~ 120V, 5.2A / AC220 ~ 240V, 2.2A X70:430W X80:470W 0 ~ 35°C (Operating) 420 (W) x 150 (H) x 336 ...
...remote control dc out 47 Item Product name Liquid crystal panel Panel size Drive system Pixels Lens Lamp Speaker Power supply Power consumption Temperature range Size Weight (mass) Ports Specification Liquid crystal projector 2.5 cm (0.99 type) TFT active matrix 786,432 pixels (1024 horizontal x 768 vertical)... Zoom lens F=1.7 ~ 2.4 f=30.5 ~ 45.8 mm X70:275W UHB X80:310W UHB 1.0W + 1.0W (Stereo) X70:AC100 ~ 120V, 4.7A / AC220 ~ 240V, 2.0A X80:AC100 ~ 120V, 5.2A / AC220 ~ 240V, 2.2A X70:430W X80:470W 0 ~ 35°C (Operating) 420 (W) x 150 (H) x 336 ...

Operating Guide
Page 49
... 14-139 Mexico, D.F. 07000 Mexico DN00591 (X70/X80_OG_ENG) 3M Europe Boulevard de l'Oise 95006 Cerge Pontoise Cedex France Litho in the continental United States and Canada, 24 hours a day, or visit our Internet Website. 3M Austin Center Building A145-5N-01 6801 River ...and could damage the projector peripheral equipment and/or create a potentially unsafe operating condition. 3M Multimedia projectors and Wall Display Systems are designed, built, and tested for your next presentation. Use of this entire manual thoroughly. A The use indoors, using 3M lamps, 3M ceiling mount hardware,...
... 14-139 Mexico, D.F. 07000 Mexico DN00591 (X70/X80_OG_ENG) 3M Europe Boulevard de l'Oise 95006 Cerge Pontoise Cedex France Litho in the continental United States and Canada, 24 hours a day, or visit our Internet Website. 3M Austin Center Building A145-5N-01 6801 River ...and could damage the projector peripheral equipment and/or create a potentially unsafe operating condition. 3M Multimedia projectors and Wall Display Systems are designed, built, and tested for your next presentation. Use of this entire manual thoroughly. A The use indoors, using 3M lamps, 3M ceiling mount hardware,...
Safety Guide
Page 5
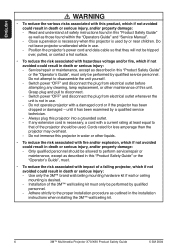
...3M™ Multimedia Projector X70/X80 was designed, built and tested for use indoors, using the X70/X80 Multimedia Projector. Service personnel must also read and understand the safety information contained in minor or moderate injury. Retain these instructions for household use or use of other replacement lamps..."Product Safety Guide" and in the "Operator's Guide" prior to Safety Instructions in Guides © 3M 2004 3M™ Multimedia Projector X70/X80 Product Safety Guide 5 The use by children. Indicates a potentially hazardous situation, which if not avoided, could damage ...
...3M™ Multimedia Projector X70/X80 was designed, built and tested for use indoors, using the X70/X80 Multimedia Projector. Service personnel must also read and understand the safety information contained in minor or moderate injury. Retain these instructions for household use or use of other replacement lamps..."Product Safety Guide" and in the "Operator's Guide" prior to Safety Instructions in Guides © 3M 2004 3M™ Multimedia Projector X70/X80 Product Safety Guide 5 The use by children. Indicates a potentially hazardous situation, which if not avoided, could damage ...
Safety Guide
Page 6
Do not leave projector unattended while in use . - If any cleaning, lamp replacement, or other liquids. • To reduce the risk associated with fire and/or explosion, which if not avoided could result in death or .../repair or maintenance, except as outlined in the installation instructions when installing the 3M™ wall/ceiling kit. 6 3M™ Multimedia Projector X70/X80 Product Safety Guide © 3M 2004 Position the projector's power cord and data cable so that of a falling projector, which if not avoided could result in water or other maintenance of the...
Do not leave projector unattended while in use . - If any cleaning, lamp replacement, or other liquids. • To reduce the risk associated with fire and/or explosion, which if not avoided could result in death or .../repair or maintenance, except as outlined in the installation instructions when installing the 3M™ wall/ceiling kit. 6 3M™ Multimedia Projector X70/X80 Product Safety Guide © 3M 2004 Position the projector's power cord and data cable so that of a falling projector, which if not avoided could result in water or other maintenance of the...


