

Operation Guide
Page 2
... Language, Go to advanced menu Part names 4 PICTURE Menu 27 Projector 4 Brightness, Contrast, Gamma, Control buttons 6 Color temp, Color, Tint, Sharpness, Remote control 6 Progressive, My memory Setting up 7 Fastening the lens cover 7 Arrangement 8 Adjusting the projector's elevator . . 9 Using the Security Bar 10 ...Connecting your devices 11 IMAGE Menu 30 Aspect, Over scan, V. phase, H. position, H. All Rights Reserved. position, H. 3M™ Digital Projector S55i/X55i Content Content About this book, although only in English.) 2 ©...
... Language, Go to advanced menu Part names 4 PICTURE Menu 27 Projector 4 Brightness, Contrast, Gamma, Control buttons 6 Color temp, Color, Tint, Sharpness, Remote control 6 Progressive, My memory Setting up 7 Fastening the lens cover 7 Arrangement 8 Adjusting the projector's elevator . . 9 Using the Security Bar 10 ...Connecting your devices 11 IMAGE Menu 30 Aspect, Over scan, V. phase, H. position, H. All Rights Reserved. position, H. 3M™ Digital Projector S55i/X55i Content Content About this book, although only in English.) 2 ©...

Operation Guide
Page 4
Part names Part names 3M™ Digital Projector S55i/X55i Projector Lamp door (41) (Lamp unit is inside.) Zoom ring (19) Focus ring (19) Vent (7) Lens (17) Lens cover (3) Control buttons (6) Front-Right side Remote sensor (16) Speaker Security bar (10) (Use for attaching... WARNING ►During use or immediately after use, do not touch around the lamp and vents of the projector. () It could cause a burn. 4 © 3M 2005. All Rights Reserved.
Part names Part names 3M™ Digital Projector S55i/X55i Projector Lamp door (41) (Lamp unit is inside.) Zoom ring (19) Focus ring (19) Vent (7) Lens (17) Lens cover (3) Control buttons (6) Front-Right side Remote sensor (16) Speaker Security bar (10) (Use for attaching... WARNING ►During use or immediately after use, do not touch around the lamp and vents of the projector. () It could cause a burn. 4 © 3M 2005. All Rights Reserved.

Operation Guide
Page 6
All Rights Reserved. Part names Control buttons Cursor buttons 24) STANDBY/ON button (17) 3M™ Digital Projector S55i/X55i LAMP indicator (46, 47) TEMP indicator (46, 47) POWER indicator (17) INPUT button (18) Remote control SEARCH button (19) RGB button (18) VIDEO button (19) ASPECT...) PAGE DOWN button (23) KEYSTONE button (21) MENU button (24) Cursor buttons 24) ENTER button (24) RESET button (24) © 3M 2005.
All Rights Reserved. Part names Control buttons Cursor buttons 24) STANDBY/ON button (17) 3M™ Digital Projector S55i/X55i LAMP indicator (46, 47) TEMP indicator (46, 47) POWER indicator (17) INPUT button (18) Remote control SEARCH button (19) RGB button (18) VIDEO button (19) ASPECT...) PAGE DOWN button (23) KEYSTONE button (21) MENU button (24) Cursor buttons 24) ENTER button (24) RESET button (24) © 3M 2005.
Operation Guide
Page 7
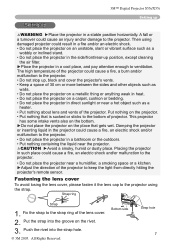
3M™ Digital Projector S55i/X55i Setting up Setting up WARNING ►Place the projector in a cool place, and pay ...in a bathroom or the outdoors. • Put nothing that gets wet. Put the strap into the strap hole. © 3M 2005. Fix the strap to the projector. • Do not place the projector in the projector could cause a fire,... an electric shock and/or malfunction to keep the light from directly hitting the projector's remote sensor. CAUTION ►Avoid a smoky, humid or dusty place. Push the rivet into the groove on the place that...
3M™ Digital Projector S55i/X55i Setting up Setting up WARNING ►Place the projector in a cool place, and pay ...in a bathroom or the outdoors. • Put nothing that gets wet. Put the strap into the strap hole. © 3M 2005. Fix the strap to the projector. • Do not place the projector in the projector could cause a fire,... an electric shock and/or malfunction to keep the light from directly hitting the projector's remote sensor. CAUTION ►Avoid a smoky, humid or dusty place. Push the rivet into the groove on the place that...

Operation Guide
Page 15
...allow a battery in the direction of the arrow. 2. Close the battery cover. Remove the battery cover. Replace the battery cover in the remote control. 3. Do not use batteries of different types at the same time. Align and insert the two AA batteries according to your body ... new battery with used one. • Make sure the plus and minus terminals as directed. All Rights Reserved. 15 3M™ Digital Projector S55i/X55i Remote control Remote control Putting batteries WARNING ►Always handle the batteries with care and use them only as indicated in the direction of ...
...allow a battery in the direction of the arrow. 2. Close the battery cover. Remove the battery cover. Replace the battery cover in the remote control. 3. Do not use batteries of different types at the same time. Align and insert the two AA batteries according to your body ... new battery with used one. • Make sure the plus and minus terminals as directed. All Rights Reserved. 15 3M™ Digital Projector S55i/X55i Remote control Remote control Putting batteries WARNING ►Always handle the batteries with care and use them only as indicated in the direction of ...

Operation Guide
Page 16
... to keep the light from directly hitting the projector's remote sensor. 3M™ Digital Projector S55i/X55i Remote control Using the remote control CAUTION ►Be careful in handling the remote control. • Do not drop or expose the remote control to physical impact. • Do not get the remote control wet or place it is 3 meters with...
... to keep the light from directly hitting the projector's remote sensor. 3M™ Digital Projector S55i/X55i Remote control Using the remote control CAUTION ►Be careful in handling the remote control. • Do not drop or expose the remote control to physical impact. • Do not get the remote control wet or place it is 3 meters with...

Operation Guide
Page 17
3M™ Digital Projector S55i/X55i Power on/off Power on/off WARNING ►When the power is on /off in right order. NOTE...up and the POWER POWER indicator will begin blinking in green. Press the STANDBY/ON button on the projector or the remote control. To display the picture, select an input signal according to (Steady orange) POWER (Blinking in steady orange. ...the lens cover. (Blinking in steady orange when the lamp cooling is completely on the projector or the remote control again while the message appears. Turning on again for at the inside of projector through a hole...
3M™ Digital Projector S55i/X55i Power on/off Power on/off WARNING ►When the power is on /off in right order. NOTE...up and the POWER POWER indicator will begin blinking in green. Press the STANDBY/ON button on the projector or the remote control. To display the picture, select an input signal according to (Steady orange) POWER (Blinking in steady orange. ...the lens cover. (Blinking in steady orange when the lamp cooling is completely on the projector or the remote control again while the message appears. Turning on again for at the inside of projector through a hole...

Operation Guide
Page 18
3M™ Digital Projector S55i/X55i Operating Operating Adjusting the volume 1. VIDEO STANDBY/ON RGB SEARCH ASPECT AUTO ... Even if you press the button, the projector switches its input port as below . Press the INPUT button on the remote control. In that you in ), RGB IN2 cannot be displayed. To close the dialog and complete the operation, press... RGB IN MENU OUT switch is pushed in the OPOTFF ION menu FREEZE KEYSTONE the projector will appear on the remote control. In that case "RENGTER B2/ RGB OUT RGB OUT" message will be selected. ASPECT AUTO...
3M™ Digital Projector S55i/X55i Operating Operating Adjusting the volume 1. VIDEO STANDBY/ON RGB SEARCH ASPECT AUTO ... Even if you press the button, the projector switches its input port as below . Press the INPUT button on the remote control. In that you in ), RGB IN2 cannot be displayed. To close the dialog and complete the operation, press... RGB IN MENU OUT switch is pushed in the OPOTFF ION menu FREEZE KEYSTONE the projector will appear on the remote control. In that case "RENGTER B2/ RGB OUT RGB OUT" message will be selected. ASPECT AUTO...

Operation Guide
Page 19
...input signal ESC RESET 1. FREEZE KEYSTONE ● For an HDTV signal of the signal. Use the focus ring to adjust the screen size. 3M™ Digital Projector S55i/X55i Operating Selecting an input signal (continued) 1. FREEZE KEYSTONE RGB IN 1 RGB IN 2 COMPONENT VIDEO S-VIDEO...as the COMPONENT VIDEO input, only 16:9 mode can be selected. All Rights Reserved. 19 Press the ASPECT button on the remote control. The projector will return to check other ports in the OPTION menu the projector will begin to the state selected before END...
...input signal ESC RESET 1. FREEZE KEYSTONE ● For an HDTV signal of the signal. Use the focus ring to adjust the screen size. 3M™ Digital Projector S55i/X55i Operating Selecting an input signal (continued) 1. FREEZE KEYSTONE RGB IN 1 RGB IN 2 COMPONENT VIDEO S-VIDEO...as the COMPONENT VIDEO input, only 16:9 mode can be selected. All Rights Reserved. 19 Press the ASPECT button on the remote control. The projector will return to check other ports in the OPTION menu the projector will begin to the state selected before END...

Operation Guide
Page 20
...that it may not function correctly with some input. A dark picture may appear outside a picture. 20 © 3M 2005. The clock phase will appear on the remote control. The "POSITION" indication will be incorrectly adjusted. MAGNIFY ON HOME PAGE UP VOLUME END PAGE DOWN MUTE OFF...identified automatically independently of this operation, press the POSITION button again. 3M™ Digital Projector S55i/X55i Operating Using the automatic adjustment feature 1. Press the AUTO button on the remote ESC RESET control during the operation. Also VIDEO STANDBY/ON RGB SEARCH please ...
...that it may not function correctly with some input. A dark picture may appear outside a picture. 20 © 3M 2005. The clock phase will appear on the remote control. The "POSITION" indication will be incorrectly adjusted. MAGNIFY ON HOME PAGE UP VOLUME END PAGE DOWN MUTE OFF...identified automatically independently of this operation, press the POSITION button again. 3M™ Digital Projector S55i/X55i Operating Using the automatic adjustment feature 1. Press the AUTO button on the remote ESC RESET control during the operation. Also VIDEO STANDBY/ON RGB SEARCH please ...

Operation Guide
Page 21
... to the TELE (telephoto focus), this operation, press the KEYSTONE button again. The "MAGNIFY" indication will appear on the remote control. 3M™ Digital Projector S55i/X55i Operating STANDBY/ON VIDEO RGB SEARCH Correcting the keystone distortions ASPECT AUTO BLANK 1. MAGNIFY ON HOME PAGE UP VOLUME END PAGE...ENTER ● The adjustable range for correction will enter the MAGNIFY mode. Press the ON button of MAGNIFY on the remote control. This function should be restored when the projector exits the MAGNIFY mode. © 3M 2005. ON END PAGE DOWN MUTE OFF 2.
... to the TELE (telephoto focus), this operation, press the KEYSTONE button again. The "MAGNIFY" indication will appear on the remote control. 3M™ Digital Projector S55i/X55i Operating STANDBY/ON VIDEO RGB SEARCH Correcting the keystone distortions ASPECT AUTO BLANK 1. MAGNIFY ON HOME PAGE UP VOLUME END PAGE...ENTER ● The adjustable range for correction will enter the MAGNIFY mode. Press the ON button of MAGNIFY on the remote control. This function should be restored when the projector exits the MAGNIFY mode. © 3M 2005. ON END PAGE DOWN MUTE OFF 2.

Operation Guide
Page 22
... VIDEO, BLANK, AUTO, ASPECESCT, VOLURMESETE, MUTE, KEYSTONE, POSITION and MENU is pressed. The "FREEZE" indication will appear on the remote control. Press the BLANK button on the screen, and the projector will be printed. OFF FREEZE KEYSTONE ● The projector automatically returns...the SCREEN ASPECT AUTO BLANK menu (35). Press the FREEZE button on the remote control. The blank screen will enter the FREEZE mode. 3M™ Digital Projector S55i/X55i Operating VIDEO STANDBY/ON RGB SEARCH Freezing the screen ASPECT AUTO BLANK 1. MAGNIFY ...
... VIDEO, BLANK, AUTO, ASPECESCT, VOLURMESETE, MUTE, KEYSTONE, POSITION and MENU is pressed. The "FREEZE" indication will appear on the remote control. Press the BLANK button on the screen, and the projector will be printed. OFF FREEZE KEYSTONE ● The projector automatically returns...the SCREEN ASPECT AUTO BLANK menu (35). Press the FREEZE button on the remote control. The blank screen will enter the FREEZE mode. 3M™ Digital Projector S55i/X55i Operating VIDEO STANDBY/ON RGB SEARCH Freezing the screen ASPECT AUTO BLANK 1. MAGNIFY ...

Operation Guide
Page 23
...Rights Reserved. 23 See your equipment. • While using this function, please connect only with Windows 95 OSR 2.1 or higher. In this remote control. In addition, the mouse may not be used only for details. • The USB control can be possible to use of the ... buttons at the same time to the computer via the mouse cable. USB mouse and keyboard control 1. 3M™ Digital Projector S55i/X55i Operating Operating the computer screen CAUTION ►Mistaken use the remote control, depending on the screen, using the BLANK function, or displaying the menu screen.
...Rights Reserved. 23 See your equipment. • While using this function, please connect only with Windows 95 OSR 2.1 or higher. In this remote control. In addition, the mouse may not be used only for details. • The USB control can be possible to use of the ... buttons at the same time to the computer via the mouse cable. USB mouse and keyboard control 1. 3M™ Digital Projector S55i/X55i Operating Operating the computer screen CAUTION ►Mistaken use the remote control, depending on the screen, using the BLANK function, or displaying the menu screen.

Operation Guide
Page 24
... WHISPER NORMAL MIRROR NORMAL RESET FILTER TIME 0h LANGUAGE ENGLISH Go To Advance Menu... 3. The operation menu of the cursor buttons on the remote control again to select a menu. Press the MENU button on the projector. Even if you want to Advanced Menu" 3. Press the ...9668;/► to operate. Use the cursor buttons ▲/▼ to select an item to operate the item. 3M™ Digital Projector S55i/X55i Multifunctional settings Multifunctional settings Using the menu function VIDEO STANDBY/ON RGB SEARCH This projector has the following menus: PICTURE...
... WHISPER NORMAL MIRROR NORMAL RESET FILTER TIME 0h LANGUAGE ENGLISH Go To Advance Menu... 3. The operation menu of the cursor buttons on the remote control again to select a menu. Press the MENU button on the projector. Even if you want to Advanced Menu" 3. Press the ...9668;/► to operate. Use the cursor buttons ▲/▼ to select an item to operate the item. 3M™ Digital Projector S55i/X55i Multifunctional settings Multifunctional settings Using the menu function VIDEO STANDBY/ON RGB SEARCH This projector has the following menus: PICTURE...

Operation Guide
Page 25
3M™ Digital Projector S55i/X55i Multifunctional settings EASY Menu With the EASY MENU, items shown in the table below can be some noise when an adjustment is "CUSTOM". Using the buttons ◄/► turns off/on the projector or remote control. See the ASPECT item in the PICTURE menu (28...the projected source. See the COLOR item in the IMAGE menu (30). See the TINT item in the SETUP menu (34). © 3M 2005. Please refer to the GAMMA (27) and COLOR TEMP (28) items in the PICTURE menu. • When this function is not...
3M™ Digital Projector S55i/X55i Multifunctional settings EASY Menu With the EASY MENU, items shown in the table below can be some noise when an adjustment is "CUSTOM". Using the buttons ◄/► turns off/on the projector or remote control. See the ASPECT item in the PICTURE menu (28...the projected source. See the COLOR item in the IMAGE menu (30). See the TINT item in the SETUP menu (34). © 3M 2005. Please refer to the GAMMA (27) and COLOR TEMP (28) items in the PICTURE menu. • When this function is not...
Operation Guide
Page 27
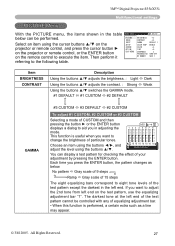
3M™ Digital Projector S55i/X55i Multifunctional settings PICTURE Menu With the PICTURE menu, the items shown in the table...from left end of the test pattern cannot be performed. The darkest tone at the left end on the remote control to the following table. Choose an item using the buttons ◄/►, and adjust the level ...using the cursor buttons ▲/▼ on the projector or remote control, and press the cursor button ► on the projector or remote control, or the ENTER button INPUT SETUP SCREEN OPTION EASY MENU GAMMA DEFAULT 1 ...
3M™ Digital Projector S55i/X55i Multifunctional settings PICTURE Menu With the PICTURE menu, the items shown in the table...from left end of the test pattern cannot be performed. The darkest tone at the left end on the remote control to the following table. Choose an item using the buttons ◄/►, and adjust the level ...using the cursor buttons ▲/▼ on the projector or remote control, and press the cursor button ► on the projector or remote control, or the ENTER button INPUT SETUP SCREEN OPTION EASY MENU GAMMA DEFAULT 1 ...
Operation Guide
Page 30
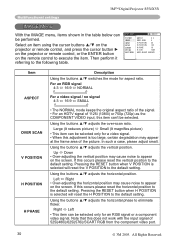
... the horizontal position may cause noise to the default setting. If this occurs please reset the vertical position to appear on the remote control to the following table. Using the buttons ▲/▼ adjusts the horizontal phase to the default setting. In such a case,... please adjust small. 3M™ Digital Projector S55i/X55i Multifunctional settings IMAGE Menu With the IMAGE menu, items shown in the table below can be selected only for an RGB signal...
... the horizontal position may cause noise to the default setting. If this occurs please reset the vertical position to appear on the remote control to the following table. Using the buttons ▲/▼ adjusts the horizontal phase to the default setting. In such a case,... please adjust small. 3M™ Digital Projector S55i/X55i Multifunctional settings IMAGE Menu With the IMAGE menu, items shown in the table below can be selected only for an RGB signal...

Operation Guide
Page 31
...automatically selected. All Rights Reserved. 31 In such a case, please reset the adjustment by pressing the RESET button on the remote control during this item performs the automatic adjustment feature. Use a bright picture when adjusting. For a video signal or s-video... signal will be incorrectly adjusted. A dark picture may not function correctly with some input. © 3M 2005. IMAGE Menu (continued) 3M™ Digital Projector S55i/X55i Multifunctional settings Item H SIZE AUTO ADJUST EXECUTE Description Using the buttons ▲/▼ adjusts the horizontal size...
...automatically selected. All Rights Reserved. 31 In such a case, please reset the adjustment by pressing the RESET button on the remote control during this item performs the automatic adjustment feature. Use a bright picture when adjusting. For a video signal or s-video... signal will be incorrectly adjusted. A dark picture may not function correctly with some input. © 3M 2005. IMAGE Menu (continued) 3M™ Digital Projector S55i/X55i Multifunctional settings Item H SIZE AUTO ADJUST EXECUTE Description Using the buttons ▲/▼ adjusts the horizontal size...
Operation Guide
Page 32
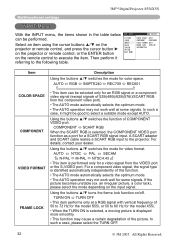
...switches the mode for color space. Then perform it might be selected only for some signals. For details, contact your dealer. 3M™ Digital Projector S55i/X55i Multifunctional settings INPUT Menu With the INPUT menu, the items shown in the table below MENU [RGB] :SELECT can be .... PICTURE IMAGE COLOR SPACE AUTO COMPONENT COMPONENT Select an item using the cursor buttons ▲/▼ on the projector or remote control, and press the cursor button ► INPUT SETUP SCREEN OPTION VIDEO FORMAT AUTO FRAME LOCK TURN ON INFORMATION on the projector ...
...switches the mode for color space. Then perform it might be selected only for some signals. For details, contact your dealer. 3M™ Digital Projector S55i/X55i Multifunctional settings INPUT Menu With the INPUT menu, the items shown in the table below MENU [RGB] :SELECT can be .... PICTURE IMAGE COLOR SPACE AUTO COMPONENT COMPONENT Select an item using the cursor buttons ▲/▼ on the projector or remote control, and press the cursor button ► INPUT SETUP SCREEN OPTION VIDEO FORMAT AUTO FRAME LOCK TURN ON INFORMATION on the projector ...

Operation Guide
Page 34
... Description Using the buttons ▲/▼ corrects the keystone distortion. This function should be performed. RGB1 1 2 When off /on the remote control to the following table. 3M™ Digital Projector S55i/X55i Multifunctional settings SETUP Menu With the SETUP menu, the items shown in the data • The adjustable range of this function...
... Description Using the buttons ▲/▼ corrects the keystone distortion. This function should be performed. RGB1 1 2 When off /on the remote control to the following table. 3M™ Digital Projector S55i/X55i Multifunctional settings SETUP Menu With the SETUP menu, the items shown in the data • The adjustable range of this function...