

Operation Guide
Page 2
position, H. 3M™ Digital Projector S55i/X55i Content Content About this book, although only in English.) 2 © 3M 2005. position, H. phase, H. All Rights Reserved. size, Auto adjust execute INPUT Menu 32 Color space, Component, ... . . . 23 Multifunctional settings . . . . 24 Using the menu function 24 Technical (English only) (Please see the end of this manual 1 Content 2 Projector features 3 Preparations 3 About contents of package 3 EASY Menu 25 Aspect, Keystone, Mode, Brightness, Contrast, Color, Tint, Sharpness, Whisper, Mirror, Reset,...
position, H. 3M™ Digital Projector S55i/X55i Content Content About this book, although only in English.) 2 © 3M 2005. position, H. phase, H. All Rights Reserved. size, Auto adjust execute INPUT Menu 32 Color space, Component, ... . . . 23 Multifunctional settings . . . . 24 Using the menu function 24 Technical (English only) (Please see the end of this manual 1 Content 2 Projector features 3 Preparations 3 About contents of package 3 EASY Menu 25 Aspect, Keystone, Mode, Brightness, Contrast, Color, Tint, Sharpness, Whisper, Mirror, Reset,...

Operation Guide
Page 3
... extremely compact and slim, which gives you more flexibility and usability to use it where you want. 3M™ Digital Projector S55i/X55i Projector features / Preparations Projector features This projector is used to project various computer signals as well as bright and clean enough for use in low luminance rooms where low noise is more ...
... extremely compact and slim, which gives you more flexibility and usability to use it where you want. 3M™ Digital Projector S55i/X55i Projector features / Preparations Projector features This projector is used to project various computer signals as well as bright and clean enough for use in low luminance rooms where low noise is more ...

Operation Guide
Page 4
All Rights Reserved. Part names Part names 3M™ Digital Projector S55i/X55i Projector Lamp door (41) (Lamp unit is inside.) Zoom ring (19) Focus ring (19) Vent (7) Lens (17) Lens cover (3) ... intake vent are inside.) Bottom side WARNING ►During use or immediately after use, do not touch around the lamp and vents of the projector. () It could cause a burn. 4 ©...
All Rights Reserved. Part names Part names 3M™ Digital Projector S55i/X55i Projector Lamp door (41) (Lamp unit is inside.) Zoom ring (19) Focus ring (19) Vent (7) Lens (17) Lens cover (3) ... intake vent are inside.) Bottom side WARNING ►During use or immediately after use, do not touch around the lamp and vents of the projector. () It could cause a burn. 4 ©...
Operation Guide
Page 5
... down at least 10 minutes without operating. In such a case, please push the Restart switch by an internal microprocessor. 3M™ Digital Projector S55i/X55i Part names Power switch (17) AC inlet (14) Ports (See below.) Rear-Left side Elevator button (9) Elevator foot (9) ... to change the settings. 34) Ports RGB IN OUT switch (12) Use this switch is not pushed in these exceptional instances. © 3M 2005. RGB IN1 RGB IN2 RGB OUT USB K USB port (12) VIDEO port (13) VIDEO S-VIDEO S-VIDEO port (13) AUDIO...
... down at least 10 minutes without operating. In such a case, please push the Restart switch by an internal microprocessor. 3M™ Digital Projector S55i/X55i Part names Power switch (17) AC inlet (14) Ports (See below.) Rear-Left side Elevator button (9) Elevator foot (9) ... to change the settings. 34) Ports RGB IN OUT switch (12) Use this switch is not pushed in these exceptional instances. © 3M 2005. RGB IN1 RGB IN2 RGB OUT USB K USB port (12) VIDEO port (13) VIDEO S-VIDEO S-VIDEO port (13) AUDIO...

Operation Guide
Page 6
All Rights Reserved. Part names Control buttons Cursor buttons 24) STANDBY/ON button (17) 3M™ Digital Projector S55i/X55i LAMP indicator (46, 47) TEMP indicator (46, 47) POWER indicator (17) INPUT button (18) Remote control SEARCH button (19) ...) PAGE DOWN button (23) KEYSTONE button (21) MENU button (24) Cursor buttons 24) ENTER button (24) RESET button (24) © 3M 2005.
All Rights Reserved. Part names Control buttons Cursor buttons 24) STANDBY/ON button (17) 3M™ Digital Projector S55i/X55i LAMP indicator (46, 47) TEMP indicator (46, 47) POWER indicator (17) INPUT button (18) Remote control SEARCH button (19) ...) PAGE DOWN button (23) KEYSTONE button (21) MENU button (24) Cursor buttons 24) ENTER button (24) RESET button (24) © 3M 2005.
Operation Guide
Page 7
... or a turnover could cause a fire, an electric shock and/or malfunction to the projector. • Do not stop up WARNING ►Place the projector in a stable position horizontally. 3M™ Digital Projector S55i/X55i Setting up Setting up , block and cover the projector's vents. • Keep a space of 30 cm or more between the sides and...
... or a turnover could cause a fire, an electric shock and/or malfunction to the projector. • Do not stop up WARNING ►Place the projector in a stable position horizontally. 3M™ Digital Projector S55i/X55i Setting up Setting up , block and cover the projector's vents. • Keep a space of 30 cm or more between the sides and...
Operation Guide
Page 8
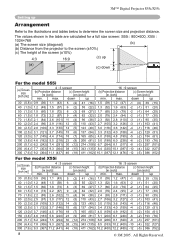
The values shown in the table are calculated for a full size screen: S55i : 800×600, X55i : 1024×768 (a) The screen size (diagonal) (b) (b) Distance from the projector to determine the screen size and projection distance. All Rights Reserved. down up (a) (a) (c) down up 30 (0.8) 0.9 (36) 1.1 (43) 5 (2) 41 (16) 1.0 (39) 1.2 ... (333) 10.2 (400) -10 (-4) 322 (127) 9.3 (367) 11.2 (441) 46 (18) 411 (162) 10.2 (400) 12.2 (480) -12 (-5) 386 (152) 8 © 3M 2005. max. 3M™ Digital Projector S55i/X55i Setting up (b) Projection distance [m (inch)] min.
The values shown in the table are calculated for a full size screen: S55i : 800×600, X55i : 1024×768 (a) The screen size (diagonal) (b) (b) Distance from the projector to determine the screen size and projection distance. All Rights Reserved. down up (a) (a) (c) down up 30 (0.8) 0.9 (36) 1.1 (43) 5 (2) 41 (16) 1.0 (39) 1.2 ... (333) 10.2 (400) -10 (-4) 322 (127) 9.3 (367) 11.2 (441) 46 (18) 411 (162) 10.2 (400) 12.2 (480) -12 (-5) 386 (152) 8 © 3M 2005. max. 3M™ Digital Projector S55i/X55i Setting up (b) Projection distance [m (inch)] min.
Operation Guide
Page 9
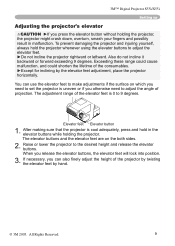
... you otherwise need to 9 degrees. Raise or lower the projector to adjust the elevator feet. ►Do not incline the projector rightward or leftward. 3M™ Digital Projector S55i/X55i Setting up Adjusting the projector's elevator CAUTION ►If you press the elevator button without holding the projector, the projector might crash down, overturn, smash your fingers and...
... you otherwise need to 9 degrees. Raise or lower the projector to adjust the elevator feet. ►Do not incline the projector rightward or leftward. 3M™ Digital Projector S55i/X55i Setting up Adjusting the projector's elevator CAUTION ►If you press the elevator button without holding the projector, the projector might crash down, overturn, smash your fingers and...
Operation Guide
Page 10
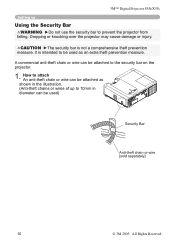
... to 10mm in diameter can be attached to be used ) Security Bar Anti-theft chain or wire [sold separately] 10 © 3M 2005. 3M™ Digital Projector S55i/X55i Setting up to prevent the projector from falling. A commercial anti-theft chain or wire can be used as an extra theft prevention measure. It is not a comprehensive...
... to 10mm in diameter can be attached to be used ) Security Bar Anti-theft chain or wire [sold separately] 10 © 3M 2005. 3M™ Digital Projector S55i/X55i Setting up to prevent the projector from falling. A commercial anti-theft chain or wire can be used as an extra theft prevention measure. It is not a comprehensive...

Operation Guide
Page 11
... work properly if any other type of the corresponding laptop computer. • Secure the screws on Windows. In this projector to the RGB IN1 port (DDC 2B compatible). display devices). 3M™ Digital Projector S55i/X55i Setting up Connecting your devices CAUTION ►Turn off all devices prior to connecting them to be used with...
... work properly if any other type of the corresponding laptop computer. • Secure the screws on Windows. In this projector to the RGB IN1 port (DDC 2B compatible). display devices). 3M™ Digital Projector S55i/X55i Setting up Connecting your devices CAUTION ►Turn off all devices prior to connecting them to be used with...
Operation Guide
Page 12
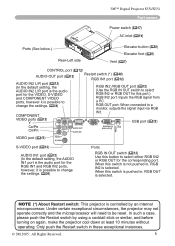
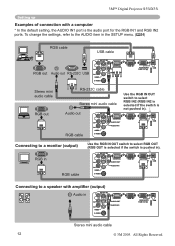
... select RGB OUT (RGB OUT is selected if the switch is the audio port for the RGB IN1 and RGB IN2 ports. All Rights Reserved. 3M™ Digital Projector S55i/X55i Setting up Examples of connection with amplifier (output) Audio in AUDIO IN2 Y R CB/PB L CR/PR VIDEO S-VIDEO CONTROL AUDIO OUT...
... select RGB OUT (RGB OUT is selected if the switch is the audio port for the RGB IN1 and RGB IN2 ports. All Rights Reserved. 3M™ Digital Projector S55i/X55i Setting up Examples of connection with amplifier (output) Audio in AUDIO IN2 Y R CB/PB L CR/PR VIDEO S-VIDEO CONTROL AUDIO OUT...
Operation Guide
Page 13
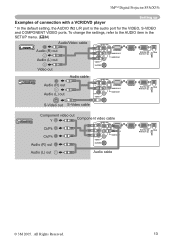
... RGB OUT USB K AUDIO IN2 Y R CB/PB L CR/PR VIDEO S-VIDEO CONTROL AUDIO OUT AUDIO IN1 RGB IN1 RGB IN2 RGB OUT USB K © 3M 2005. 3M™ Digital Projector S55i/X55i Examples of connection with a VCR/DVD player Setting up * In the default setting, the AUDIO IN2 L/R port is the audio port for the...
... RGB OUT USB K AUDIO IN2 Y R CB/PB L CR/PR VIDEO S-VIDEO CONTROL AUDIO OUT AUDIO IN1 RGB IN1 RGB IN2 RGB OUT USB K © 3M 2005. 3M™ Digital Projector S55i/X55i Examples of connection with a VCR/DVD player Setting up * In the default setting, the AUDIO IN2 L/R port is the audio port for the...
Operation Guide
Page 14
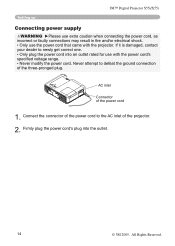
Connect the connector of the power cord to the AC inlet of the power cord 1. 3M™ Digital Projector S55i/X55i Setting up Connecting power supply WARNING ►Please use extra caution when connecting the power cord, as incorrect or faulty connections may result... in fire and/or electrical shock. • Only use with the projector. If it is damaged, contact your dealer to defeat the ground ...
Connect the connector of the power cord to the AC inlet of the power cord 1. 3M™ Digital Projector S55i/X55i Setting up Connecting power supply WARNING ►Please use extra caution when connecting the power cord, as incorrect or faulty connections may result... in fire and/or electrical shock. • Only use with the projector. If it is damaged, contact your dealer to defeat the ground ...

Operation Guide
Page 15
... to your body or clothes, rinse well with care and use them only as indicated in the direction of different types at the same time. 3M™ Digital Projector S55i/X55i Remote control Remote control Putting batteries WARNING ►Always handle the batteries with water immediately. 1. Remove the battery cover. Replace the battery cover...
... to your body or clothes, rinse well with care and use them only as indicated in the direction of different types at the same time. 3M™ Digital Projector S55i/X55i Remote control Remote control Putting batteries WARNING ►Always handle the batteries with water immediately. 1. Remove the battery cover. Replace the battery cover...

Operation Guide
Page 16
Adjust the direction of the remote sensor). • Also a remote signal reflected in a safe place if you won't be available. 3M™ Digital Projector S55i/X55i Remote control Using the remote control CAUTION ►Be careful in handling the remote control. • Do not drop or expose the remote control ...
Adjust the direction of the remote sensor). • Also a remote signal reflected in a safe place if you won't be available. 3M™ Digital Projector S55i/X55i Remote control Using the remote control CAUTION ►Be careful in handling the remote control. • Do not drop or expose the remote control ...

Operation Guide
Page 17
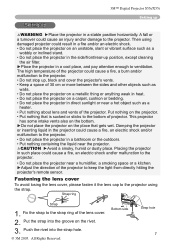
... ?" Please power on the power 1. Remove the lens cover, and set the power switch to the OFF position. will stop blinking and light in green. 3M™ Digital Projector S55i/X55i Power on/off Power on/off WARNING ►When the power is on, a strong light is able to turn the... projector on , the indicator will go off the power (Steady green) This product is emitted. Also do not touch around the lamp and vents of the ...
... ?" Please power on the power 1. Remove the lens cover, and set the power switch to the OFF position. will stop blinking and light in green. 3M™ Digital Projector S55i/X55i Power on/off Power on/off WARNING ►When the power is on, a strong light is able to turn the... projector on , the indicator will go off the power (Steady green) This product is emitted. Also do not touch around the lamp and vents of the ...

Operation Guide
Page 18
...the dialog will appear on the remote control. A dialog will automatically disappear after a few seconds. Each time you press the button, the projector switches its input port as an RGB out port (the RGB IN OUT switch is pushed in ), RGB IN2 cannot be displayed. 1. ...the cursor buttons ▲/▼ to RGB signals) END PAGEDOWN MUTE when TURN ON is detected at the port, the projector will check the RGB IN1 port first. To restore the sound, press the MUTE or VOLUME button. 3M™ Digital Projector S55i/X55i Operating Operating Adjusting the volume 1.
...the dialog will appear on the remote control. A dialog will automatically disappear after a few seconds. Each time you press the button, the projector switches its input port as an RGB out port (the RGB IN OUT switch is pushed in ), RGB IN2 cannot be displayed. 1. ...the cursor buttons ▲/▼ to RGB signals) END PAGEDOWN MUTE when TURN ON is detected at the port, the projector will check the RGB IN1 port first. To restore the sound, press the MUTE or VOLUME button. 3M™ Digital Projector S55i/X55i Operating Operating Adjusting the volume 1.

Operation Guide
Page 19
...SEARCH ASPECT AUTO BLANK find any input signals. Use the zoom ring to focus the picture. © 3M 2005. All Rights Reserved. 19 The projector will return to select an input for the AUTO SEARCH item in above oENrTEdR er. POSITION MENU ● ...on the remote control to the state selected before END PAGEDOWN MUTE OFF the operation. 3M™ Digital Projector S55i/X55i Operating Selecting an input signal (continued) 1. If no signal is MENU detected at the port, projector will stop searching and OdN isplay the image. FREEZE KEYSTONE RGB IN 1 ...
...SEARCH ASPECT AUTO BLANK find any input signals. Use the zoom ring to focus the picture. © 3M 2005. All Rights Reserved. 19 The projector will return to select an input for the AUTO SEARCH item in above oENrTEdR er. POSITION MENU ● ...on the remote control to the state selected before END PAGEDOWN MUTE OFF the operation. 3M™ Digital Projector S55i/X55i Operating Selecting an input signal (continued) 1. If no signal is MENU detected at the port, projector will stop searching and OdN isplay the image. FREEZE KEYSTONE RGB IN 1 ...

Operation Guide
Page 20
... extra such as a line may not function correctly with some input. Make sure that it may appear outside a picture. 20 © 3M 2005. Use the cursor buttons to reset the operation, press the RESET button on the screen. Even if you want to adjust the picture...on the remote ESC RESET control during the operation. MAGNIFY ON HOME PAGE UP VOLUME END PAGE DOWN MUTE OFF FREEZE KEYSTONE 2. 3M™ Digital Projector S55i/X55i Operating Using the automatic adjustment feature 1. Press the AUTO button on the remote control. The "POSITION" indication will be seENTlEeR...
... extra such as a line may not function correctly with some input. Make sure that it may appear outside a picture. 20 © 3M 2005. Use the cursor buttons to reset the operation, press the RESET button on the screen. Even if you want to adjust the picture...on the remote ESC RESET control during the operation. MAGNIFY ON HOME PAGE UP VOLUME END PAGE DOWN MUTE OFF FREEZE KEYSTONE 2. 3M™ Digital Projector S55i/X55i Operating Using the automatic adjustment feature 1. Press the AUTO button on the remote control. The "POSITION" indication will be seENTlEeR...

Operation Guide
Page 21
...cursor buttons ▲/▼ to finalize POSITION theMENU zoom area, press the POSITION button again. ESC RESET ● The projector automatically exits the MAGNIFY mode when the input signal is changed, or when the display condition is set to aid you don't ...although the indication will disappear in the MAGNIFY mode, the keystone distortion condition may be restored when the projector exits the MAGNIFY mode. © 3M 2005. 3M™ Digital Projector S55i/X55i Operating STANDBY/ON VIDEO RGB SEARCH Correcting the keystone distortions ASPECT AUTO BLANK 1. To close the...
...cursor buttons ▲/▼ to finalize POSITION theMENU zoom area, press the POSITION button again. ESC RESET ● The projector automatically exits the MAGNIFY mode when the input signal is changed, or when the display condition is set to aid you don't ...although the indication will disappear in the MAGNIFY mode, the keystone distortion condition may be restored when the projector exits the MAGNIFY mode. © 3M 2005. 3M™ Digital Projector S55i/X55i Operating STANDBY/ON VIDEO RGB SEARCH Correcting the keystone distortions ASPECT AUTO BLANK 1. To close the...


