Operation Guide
Page 1
Document téléchargé sur www.lampe-videoprojecteur.info MP8795 Multimedia Projector Operator's Guide © 3M 2003. All Rights Reserved.
Document téléchargé sur www.lampe-videoprojecteur.info MP8795 Multimedia Projector Operator's Guide © 3M 2003. All Rights Reserved.
Operation Guide
Page 2
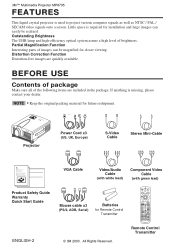
... Please read the "Product Safety Guide" and this manual. © 3M 2003. CONTENTS Page FEATURES 2 BEFORE USE 2 Contents of Package 2 Part Names 3 Loading the Batteries 5 INSTALLATION 6 Installation of the Projector and Screen........6 Angle Adjustment 6 Cabling 7 Power Connection 8 Example of ...6 Table 2. Input Menu 13 Table 6. Setup Menu 12 Table 5. No Signal Menu 16 Table 9. ENGLISH 3M™ Multimedia Projector MP8795 Liquid Crystal Projector Operator's Guide Thank you for any errors that may appear in this manual • The reproduction, transmission or ...
... Please read the "Product Safety Guide" and this manual. © 3M 2003. CONTENTS Page FEATURES 2 BEFORE USE 2 Contents of Package 2 Part Names 3 Loading the Batteries 5 INSTALLATION 6 Installation of the Projector and Screen........6 Angle Adjustment 6 Cabling 7 Power Connection 8 Example of ...6 Table 2. Input Menu 13 Table 6. Setup Menu 12 Table 5. No Signal Menu 16 Table 9. ENGLISH 3M™ Multimedia Projector MP8795 Liquid Crystal Projector Operator's Guide Thank you for any errors that may appear in this manual • The reproduction, transmission or ...
Operation Guide
Page 3
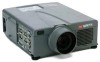
...; Keep the original packing material for closer viewing. Sicherheitsanleitung des Gerats MP8775i Proyector de Multimedia - Guia da Seguranca de Produto MP8775i Multimedia Projektør- Guía de Seguridad del Producto MP8775i Proiettore Multimediale - All Rights Reserved. Veiligheidgids op Product MP8775i Projector dos Multimedia - 3M™ Multimedia Projector MP8795 FEATURES This liquid crystal projector is missing, please contact your dealer.
...; Keep the original packing material for closer viewing. Sicherheitsanleitung des Gerats MP8775i Proyector de Multimedia - Guia da Seguranca de Produto MP8775i Multimedia Projektør- Guía de Seguridad del Producto MP8775i Proiettore Multimediale - All Rights Reserved. Veiligheidgids op Product MP8775i Projector dos Multimedia - 3M™ Multimedia Projector MP8795 FEATURES This liquid crystal projector is missing, please contact your dealer.
Operation Guide
Page 4
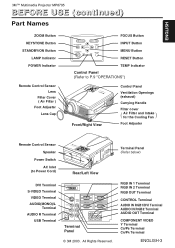
... Terminal AUDIO OUT Terminal COMPONENT VIDEO Y Terminal CB/PB Terminal CR/PR Terminal ENGLISH-3 All Rights Reserved. ENGLISH 3M™ Multimedia Projector MP8795 BEFORE USE (continued) Part Names ZOOM Button KEYSTONE Button STANDBY/ON Button LAMP Indicator POWER Indicator Remote Control Sensor ... RESET TEMP FOCUS Button INPUT Button MENU Button RESET Button TEMP Indicator Control Panel (Refer to P.9 "OPERATIONS") MP8795 Front/Right View PORTABLE PROJECTOR MP8795 Control Panel Ventilation Openings (exhaust) Carrying Handle Filter cover ( ) Air Filter and Intake for the Cooling Fan...
... Terminal AUDIO OUT Terminal COMPONENT VIDEO Y Terminal CB/PB Terminal CR/PR Terminal ENGLISH-3 All Rights Reserved. ENGLISH 3M™ Multimedia Projector MP8795 BEFORE USE (continued) Part Names ZOOM Button KEYSTONE Button STANDBY/ON Button LAMP Indicator POWER Indicator Remote Control Sensor ... RESET TEMP FOCUS Button INPUT Button MENU Button RESET Button TEMP Indicator Control Panel (Refer to P.9 "OPERATIONS") MP8795 Front/Right View PORTABLE PROJECTOR MP8795 Control Panel Ventilation Openings (exhaust) Carrying Handle Filter cover ( ) Air Filter and Intake for the Cooling Fan...
Operation Guide
Page 5
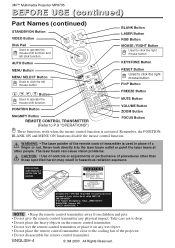
... into the laser beam outlet or point the laser beam at other than those specified herein may result in place of the projector. • Do not disassemble the remote control transmitter. AVOID EXPOSURELASER RADIATIONS IS EMITTED FROM THIS APERTURE CAUTION LASER RADIATIONDO NOT ...for deviations pursuant to operate the mouse shift function and left mouse button. , , , Button Used to click the right mouse button. 3M™ Multimedia Projector MP8795 BEFORE USE (continued) Part Names (continued) STANDBY/ON Button VIDEO Button Disk Pad Used to Laser Notice No.50, dated 2001.7.26...
... into the laser beam outlet or point the laser beam at other than those specified herein may result in place of the projector. • Do not disassemble the remote control transmitter. AVOID EXPOSURELASER RADIATIONS IS EMITTED FROM THIS APERTURE CAUTION LASER RADIATIONDO NOT ...for deviations pursuant to operate the mouse shift function and left mouse button. , , , Button Used to click the right mouse button. 3M™ Multimedia Projector MP8795 BEFORE USE (continued) Part Names (continued) STANDBY/ON Button VIDEO Button Disk Pad Used to Laser Notice No.50, dated 2001.7.26...
Operation Guide
Page 6
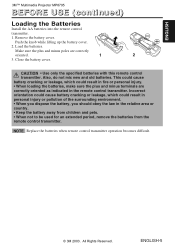
ENGLISH 3M™ Multimedia Projector MP8795 BEFORE USE (continued) Loading the Batteries Install the AA batteries into the remote control transmitter. 1. Remove the battery cover. CAUTION • Use only the ... Push the knob while lifting up the battery cover. 2. Close the battery cover. NOTE Replace the batteries when remote control transmitter operation becomes difficult. © 3M 2003. Make sure the plus and minus terminals are correctly oriented. 1 2 3. Incorrect orientation could cause battery cracking or leakage, which could result in personal ...
ENGLISH 3M™ Multimedia Projector MP8795 BEFORE USE (continued) Loading the Batteries Install the AA batteries into the remote control transmitter. 1. Remove the battery cover. CAUTION • Use only the ... Push the knob while lifting up the battery cover. 2. Close the battery cover. NOTE Replace the batteries when remote control transmitter operation becomes difficult. © 3M 2003. Make sure the plus and minus terminals are correctly oriented. 1 2 3. Incorrect orientation could cause battery cracking or leakage, which could result in personal ...

Operation Guide
Page 7
... careful not to install it with ventilation holes blocked. • Do not install LCD projector in smoke effected environment. Lift up and cause damage. Foot Adjusters Variable within 0˚ to 9˚ approximately. 1. 3M™ Multimedia Projector MP8795 INSTALLATION Installation of the Projector and Screen Refer to the drawing and table below are for full size (1024...
... careful not to install it with ventilation holes blocked. • Do not install LCD projector in smoke effected environment. Lift up and cause damage. Foot Adjusters Variable within 0˚ to 9˚ approximately. 1. 3M™ Multimedia Projector MP8795 INSTALLATION Installation of the Projector and Screen Refer to the drawing and table below are for full size (1024...
Operation Guide
Page 8
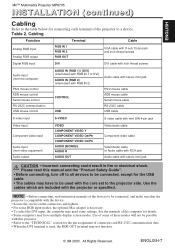
... CAUTION • Incorrect connecting could result in fire or electrical shock. See the manuals of some settings. ENGLISH-7 ENGLISH 3M™ Multimedia Projector MP8795 INSTALLATION (continued) Cabling Refer to the table below for connecting each terminal of the devices to be connected, and make sure... that the projector is compatible with the device. • Secure the screws on the connectors and tighten. • For some ...
... CAUTION • Incorrect connecting could result in fire or electrical shock. See the manuals of some settings. ENGLISH-7 ENGLISH 3M™ Multimedia Projector MP8795 INSTALLATION (continued) Cabling Refer to the table below for connecting each terminal of the devices to be connected, and make sure... that the projector is compatible with the device. • Secure the screws on the connectors and tighten. • For some ...
Operation Guide
Page 9
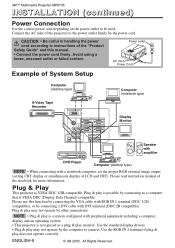
...& play is VESA DDC (Display Data Channel) compatible. Please use this manual. • Connect the power cord firmly. Power outlet MP8795 PORTABLE PROJECTOR AC Inlet Power Cord Example of System Setup Computer (desktop type) Computer (notebook type) S-Video Tape Recorder DIGTAL S-VIDEO VIDEO (MONO... terminal if plug & play may not operate by the power cord. Please read instruction manual of LCD and CRT). 3M™ Multimedia Projector MP8795 INSTALLATION (continued) Power Connection Use the correct power cord depending on the power outlet to the power outlet firmly by ...
...& play is VESA DDC (Display Data Channel) compatible. Please use this manual. • Connect the power cord firmly. Power outlet MP8795 PORTABLE PROJECTOR AC Inlet Power Cord Example of System Setup Computer (desktop type) Computer (notebook type) S-Video Tape Recorder DIGTAL S-VIDEO VIDEO (MONO... terminal if plug & play may not operate by the power cord. Please read instruction manual of LCD and CRT). 3M™ Multimedia Projector MP8795 INSTALLATION (continued) Power Connection Use the correct power cord depending on the power outlet to the power outlet firmly by ...
Operation Guide
Page 10
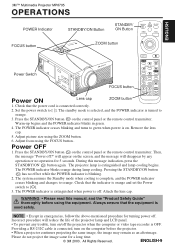
... button again. ENGLISH-9 The standby mode is selected, and the POWER indicator is connected correctly. 2. 3M™ Multimedia Projector MP8795 OPERATIONS ENGLISH POWER Indicator STANDBY/ON Button STANDBY/ ON Button STANDBY/ON BLANK LASER VIDEO RGB FOCUS button PORTABLE PROJECTOR MP8795 ZOOM button STANDBY ON LAMP PWER TEMP - ZOOM + MUTE MENU RESET - FOCUS + INPUT Power Switch...
... button again. ENGLISH-9 The standby mode is selected, and the POWER indicator is connected correctly. 2. 3M™ Multimedia Projector MP8795 OPERATIONS ENGLISH POWER Indicator STANDBY/ON Button STANDBY/ ON Button STANDBY/ON BLANK LASER VIDEO RGB FOCUS button PORTABLE PROJECTOR MP8795 ZOOM button STANDBY ON LAMP PWER TEMP - ZOOM + MUTE MENU RESET - FOCUS + INPUT Power Switch...
Operation Guide
Page 11
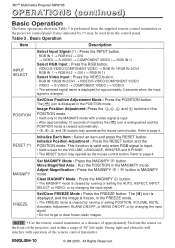
... mode. • Valid only in the MAGNIFY mode with operation of approximately 5m from the supplied remote control transmitter or the projector control panel. ENGLISH-10 © 3M 2003. VIDEO/S-VIDEO/COMPONENT VIDEO → RGB IN 1/RGB IN 2/DVI RGB IN 1 → RGB IN 2 →...The FREEZE mode is cleared by running or setting the AUTO, ASPECT, INPUT SELECT or VIDEO, or by changing the input signal. 3M™ Multimedia Projector MP8795 OPERATIONS (continued) Basic Operation The basic operations shown in Table 3 is cleared by running or setting POSITION, VOLUME, MUTE, Automatic ...
... mode. • Valid only in the MAGNIFY mode with operation of approximately 5m from the supplied remote control transmitter or the projector control panel. ENGLISH-10 © 3M 2003. VIDEO/S-VIDEO/COMPONENT VIDEO → RGB IN 1/RGB IN 2/DVI RGB IN 1 → RGB IN 2 →...The FREEZE mode is cleared by running or setting the AUTO, ASPECT, INPUT SELECT or VIDEO, or by changing the input signal. 3M™ Multimedia Projector MP8795 OPERATIONS (continued) Basic Operation The basic operations shown in Table 3 is cleared by running or setting POSITION, VOLUME, MUTE, Automatic ...
Operation Guide
Page 12
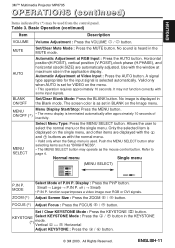
.... It may not function correctly with the window at maximum size in the MUTE mode. Allows the user to page 4. All Rights Reserved. ENGLISH 3M™ Multimedia Projector MP8795 OPERATIONS (continued) Items indicated by (*) may be used . ON/OFF (*) • The menu display is terminated automatically after selecting items such as "BRIGHTNESS". • The...
.... It may not function correctly with the window at maximum size in the MUTE mode. Allows the user to page 4. All Rights Reserved. ENGLISH 3M™ Multimedia Projector MP8795 OPERATIONS (continued) Items indicated by (*) may be used . ON/OFF (*) • The menu display is terminated automatically after selecting items such as "BRIGHTNESS". • The...
Operation Guide
Page 13
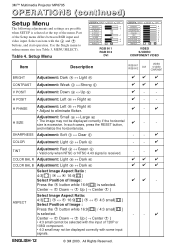
... component. • 4:3 small may not be displayed correctly with the and buttons, and start operation. Center → Down → Up ( → Center ) ✔✔ - 3M™ Multimedia Projector MP8795 OPERATIONS (continued) Setup Menu The following adjustments and settings are possible when SETUP is selected. Part of the menu. SHARPNESS Adjustment: Soft ↔ Clear -- ✔... Image: Press the button while 16:9[ ] is selected at the top of the Setup menu differs between RGB input and video input. ENGLISH-12 © 3M 2003.
... component. • 4:3 small may not be displayed correctly with the and buttons, and start operation. Center → Down → Up ( → Center ) ✔✔ - 3M™ Multimedia Projector MP8795 OPERATIONS (continued) Setup Menu The following adjustments and settings are possible when SETUP is selected. Part of the menu. SHARPNESS Adjustment: Soft ↔ Clear -- ✔... Image: Press the button while 16:9[ ] is selected at the top of the Setup menu differs between RGB input and video input. ENGLISH-12 © 3M 2003.
Operation Guide
Page 14
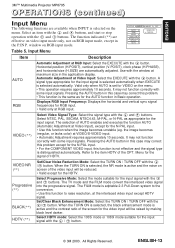
... the / button. VIDEO NR (**) Set/Clear Noise Reduction Mode: Select the TURN ON / TURN OFF with the / button. © 3M 2003. Select HDTV mode: Select the 1035i mode or 1080i mode suitable for the N-PAL input. • Use this function to raise resolution... signal type appropriate for the input signal is selected automatically when EXECUTE is active and the contrast ratio of the OPT. ENGLISH 3M™ Multimedia Projector MP8795 OPERATIONS (continued) Input Menu The following functions are available when INPUT is selected on the menu. • This operation requires ...
... the / button. VIDEO NR (**) Set/Clear Noise Reduction Mode: Select the TURN ON / TURN OFF with the / button. © 3M 2003. Select HDTV mode: Select the 1035i mode or 1080i mode suitable for the N-PAL input. • Use this function to raise resolution... signal type appropriate for the input signal is selected automatically when EXECUTE is active and the contrast ratio of the OPT. ENGLISH 3M™ Multimedia Projector MP8795 OPERATIONS (continued) Input Menu The following functions are available when INPUT is selected on the menu. • This operation requires ...

Operation Guide
Page 15
... cancel freezing and return to the CAPT. After selecting the magnification, press the KEYSTONE button to go to the NORM. executes a capturing the image. 3M™ Multimedia Projector MP8795 OPERATIONS (continued) Image Menu The following adjustments and settings are available when IMAGE is the blue screen at the factory setting. Refer to the MyScreen...
... cancel freezing and return to the CAPT. After selecting the magnification, press the KEYSTONE button to go to the NORM. executes a capturing the image. 3M™ Multimedia Projector MP8795 OPERATIONS (continued) Image Menu The following adjustments and settings are available when IMAGE is the blue screen at the factory setting. Refer to the MyScreen...
Operation Guide
Page 16
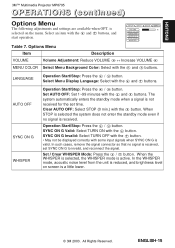
... ON G Valid: Select TURN ON with the button. Table 7. The system automatically enters the standby mode when a signal is a little lower. © 3M 2003. When the WHISPER is selected, the WHISPER mode is received. ENGLISH-15 Set / Crear WHISPER Mode: Press the / button. is selected on screen ..., remove the signal connector so that no signal is active. AUTO OFF SYNC ON G WHISPER Operation Start/Stop: Press the / button. ENGLISH 3M™ Multimedia Projector MP8795 OPERATIONS (continued) Options Menu The following adjustments and settings are available when OPT.
... ON G Valid: Select TURN ON with the button. Table 7. The system automatically enters the standby mode when a signal is a little lower. © 3M 2003. When the WHISPER is selected, the WHISPER mode is received. ENGLISH-15 Set / Crear WHISPER Mode: Press the / button. is selected on screen ..., remove the signal connector so that no signal is active. AUTO OFF SYNC ON G WHISPER Operation Start/Stop: Press the / button. ENGLISH 3M™ Multimedia Projector MP8795 OPERATIONS (continued) Options Menu The following adjustments and settings are available when OPT.
Operation Guide
Page 17
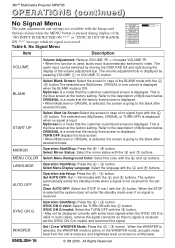
... is going to the description of MyScreen below . Operation Start/Stop: Press the / button. MyScreen is a mode that the factory fixed screen is received. 3M™ Multimedia Projector MP8795 OPERATIONS (continued) No Signal Menu VOLUME 16 The same adjustments and settings are available with the Image and BLANK START UP Options menus when the...
... is going to the description of MyScreen below . Operation Start/Stop: Press the / button. MyScreen is a mode that the factory fixed screen is received. 3M™ Multimedia Projector MP8795 OPERATIONS (continued) No Signal Menu VOLUME 16 The same adjustments and settings are available with the Image and BLANK START UP Options menus when the...
Operation Guide
Page 18
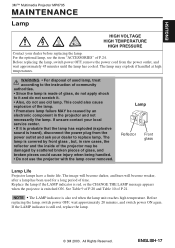
... has cooled. Replace the lamp if the LAMP indicator is red, or the CHANGE THE LAMP message appears when the projector is still red, replace the lamp. © 3M 2003. If the LAMP indicator is switched ON. See Table 9 of P.20 and Table 10 of time. This ..., do not apply shock to it and do not use the projector with the lamp cover removed. Before replacing the lamp, switch power OFF, wait approximately 20 minutes, and switch power ON again. ENGLISH 3M™ Multimedia Projector MP8795 MAINTENANCE Lamp HIGH VOLTAGE HIGH TEMPERATURE HIGH PRESSURE Contact your dealer to...
... has cooled. Replace the lamp if the LAMP indicator is red, or the CHANGE THE LAMP message appears when the projector is still red, replace the lamp. © 3M 2003. If the LAMP indicator is switched ON. See Table 9 of P.20 and Table 10 of time. This ..., do not apply shock to it and do not use the projector with the lamp cover removed. Before replacing the lamp, switch power OFF, wait approximately 20 minutes, and switch power ON again. ENGLISH 3M™ Multimedia Projector MP8795 MAINTENANCE Lamp HIGH VOLTAGE HIGH TEMPERATURE HIGH PRESSURE Contact your dealer to...
Operation Guide
Page 19
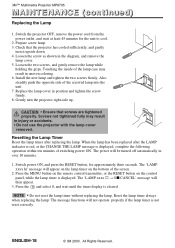
... button on the bottom of switching power ON. Replace the lamp cover in injury or accidents. • Do not use the projector with the lamp cover removed. The 'LAMP xxxx hr' message will not operate properly if the lamp timer is displayed. The ..., and remove the lamp cover. 5. ENGLISH-18 © 3M 2003. 3M™ Multimedia Projector MP8795 MAINTENANCE (continued) Replacing the Lamp 1. CAUTION • Ensure that the projector has cooled sufficiently, and gently turn the projector right-side up. Switch the projector OFF, remove the power cord from the power outlet, and ...
... button on the bottom of switching power ON. Replace the lamp cover in injury or accidents. • Do not use the projector with the lamp cover removed. The 'LAMP xxxx hr' message will not operate properly if the lamp timer is displayed. The ..., and remove the lamp cover. 5. ENGLISH-18 © 3M 2003. 3M™ Multimedia Projector MP8795 MAINTENANCE (continued) Replacing the Lamp 1. CAUTION • Ensure that the projector has cooled sufficiently, and gently turn the projector right-side up. Switch the projector OFF, remove the power cord from the power outlet, and ...
Operation Guide
Page 20
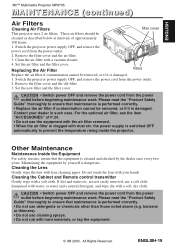
These air filters should be removed, or if it is switched OFF automatically to prevent the temperature rising inside the projector. MP8795 1. Clean the air filter with a soft cloth. Set the new filter and the filter cover. CAUTION • Switch...8226; Do not rub with a soft, dry cloth. Maintaining the equipment by the dealer once every two years. ENGLISH 3M™ Multimedia Projector MP8795 MAINTENANCE (continued) Air Filters PORTABLE PROJECTOR MP8795 Cleaning Air Filters STANDBY ON filter cover LAMP PWER TEMP - Remove the filter cover and the old filter. 3. Cleaning ...
These air filters should be removed, or if it is switched OFF automatically to prevent the temperature rising inside the projector. MP8795 1. Clean the air filter with a soft cloth. Set the new filter and the filter cover. CAUTION • Switch...8226; Do not rub with a soft, dry cloth. Maintaining the equipment by the dealer once every two years. ENGLISH 3M™ Multimedia Projector MP8795 MAINTENANCE (continued) Air Filters PORTABLE PROJECTOR MP8795 Cleaning Air Filters STANDBY ON filter cover LAMP PWER TEMP - Remove the filter cover and the old filter. 3. Cleaning ...


