Operation Guide
Page 2
... Description 6 2.1 Machine Characteristics 6 2.2 Main Unit Identification 7 2.3 System Setup ...8 2.4 Remote Control Transmitter Identification 9 Section 3: Basic Operations 10 3.1 Installation ...10 3.2 Using the Projector ...11 3.3 Turn Off Power ...12 Section 4: Adjustments and Functions 13 4.1 Menu ...13 4.2 How To Use Foot Adjusters 14 4.3 SETUP ...15 4.4 INPUT ...16 4.5 IMAGE ...You Think Something Is Wrong 25 Section 7: Technical Specifications 26 7.1 Specifications ...26 7.2 Accessories ...26 7.3 Dimension Diagram ...27 3M™ Multimedia Projector MP8640 2 © 3M 1997
... Description 6 2.1 Machine Characteristics 6 2.2 Main Unit Identification 7 2.3 System Setup ...8 2.4 Remote Control Transmitter Identification 9 Section 3: Basic Operations 10 3.1 Installation ...10 3.2 Using the Projector ...11 3.3 Turn Off Power ...12 Section 4: Adjustments and Functions 13 4.1 Menu ...13 4.2 How To Use Foot Adjusters 14 4.3 SETUP ...15 4.4 INPUT ...16 4.5 IMAGE ...You Think Something Is Wrong 25 Section 7: Technical Specifications 26 7.1 Specifications ...26 7.2 Accessories ...26 7.3 Dimension Diagram ...27 3M™ Multimedia Projector MP8640 2 © 3M 1997
Operation Guide
Page 3
... particular attention to disconnect. 9. Indicates a potentially hazardous situation which , if not avoided, could damage your 3M MP8640 Multimedia Projector. © 3M 1997 3M™ Multimedia Projector MP8640 3 Do not leave appliance unattended while in use. Incorrect assembly can occur from electrical outlet before using 3M™ brand lamps and nominal local voltages. IMPORTANT SAFEGUARDS 1. Close supervision is on . Do not...
... particular attention to disconnect. 9. Indicates a potentially hazardous situation which , if not avoided, could damage your 3M MP8640 Multimedia Projector. © 3M 1997 3M™ Multimedia Projector MP8640 3 Do not leave appliance unattended while in use. Incorrect assembly can occur from electrical outlet before using 3M™ brand lamps and nominal local voltages. IMPORTANT SAFEGUARDS 1. Close supervision is on . Do not...
Operation Guide
Page 4
... exclusive remedy shall be required to reduce the interference noise radiation. In the event this equipment in which are registered trademarks of Toshiba Corporation. 3M™ Multimedia Projector MP8640 4 © 3M 1997 FCC STATEMENT - Operation of any defects in a similar way to correct the interference. Video inputs: The input signal amplitude must be void if...
... exclusive remedy shall be required to reduce the interference noise radiation. In the event this equipment in which are registered trademarks of Toshiba Corporation. 3M™ Multimedia Projector MP8640 4 © 3M 1997 FCC STATEMENT - Operation of any defects in a similar way to correct the interference. Video inputs: The input signal amplitude must be void if...
Operation Guide
Page 5
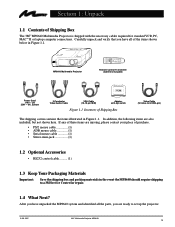
... box and packing materials in the event the MP8640 should require shipping to set up the projector. © 3M 1997 3M™ Multimedia Projector MP8640 5 US 220V - Section 1: Unpack 1.1 Contents of Shipping Box The 3M™ MP8640 Multimedia Projector is shipped with dip switch Figure 1.1 Inventory of the items shown below in Figure 1.1. MP8640 Multimedia Projector Remote Control Transmitter (batteries included) Power Cord 110V...
... box and packing materials in the event the MP8640 should require shipping to set up the projector. © 3M 1997 3M™ Multimedia Projector MP8640 5 US 220V - Section 1: Unpack 1.1 Contents of Shipping Box The 3M™ MP8640 Multimedia Projector is shipped with dip switch Figure 1.1 Inventory of the items shown below in Figure 1.1. MP8640 Multimedia Projector Remote Control Transmitter (batteries included) Power Cord 110V...
Operation Guide
Page 6
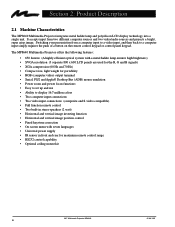
... • Optional ceiling mount kit 3M™ Multimedia Projector MP8640 6 © 3M 1997 Switching your presentation from two different computer sources and two video/audio sources and projects a bright, super crisp image. Section 2: Product Description 2.1 Machine Characteristics The MP8640 Multimedia Projector integrates metal halide lamp and polysilicon LCD display technology into a single unit. The MP8640 Multimedia Projector offers the following features: •...
... • Optional ceiling mount kit 3M™ Multimedia Projector MP8640 6 © 3M 1997 Switching your presentation from two different computer sources and two video/audio sources and projects a bright, super crisp image. Section 2: Product Description 2.1 Machine Characteristics The MP8640 Multimedia Projector integrates metal halide lamp and polysilicon LCD display technology into a single unit. The MP8640 Multimedia Projector offers the following features: •...
Operation Guide
Page 7
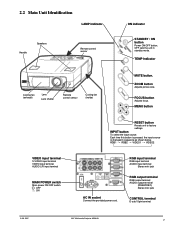
... terminal Stereo mini jack RGB output terminal RGB output terminal AUDIO output terminal (RGB/VIDEO) Stereo mini jack CONTROL terminal D-sub 15pin terminal © 3M 1997 3M™ Multimedia Projector MP8640 7 MENU button VIDEO input terminal S-VIDEO input terminal VIDEO input terminal AUDIO L/R input terminal MAIN POWER switch Main power ON/OFF switch. : OFF ...
... terminal Stereo mini jack RGB output terminal RGB output terminal AUDIO output terminal (RGB/VIDEO) Stereo mini jack CONTROL terminal D-sub 15pin terminal © 3M 1997 3M™ Multimedia Projector MP8640 7 MENU button VIDEO input terminal S-VIDEO input terminal VIDEO input terminal AUDIO L/R input terminal MAIN POWER switch Main power ON/OFF switch. : OFF ...
Operation Guide
Page 8
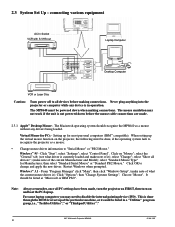
... be done, if the operating system fails to recognize the projector as a mouse: • Change mouse driver information to change and apply the new driver. It should recognize the MP8640 as "Microsoft or IBM PS/2". The mouse emulation may need..."Options"; then "Change Systems Settings". This is in a "Utilities" program group, i.e., "Toshiba Utilities™," or "Thinkpad Utilities™." 3M™ Multimedia Projector MP8640 8 © 3M 1997 Windows™ 3.1 - Click on and boot the PC/laptop. 2.3 System Set Up - select "Settings"; Note: Always remember, ...
... be done, if the operating system fails to recognize the projector as a mouse: • Change mouse driver information to change and apply the new driver. It should recognize the MP8640 as "Microsoft or IBM PS/2". The mouse emulation may need..."Options"; then "Change Systems Settings". This is in a "Utilities" program group, i.e., "Toshiba Utilities™," or "Thinkpad Utilities™." 3M™ Multimedia Projector MP8640 8 © 3M 1997 Windows™ 3.1 - Click on and boot the PC/laptop. 2.3 System Set Up - select "Settings"; Note: Always remember, ...
Operation Guide
Page 9
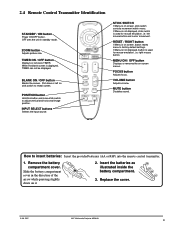
... mouse button and cursor movement. left on screen, button resets menu to reveal screen. BLANK ON / OFF button Blanks the screen. Replace the cover. © 3M 1997 3M™ Multimedia Projector MP8640 9
... mouse button and cursor movement. left on screen, button resets menu to reveal screen. BLANK ON / OFF button Blanks the screen. Replace the cover. © 3M 1997 3M™ Multimedia Projector MP8640 9
Operation Guide
Page 10
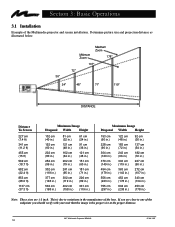
This is the proper size at the proper distance. 3M™ Multimedia Projector MP8640 10 © 3M 1997 If you should verify with your unit that the image is due to one of the endpoints you are ± 1 inch. Determine picture size ... in.) 272 cm (107 in.) 340 cm (134 in.) 453 cm (178 in.) Note: These sizes are close to variations in the manufacture of the Multimedia projector and screen installation. Section 3: Basic Operations 3.1 Installation Example of the lens.
This is the proper size at the proper distance. 3M™ Multimedia Projector MP8640 10 © 3M 1997 If you should verify with your unit that the image is due to one of the endpoints you are ± 1 inch. Determine picture size ... in.) 272 cm (107 in.) 340 cm (134 in.) 453 cm (178 in.) Note: These sizes are close to variations in the manufacture of the Multimedia projector and screen installation. Section 3: Basic Operations 3.1 Installation Example of the lens.
Operation Guide
Page 11
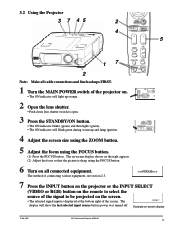
...FOCUS button. (1) Press the FOCUS button. The method of connecting various equipment, see section 2.3. 7 Press the INPUT button on the projector or the INPUT SELECT (VIDEO or RGB) button on the remote to select the source of the signal to open. 3 Press ...Projector 3 7 45 2 4 5 17 2 Note: Make all cable connections and line hookups FIRST. 1 Turn the MAIN POWER switch of the projector on. • The ON indicator will light up orange. 2 Open the lens shutter. • Push down lens shutter switch to be projected on -screen display © 3M 1997 3M™ Multimedia Projector MP8640...
...FOCUS button. (1) Press the FOCUS button. The method of connecting various equipment, see section 2.3. 7 Press the INPUT button on the projector or the INPUT SELECT (VIDEO or RGB) button on the remote to select the source of the signal to open. 3 Press ...Projector 3 7 45 2 4 5 17 2 Note: Make all cable connections and line hookups FIRST. 1 Turn the MAIN POWER switch of the projector on. • The ON indicator will light up orange. 2 Open the lens shutter. • Push down lens shutter switch to be projected on -screen display © 3M 1997 3M™ Multimedia Projector MP8640...
Operation Guide
Page 12
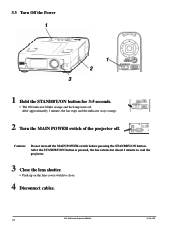
... 3 1 Hold the STANDBY/ON button for about 1 minute to cool the projector. 3 Close the lens shutter. • Push up on the lens cover switch to close. 4 Disconnect cables. 3M™ Multimedia Projector MP8640 12 © 3M 1997 After approximately 1 minute, the fan stops and the indicator stays orange. ...2 Turn the MAIN POWER switch of the projector off the MAIN POWER switch before pressing the STANDBY/...
... 3 1 Hold the STANDBY/ON button for about 1 minute to cool the projector. 3 Close the lens shutter. • Push up on the lens cover switch to close. 4 Disconnect cables. 3M™ Multimedia Projector MP8640 12 © 3M 1997 After approximately 1 minute, the fan stops and the indicator stays orange. ...2 Turn the MAIN POWER switch of the projector off the MAIN POWER switch before pressing the STANDBY/...

Operation Guide
Page 13
... Note: Separate settings are saved after power off. Only the selected item resets. VOL BRI CON SHA COL TIN RESET 'SETUP' DEFAULT CANCEL © 3M 1997 3M™ Multimedia Projector MP8640 13 SETUP INPUT IMAGE OPT. To return to be adjusted using the MENU ( or STICK SWITCH. • Highlighted items may be adjusted using the...
... Note: Separate settings are saved after power off. Only the selected item resets. VOL BRI CON SHA COL TIN RESET 'SETUP' DEFAULT CANCEL © 3M 1997 3M™ Multimedia Projector MP8640 13 SETUP INPUT IMAGE OPT. To return to be adjusted using the MENU ( or STICK SWITCH. • Highlighted items may be adjusted using the...
Operation Guide
Page 14
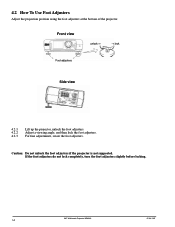
... Side view 4.2.1 4.2.2 4.2.3 Lift up the projector, unlock the foot adjusters. 4.2 How To Use Foot Adjusters Adjust the projection position using the foot adjusters at the bottom of the projector. If the foot adjusters do not lock completely, turn the foot adjusters slightly before locking. 3M™ Multimedia Projector MP8640 14 © 3M 1997 Caution: Do not unlock...
... Side view 4.2.1 4.2.2 4.2.3 Lift up the projector, unlock the foot adjusters. 4.2 How To Use Foot Adjusters Adjust the projection position using the foot adjusters at the bottom of the projector. If the foot adjusters do not lock completely, turn the foot adjusters slightly before locking. 3M™ Multimedia Projector MP8640 14 © 3M 1997 Caution: Do not unlock...
Operation Guide
Page 15
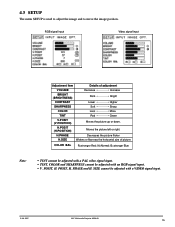
POSIT, H. SIZE cannot be adjusted with a VIDEO signal input. © 3M 1997 3M™ Multimedia Projector MP8640 15 RGB signal input Video signal input Adjustment Item Details of picture COLOR BAL R=stronger Red; N=Normal; PHASE and H. H.POSIT (H.POSITION) Moves the picture left ...
POSIT, H. SIZE cannot be adjusted with a VIDEO signal input. © 3M 1997 3M™ Multimedia Projector MP8640 15 RGB signal input Video signal input Adjustment Item Details of picture COLOR BAL R=stronger Red; N=Normal; PHASE and H. H.POSIT (H.POSITION) Moves the picture left ...
Operation Guide
Page 16
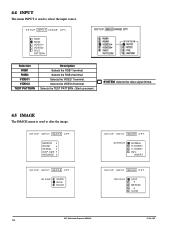
... VIDEO 2 terminal. BLANK WHITE BLUE BLACK SETUP INPUT IMAGE OPT. 4.4 INPUT The menu INPUT is used to alter the image. REVEAL FAST MEDIUM SLOW 3M™ Multimedia Projector MP8640 16 © 3M 1997 Selects the VIDEO 1 terminal. MIRROR BLANK REVEAL DISP. Selects the TEST PATTERN. (Start up screen). SIZE MESSAGE SETUP INPUT IMAGE OPT. RGB1...
... VIDEO 2 terminal. BLANK WHITE BLUE BLACK SETUP INPUT IMAGE OPT. 4.4 INPUT The menu INPUT is used to alter the image. REVEAL FAST MEDIUM SLOW 3M™ Multimedia Projector MP8640 16 © 3M 1997 Selects the VIDEO 1 terminal. MIRROR BLANK REVEAL DISP. Selects the TEST PATTERN. (Start up screen). SIZE MESSAGE SETUP INPUT IMAGE OPT. RGB1...

Operation Guide
Page 17
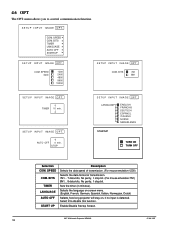
... Description MIRROR BLANK REVEAL DISP. 4.5 IMAGE (continued) SETUP INPUT IMAGE OPT. H : INVERT Inverts the picture horizontally. Note: For XGA inputs, "REVEAL" does not work. Expands video to fill 800x600 screen © 3M 1997 3M™ Multimedia Projector MP8640 17 SIZE MESSAGE Inverts the picture horizontally or vertically. See chart below. H&V : INVERT Inverts the picture horizontally and...
... Description MIRROR BLANK REVEAL DISP. 4.5 IMAGE (continued) SETUP INPUT IMAGE OPT. H : INVERT Inverts the picture horizontally. Note: For XGA inputs, "REVEAL" does not work. Expands video to fill 800x600 screen © 3M 1997 3M™ Multimedia Projector MP8640 17 SIZE MESSAGE Inverts the picture horizontally or vertically. See chart below. H&V : INVERT Inverts the picture horizontally and...
Operation Guide
Page 18
... disable this function. AUTO OFF 0 min. BITS TIMER LANGUAGE AUTO OFF STARTUP SETUP INPUT IMAGE OPT. Sets the timer (in minutes). Enable/Disable Startup Screen. 3M™ Multimedia Projector MP8640 18 © 3M 1997 Selects the language on-screen menu. (English, French, German, Spanish, Italian, Norwegian, Dutch) Selects how long...
... disable this function. AUTO OFF 0 min. BITS TIMER LANGUAGE AUTO OFF STARTUP SETUP INPUT IMAGE OPT. Sets the timer (in minutes). Enable/Disable Startup Screen. 3M™ Multimedia Projector MP8640 18 © 3M 1997 Selects the language on-screen menu. (English, French, German, Spanish, Italian, Norwegian, Dutch) Selects how long...
Operation Guide
Page 19
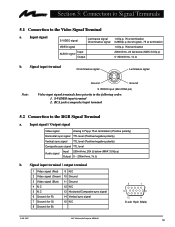
... (Blue) 11 Ground 4 N.C 12 N.C 5 N.C 13 Horizontal/Composite sync signal 6 Ground (for R) 14 Vertical sync signal 7 Ground (for G) 15 N.C 8 Ground (for B) D-sub 15pin (Male) © 3M 1997 3M™ Multimedia Projector MP8640 19 Input signal S-VIDEO signal Luminance signal Chrominance signal VIDEO signal Input AUDIO signal Output 1.0Vp-p, 75 Ω termination 0.286Vp-p (burst signal), 75 Ω...
... (Blue) 11 Ground 4 N.C 12 N.C 5 N.C 13 Horizontal/Composite sync signal 6 Ground (for R) 14 Vertical sync signal 7 Ground (for G) 15 N.C 8 Ground (for B) D-sub 15pin (Male) © 3M 1997 3M™ Multimedia Projector MP8640 19 Input signal S-VIDEO signal Luminance signal Chrominance signal VIDEO signal Input AUDIO signal Output 1.0Vp-p, 75 Ω termination 0.286Vp-p (burst signal), 75 Ω...
Operation Guide
Page 20
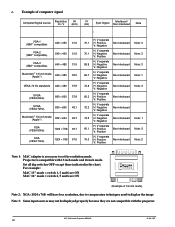
... H, V separate 70.0 H: Positive Non-interlaced Note: 2 V: Positive Note 1: MAC adapter is compatible with the projector. 3M™ Multimedia Projector MP8640 20 © 3M 1997 Set all dip switches OFF except those indicated in the chart. Example of 16 inch mode) Note 2: XGA (1024 x 768) will have less resolution, due to compression techniques used to set the resolution...
... H, V separate 70.0 H: Positive Non-interlaced Note: 2 V: Positive Note 1: MAC adapter is compatible with the projector. 3M™ Multimedia Projector MP8640 20 © 3M 1997 Set all dip switches OFF except those indicated in the chart. Example of 16 inch mode) Note 2: XGA (1024 x 768) will have less resolution, due to compression techniques used to set the resolution...
Operation Guide
Page 21
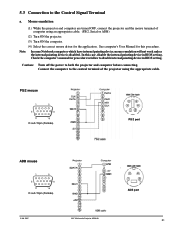
... cable. (PS/2, Serial or ADB) (2) Turn ON the projector. (3) Turn ON the computer. (4) Select the correct mouse driver for this case, disable the internal pointing device in BIOS setting. PS/2 mouse D-sub 15pin (Female) PS/2 port ADB mouse D-sub 15pin (Female) © 3M 1997 3M™ Multimedia Projector MP8640 ADB port 21 5.3 Connection to both the...
... cable. (PS/2, Serial or ADB) (2) Turn ON the projector. (3) Turn ON the computer. (4) Select the correct mouse driver for this case, disable the internal pointing device in BIOS setting. PS/2 mouse D-sub 15pin (Female) PS/2 port ADB mouse D-sub 15pin (Female) © 3M 1997 3M™ Multimedia Projector MP8640 ADB port 21 5.3 Connection to both the...


