Operation Guide
Page 2
... 2.4 Remote Control Transmitter Identification 9 Section 3: Basic Operations 10 3.1 Installation ...10 3.2 Using the Projector ...11 3.3 Turn Off Power ...12 Section 4: Adjustments and Functions 13 4.1 Menu ...13 4.2 How To Use Foot Adjusters 14 4.3 SETUP ...15 4.4 INPUT ...16 4.5 IMAGE ...16 4.6 OPT ...18 Section 5: Connection to Signal Terminals 19 5.1 Connection to the Video Signal Terminal 19 5.2 Connection to the RGB Signal Terminal 19 5.3 Connection to the Control Signal Terminal 21 Section 6: Maintenance 23 6.1 Cleaning the Air Filter 23 6.2 Message Table ...23 6.3 Lamp ...24...
... 2.4 Remote Control Transmitter Identification 9 Section 3: Basic Operations 10 3.1 Installation ...10 3.2 Using the Projector ...11 3.3 Turn Off Power ...12 Section 4: Adjustments and Functions 13 4.1 Menu ...13 4.2 How To Use Foot Adjusters 14 4.3 SETUP ...15 4.4 INPUT ...16 4.5 IMAGE ...16 4.6 OPT ...18 Section 5: Connection to Signal Terminals 19 5.1 Connection to the Video Signal Terminal 19 5.2 Connection to the RGB Signal Terminal 19 5.3 Connection to the Control Signal Terminal 21 Section 6: Maintenance 23 6.1 Cleaning the Air Filter 23 6.2 Message Table ...23 6.3 Lamp ...24...
Operation Guide
Page 3
... other replacement lamps, outdoor operation or different voltages has not been tested and could damage your 3M MP8640 Multimedia Projector. © 3M 1997 3M™ Multimedia Projector MP8640 3 Care must be used . until it will help you operate and maintain your eyesight. 4. Position the cord so that of other liquids. 10. To reduce the risk of electric shock, do not immerse this manual will not be used to...
... other replacement lamps, outdoor operation or different voltages has not been tested and could damage your 3M MP8640 Multimedia Projector. © 3M 1997 3M™ Multimedia Projector MP8640 3 Care must be used . until it will help you operate and maintain your eyesight. 4. Position the cord so that of other liquids. 10. To reduce the risk of electric shock, do not immerse this manual will not be used to...
Operation Guide
Page 4
...for choosing 3M Multimedia Projector equipment. Video signal cables: Double shielded coaxial cables (FCC shield cable) must be replacement of International Business Machines Corporation. All other rights which case the user at his...instruction manual may be connected to come. LIMITATION OF LIABILITY THE FOREGOING WARRANTY IS MADE IN LIEU OF ALL OTHER WARRANTIES, EXPRESSED OR IMPLIED, AND 3M SPECIFICALLY DISCLAIMS ANY IMPLIED WARRANTY OF MERCHANTIBILITY AND FITNESS. 3M SHALL NOT BE LIABLE FOR ANY DAMAGES, DIRECT, CONSEQUENTIAL, OR INCIDENTAL, ARISING OUT OF THE USE OR INABILITY TO USE...
...for choosing 3M Multimedia Projector equipment. Video signal cables: Double shielded coaxial cables (FCC shield cable) must be replacement of International Business Machines Corporation. All other rights which case the user at his...instruction manual may be connected to come. LIMITATION OF LIABILITY THE FOREGOING WARRANTY IS MADE IN LIEU OF ALL OTHER WARRANTIES, EXPRESSED OR IMPLIED, AND 3M SPECIFICALLY DISCLAIMS ANY IMPLIED WARRANTY OF MERCHANTIBILITY AND FITNESS. 3M SHALL NOT BE LIABLE FOR ANY DAMAGES, DIRECT, CONSEQUENTIAL, OR INCIDENTAL, ARISING OUT OF THE USE OR INABILITY TO USE...
Operation Guide
Page 5
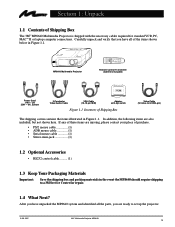
...; RS232 control cable 1) 1.3 Keep Your Packaging Materials Important: Save the shipping box and packing materials in the event the MP8640 should require shipping to set up the projector. © 3M 1997 3M™ Multimedia Projector MP8640 5 US 220V - UK, Europe 3-Conductor Video/Audio Cable VGA Cable (15-15 pin M/M) Adapter with the necessary cables required for repair. 1.4 What Next? In addition, the following items are ready to a 3M Service Center for...
...; RS232 control cable 1) 1.3 Keep Your Packaging Materials Important: Save the shipping box and packing materials in the event the MP8640 should require shipping to set up the projector. © 3M 1997 3M™ Multimedia Projector MP8640 5 US 220V - UK, Europe 3-Conductor Video/Audio Cable VGA Cable (15-15 pin M/M) Adapter with the necessary cables required for repair. 1.4 What Next? In addition, the following items are ready to a 3M Service Center for...
Operation Guide
Page 6
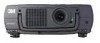
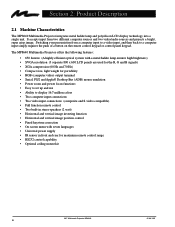
... video/audio sources and projects a bright, super crisp image. The MP8640 Multimedia Projector offers the following features: • 650 lumens (A highly efficient optical system with a metal halide lamp ensures high brightness) • SVGA resolution (3 separate 800 x 600 LCD panels are used for the R, G and B signals) • XGA compression (60 Hz and 70 Hz) • Compact size, light weight for maximum remote control range • RS232 control capability • Optional ceiling mount kit 3M™ Multimedia Projector MP8640 6 © 3M...
... video/audio sources and projects a bright, super crisp image. The MP8640 Multimedia Projector offers the following features: • 650 lumens (A highly efficient optical system with a metal halide lamp ensures high brightness) • SVGA resolution (3 separate 800 x 600 LCD panels are used for the R, G and B signals) • XGA compression (60 Hz and 70 Hz) • Compact size, light weight for maximum remote control range • RS232 control capability • Optional ceiling mount kit 3M™ Multimedia Projector MP8640 6 © 3M...
Operation Guide
Page 7
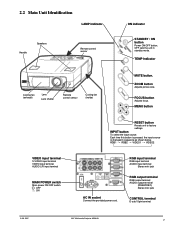
...; Multimedia Projector MP8640 7 INPUT button To select the input source. Each time this button is pressed, the input source is changed in standby mode. OFF sets the unit in sequence as shown below. MENU button VIDEO input terminal S-VIDEO input terminal VIDEO input terminal AUDIO L/R input terminal MAIN POWER switch Main power ON/OFF switch. : OFF : ON RESET button Resets unit to factory settings. RGB1 RGB2 VIDEO1 VIDEO2 AC IN socket Connect the provided power cord. FOCUS button Adjusts focus. 2.2 Main Unit Identification LAMP indicator Handle Speakers Remote control...
...; Multimedia Projector MP8640 7 INPUT button To select the input source. Each time this button is pressed, the input source is changed in standby mode. OFF sets the unit in sequence as shown below. MENU button VIDEO input terminal S-VIDEO input terminal VIDEO input terminal AUDIO L/R input terminal MAIN POWER switch Main power ON/OFF switch. : OFF : ON RESET button Resets unit to factory settings. RGB1 RGB2 VIDEO1 VIDEO2 AC IN socket Connect the provided power cord. FOCUS button Adjusts focus. 2.2 Main Unit Identification LAMP indicator Handle Speakers Remote control...
Operation Guide
Page 8
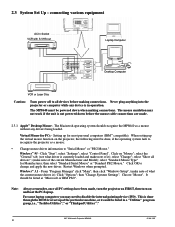
... out Laptop Computer Desktop Computer VCR or Laser Disc Caution: Turn power off to "Serial Mouse" or "PS/2 Mouse." When setting up the virtual mouse function on the projector, the following must be listed in operation. select "Control Panel". Virtual Mouse for Manufacturer; Click "Start"; select the "General" tab; (see what the current mouse driver is not powered down when making connections. select...
... out Laptop Computer Desktop Computer VCR or Laser Disc Caution: Turn power off to "Serial Mouse" or "PS/2 Mouse." When setting up the virtual mouse function on the projector, the following must be listed in operation. select "Control Panel". Virtual Mouse for Manufacturer; Click "Start"; select the "General" tab; (see what the current mouse driver is not powered down when making connections. select...
Operation Guide
Page 9
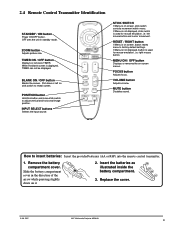
... to factory default settings. Insert the batteries as illustrated inside the battery compartment. 3. left on stick switch to adjust vertical and horizontal image position. FOCUS button Adjusts focus. Replace the cover. © 3M 1997 3M™ Multimedia Projector MP8640 9 RESET / RIGHT button If Menu is used for mouse emulation, i.e. right mouse button. 2.4 Remote Control Transmitter Identification STANDBY / ON button Power ON/OFF button. MUTE button Disables sound. ZOOM button Adjusts picture size. INPUT SELECT buttons Selects the input source. Remove the...
... to factory default settings. Insert the batteries as illustrated inside the battery compartment. 3. left on stick switch to adjust vertical and horizontal image position. FOCUS button Adjusts focus. Replace the cover. © 3M 1997 3M™ Multimedia Projector MP8640 9 RESET / RIGHT button If Menu is used for mouse emulation, i.e. right mouse button. 2.4 Remote Control Transmitter Identification STANDBY / ON button Power ON/OFF button. MUTE button Disables sound. ZOOM button Adjusts picture size. INPUT SELECT buttons Selects the input source. Remove the...
Operation Guide
Page 11
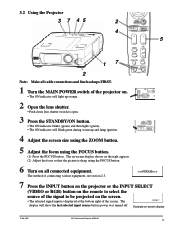
... ZOOM button. 5 Adjust the focus using the FOCUS button. 6 Turn on . • The ON indicator will light up orange. 2 Open the lens shutter. • Push down lens shutter switch to open. 3 Press the STANDBY/ON button. • The ON indicator blinks (green) and then lights (green). • The ON indicator will show the last selected input source before power was turned off. Example on the right appears. (2) Adjust the focus so that the picture is displayed at the bottom right of the projector...
... ZOOM button. 5 Adjust the focus using the FOCUS button. 6 Turn on . • The ON indicator will light up orange. 2 Open the lens shutter. • Push down lens shutter switch to open. 3 Press the STANDBY/ON button. • The ON indicator blinks (green) and then lights (green). • The ON indicator will show the last selected input source before power was turned off. Example on the right appears. (2) Adjust the focus so that the picture is displayed at the bottom right of the projector...
Operation Guide
Page 12
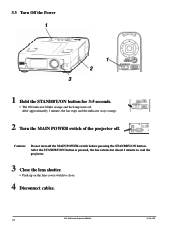
... POWER switch of the projector off the MAIN POWER switch before pressing the STANDBY/ON button. Caution: Do not turn off . 3.3 Turn Off the Power 1 1 2 3 1 Hold the STANDBY/ON button for about 1 minute to cool the projector. 3 Close the lens shutter. • Push up on the lens cover switch to close. 4 Disconnect cables. 3M™ Multimedia Projector MP8640 12 © 3M 1997 After the STANDBY/ON button is pressed, the fan rotates for 3-5 seconds. • The ON indicator blinks orange...
... POWER switch of the projector off the MAIN POWER switch before pressing the STANDBY/ON button. Caution: Do not turn off . 3.3 Turn Off the Power 1 1 2 3 1 Hold the STANDBY/ON button for about 1 minute to cool the projector. 3 Close the lens shutter. • Push up on the lens cover switch to close. 4 Disconnect cables. 3M™ Multimedia Projector MP8640 12 © 3M 1997 After the STANDBY/ON button is pressed, the fan rotates for 3-5 seconds. • The ON indicator blinks orange...

Operation Guide
Page 13
... item from SETUP menu • Select the adjustment item (brightness, contrast...) • Press the RESET button. VOL BRI CON SHA COL TIN RESET 'SETUP' DEFAULT CANCEL © 3M 1997 3M™ Multimedia Projector MP8640 13 SETUP INPUT IMAGE OPT. 4.1 Menu Section 4: Adjustment and Functions 1, 2 2 1 MENU RESET 1 1 Press the MENU ( ) buttons on projector or remote control MENU button. • On-screen menus are displayed on the screen. 2 Select the menu to be adjusted. ) buttons or ) buttons Note: Separate settings are saved after power off. Adjustments are provided...
... item from SETUP menu • Select the adjustment item (brightness, contrast...) • Press the RESET button. VOL BRI CON SHA COL TIN RESET 'SETUP' DEFAULT CANCEL © 3M 1997 3M™ Multimedia Projector MP8640 13 SETUP INPUT IMAGE OPT. 4.1 Menu Section 4: Adjustment and Functions 1, 2 2 1 MENU RESET 1 1 Press the MENU ( ) buttons on projector or remote control MENU button. • On-screen menus are displayed on the screen. 2 Select the menu to be adjusted. ) buttons or ) buttons Note: Separate settings are saved after power off. Adjustments are provided...
Operation Guide
Page 16
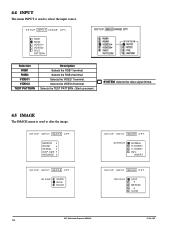
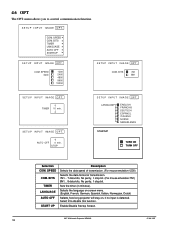
... WHITE BLUE BLACK SETUP INPUT IMAGE OPT. MIRROR NORMAL H : INVERT V : INVERT H&V : INVERT SETUP INPUT IMAGE OPT. RGB1 RGB2 VIDEO1 VIDEO2 TEST PATTERN Selection RGB1 RGB2 VIDEO1 VIDEO2 TEST PATTERN Description Selects the RGB 1 terminal. SYSTEM Selects the video signal format. 4.5 IMAGE The IMAGE menu is used to select the input source. 4.4 INPUT The menu INPUT is used to alter the image. MIRROR BLANK REVEAL DISP. Selects the VIDEO 2 terminal. Selects the TEST PATTERN. (Start up screen). SIZE MESSAGE SETUP INPUT IMAGE OPT. SETUP INPUT IMAGE...
... WHITE BLUE BLACK SETUP INPUT IMAGE OPT. MIRROR NORMAL H : INVERT V : INVERT H&V : INVERT SETUP INPUT IMAGE OPT. RGB1 RGB2 VIDEO1 VIDEO2 TEST PATTERN Selection RGB1 RGB2 VIDEO1 VIDEO2 TEST PATTERN Description Selects the RGB 1 terminal. SYSTEM Selects the video signal format. 4.5 IMAGE The IMAGE menu is used to select the input source. 4.4 INPUT The menu INPUT is used to alter the image. MIRROR BLANK REVEAL DISP. Selects the VIDEO 2 terminal. Selects the TEST PATTERN. (Start up screen). SIZE MESSAGE SETUP INPUT IMAGE OPT. SETUP INPUT IMAGE...

Operation Guide
Page 17
Expands video to full 800x600 screen. 4.5 IMAGE (continued) SETUP INPUT IMAGE OPT. H : INVERT Inverts the picture horizontally. H&V : INVERT Inverts the picture horizontally and vertically. Displays full 800x600. This window can be moved with H and V Position or by holding position button and moving the stick switch. V : INTERT Inverts the picture vertically. Expands 640x480 to fill 800x600 screen © 3M 1997 3M™ Multimedia Projector MP8640 17 MESSAGE TURN ON TURN OFF Selection Description MIRROR BLANK REVEAL DISP. Display Size Source 640 X 480...
Expands video to full 800x600 screen. 4.5 IMAGE (continued) SETUP INPUT IMAGE OPT. H : INVERT Inverts the picture horizontally. H&V : INVERT Inverts the picture horizontally and vertically. Displays full 800x600. This window can be moved with H and V Position or by holding position button and moving the stick switch. V : INTERT Inverts the picture vertically. Expands 640x480 to fill 800x600 screen © 3M 1997 3M™ Multimedia Projector MP8640 17 MESSAGE TURN ON TURN OFF Selection Description MIRROR BLANK REVEAL DISP. Display Size Source 640 X 480...
Operation Guide
Page 18
... 8N1 SETUP INPUT IMAGE OPT. SPEED COM. Select 0 to control communication function. SETUP INPUT IMAGE OPT. Selects the language on-screen menu. (English, French, German, Spanish, Italian, Norwegian, Dutch) Selects how long projector will stay on, if no input is detected. SPEED COM. COM. SETUP INPUT IMAGE OPT. AUTO OFF 0 min. Enable/Disable Startup Screen. 3M™ Multimedia Projector MP8640 18 © 3M 1997 BITS TIMER LANGUAGE AUTO OFF START UP Description Selects the data...
... 8N1 SETUP INPUT IMAGE OPT. SPEED COM. Select 0 to control communication function. SETUP INPUT IMAGE OPT. Selects the language on-screen menu. (English, French, German, Spanish, Italian, Norwegian, Dutch) Selects how long projector will stay on, if no input is detected. SPEED COM. COM. SETUP INPUT IMAGE OPT. AUTO OFF 0 min. Enable/Disable Startup Screen. 3M™ Multimedia Projector MP8640 18 © 3M 1997 BITS TIMER LANGUAGE AUTO OFF START UP Description Selects the data...
Operation Guide
Page 20
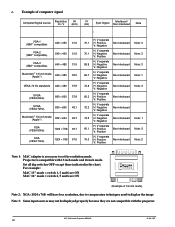
... Non-interlaced Note: 2 V: Positive Note 1: MAC adapter is compatible with the projector. 3M™ Multimedia Projector MP8640 20 © 3M 1997 c. Projector is necessary to display the image Note 3: Some input sources may not be displayed properly because they are not compatible with 13 inch mode and 16 inch mode. Example of 16 inch mode) Note 2: XGA (1024 x 768) will have less resolution, due to compression techniques used to set the resolution mode.
... Non-interlaced Note: 2 V: Positive Note 1: MAC adapter is compatible with the projector. 3M™ Multimedia Projector MP8640 20 © 3M 1997 c. Projector is necessary to display the image Note 3: Some input sources may not be displayed properly because they are not compatible with 13 inch mode and 16 inch mode. Example of 16 inch mode) Note 2: XGA (1024 x 768) will have less resolution, due to compression techniques used to set the resolution mode.
Operation Guide
Page 21
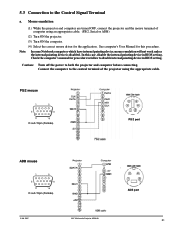
... mouse D-sub 15pin (Female) © 3M 1997 3M™ Multimedia Projector MP8640 ADB port 21 Check the computer's manual for procedure to follow to the Control Signal Terminal a. See computer's User Manual for the application. Mouse emulation (1) While the projector and computer are turned OFF, connect the projector and the mouse terminal of the projector using an appropriate cable. (PS/2, Serial or ADB) (2) Turn ON the projector. (3) Turn ON the computer. (4) Select the...
... mouse D-sub 15pin (Female) © 3M 1997 3M™ Multimedia Projector MP8640 ADB port 21 Check the computer's manual for procedure to follow to the Control Signal Terminal a. See computer's User Manual for the application. Mouse emulation (1) While the projector and computer are turned OFF, connect the projector and the mouse terminal of the projector using an appropriate cable. (PS/2, Serial or ADB) (2) Turn ON the projector. (3) Turn ON the computer. (4) Select the...
Operation Guide
Page 23
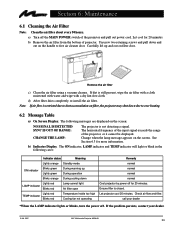
... pull down Lights red LAMP indicator Blinks red Lamp cannot light Air filter open Lights red TEMP indicator Blinks red Temperature inside too high Cooling fan not operating Remedy normal normal normal normal Cool projector by power off the MAIN POWER switch of the projector and pull out power cord. Remove the air filter c) Clean the air filter using a vacuum cleaner. Check air flow and filter. Change when the lamp message appears on the handle to over heating. 6.2 Message Table a) On Screen Display. d) After filter dries completely, re-install the air filter. a) Turn off...
... pull down Lights red LAMP indicator Blinks red Lamp cannot light Air filter open Lights red TEMP indicator Blinks red Temperature inside too high Cooling fan not operating Remedy normal normal normal normal Cool projector by power off the MAIN POWER switch of the projector and pull out power cord. Remove the air filter c) Clean the air filter using a vacuum cleaner. Check air flow and filter. Change when the lamp message appears on the handle to over heating. 6.2 Message Table a) On Screen Display. d) After filter dries completely, re-install the air filter. a) Turn off...
Operation Guide
Page 24
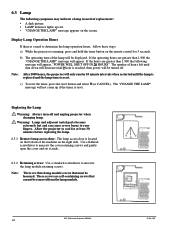
..., then power will be removed from the lamp module. 3M™ Multimedia Projector MP8640 24 © 3M 1997 Use a flathead screwdriver to unscrew the cover retaining screws and gently open the cover and set it aside.. 6.3.2 Retaining screws: Use a standard screwdriver to your fingers. Display Lamp Operation Hours If there is a need of replacement: • A dark picture. • LAMP indicator lights up if the timer is located on the right side. If the operating hours are self-containing screws that...
..., then power will be removed from the lamp module. 3M™ Multimedia Projector MP8640 24 © 3M 1997 Use a flathead screwdriver to unscrew the cover retaining screws and gently open the cover and set it aside.. 6.3.2 Retaining screws: Use a standard screwdriver to your fingers. Display Lamp Operation Hours If there is a need of replacement: • A dark picture. • LAMP indicator lights up if the timer is located on the right side. If the operating hours are self-containing screws that...
Operation Guide
Page 25
... lamp module in place. No picture and sound • The setting of the input source is not correct. • Set the correct input using the input select button of case is open. • Ensure air filter door is not turned on bottom of the projector or the remote control. •RGB/Video/Audio wiring to projector is set fully to dark. Sound is • The color and tint have been adjusted incorrect incorrectly. • Adjust the color...
... lamp module in place. No picture and sound • The setting of the input source is not correct. • Set the correct input using the input select button of case is open. • Ensure air filter door is not turned on bottom of the projector or the remote control. •RGB/Video/Audio wiring to projector is set fully to dark. Sound is • The color and tint have been adjusted incorrect incorrectly. • Adjust the color...

Operation Guide
Page 26
...-3312-4 (not included with 3 panels. Product name Multimedia projector Model Name MP8640 Display system 3 beam poly-silicon LCD Liquid crystal panel Panel size Drive system Number of pixels 1.3 inches (33 mm) TFT active matrix 480,000 pixels (V600 × H800) per panel. 1.44 million pixels total with basic packout) 3M™ Multimedia Projector MP8640 26 © 3M 1997 Section 7: Technical Specifications 7.1 Specifications Note: All specifications are subject to change without notice.
...-3312-4 (not included with 3 panels. Product name Multimedia projector Model Name MP8640 Display system 3 beam poly-silicon LCD Liquid crystal panel Panel size Drive system Number of pixels 1.3 inches (33 mm) TFT active matrix 480,000 pixels (V600 × H800) per panel. 1.44 million pixels total with basic packout) 3M™ Multimedia Projector MP8640 26 © 3M 1997 Section 7: Technical Specifications 7.1 Specifications Note: All specifications are subject to change without notice.


