Operation Guide
Page 2
...13 4.2 How To Use Foot Adjusters 14 4.3 SETUP ...15 4.4 INPUT ...16 4.5 IMAGE ...16 4.6 OPT ...18 Section 5: Connection to Signal Terminals 19 5.1 Connection to the Video Signal Terminal 19 5.2 Connection to the RGB Signal Terminal 19 5.3 Connection to the Control Signal Terminal 21 Section 6: Maintenance 23 6.1 Cleaning the Air Filter 23...6.2 Message Table ...23 6.3 Lamp ...24 6.4 When You Think Something Is Wrong 25 Section 7: Technical Specifications 26 7.1 Specifications ...26 7.2 Accessories ...26 7.3 Dimension Diagram ...27 3M™ Multimedia Projector MP8640 2 © 3M 1997
...13 4.2 How To Use Foot Adjusters 14 4.3 SETUP ...15 4.4 INPUT ...16 4.5 IMAGE ...16 4.6 OPT ...18 Section 5: Connection to Signal Terminals 19 5.1 Connection to the Video Signal Terminal 19 5.2 Connection to the RGB Signal Terminal 19 5.3 Connection to the Control Signal Terminal 21 Section 6: Maintenance 23 6.1 Cleaning the Air Filter 23...6.2 Message Table ...23 6.3 Lamp ...24 6.4 When You Think Something Is Wrong 25 Section 7: Technical Specifications 26 7.1 Specifications ...26 7.2 Accessories ...26 7.3 Dimension Diagram ...27 3M™ Multimedia Projector MP8640 2 © 3M 1997
Operation Guide
Page 4
...Video inputs: The input signal amplitude must be void if the customer fails to the ground. We hope you will be connected to operate product in accordance with the instruction manual may have other products are trademarks of Toshiba Corporation. 3M™ Multimedia Projector MP8640 4 © 3M... 1997 Proof of their respective companies. This warranty gives you specific legal rights and you may cause interference to be defective within the warranty period, 3M's only obligation and your...
...Video inputs: The input signal amplitude must be void if the customer fails to the ground. We hope you will be connected to operate product in accordance with the instruction manual may have other products are trademarks of Toshiba Corporation. 3M™ Multimedia Projector MP8640 4 © 3M... 1997 Proof of their respective companies. This warranty gives you specific legal rights and you may cause interference to be defective within the warranty period, 3M's only obligation and your...
Operation Guide
Page 5
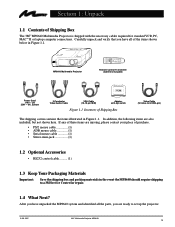
...; II or laptop computer connections. Section 1: Unpack 1.1 Contents of Shipping Box The 3M™ MP8640 Multimedia Projector is shipped with dip switch Figure 1.1 Inventory of Shipping Box Video Cable (S-Video mini DIN4-pin) The shipping carton contains the items illustrated in the event the MP8640 should require shipping to set up the projector. © 3M 1997 3M™ Multimedia Projector MP8640 5
...; II or laptop computer connections. Section 1: Unpack 1.1 Contents of Shipping Box The 3M™ MP8640 Multimedia Projector is shipped with dip switch Figure 1.1 Inventory of Shipping Box Video Cable (S-Video mini DIN4-pin) The shipping carton contains the items illustrated in the event the MP8640 should require shipping to set up the projector. © 3M 1997 3M™ Multimedia Projector MP8640 5
Operation Guide
Page 6
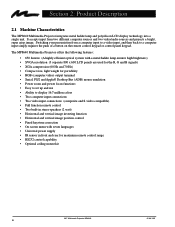
...The MP8640 Multimedia Projector integrates metal halide lamp and polysilicon LCD display technology into a single unit. It accepts input from a computer input to a video input, and then back to display 16.7 million colors • Two computer input connections • Two video input connections (composite and S-video ...) • SVGA resolution (3 separate 800 x 600 LCD panels are used for the R, G and B signals) • XGA compression (60 Hz and 70 Hz) • Compact size, light weight for portability • RGB (computer video) output terminal • Serial, PS/2 and Apple©...
...The MP8640 Multimedia Projector integrates metal halide lamp and polysilicon LCD display technology into a single unit. It accepts input from a computer input to a video input, and then back to display 16.7 million colors • Two computer input connections • Two video input connections (composite and S-video ...) • SVGA resolution (3 separate 800 x 600 LCD panels are used for the R, G and B signals) • XGA compression (60 Hz and 70 Hz) • Compact size, light weight for portability • RGB (computer video) output terminal • Serial, PS/2 and Apple©...
Operation Guide
Page 7
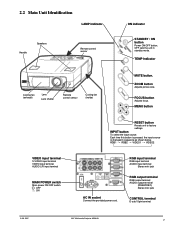
... the unit in sequence as shown below. FOCUS button Adjusts focus. INPUT button To select the input source. MENU button VIDEO input terminal S-VIDEO input terminal VIDEO input terminal AUDIO L/R input terminal MAIN POWER switch Main power ON/OFF switch. : OFF : ON RESET ... AUDIO input terminal Stereo mini jack RGB output terminal RGB output terminal AUDIO output terminal (RGB/VIDEO) Stereo mini jack CONTROL terminal D-sub 15pin terminal © 3M 1997 3M™ Multimedia Projector MP8640 7 Each time this button is pressed, the input source is changed in standby mode.
... the unit in sequence as shown below. FOCUS button Adjusts focus. INPUT button To select the input source. MENU button VIDEO input terminal S-VIDEO input terminal VIDEO input terminal AUDIO L/R input terminal MAIN POWER switch Main power ON/OFF switch. : OFF : ON RESET ... AUDIO input terminal Stereo mini jack RGB output terminal RGB output terminal AUDIO output terminal (RGB/VIDEO) Stereo mini jack CONTROL terminal D-sub 15pin terminal © 3M 1997 3M™ Multimedia Projector MP8640 7 Each time this button is pressed, the input source is changed in standby mode.
Operation Guide
Page 11
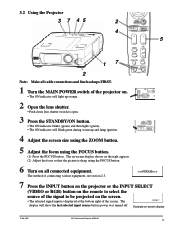
...is sharp using the FOCUS button. 6 Turn on all cable connections and line hookups FIRST. 1 Turn the MAIN POWER switch of the projector on. • The ON indicator will light up and lamp ignition. 4 Adjust the screen size using the ZOOM button. 5 Adjust ... the remote to select the source of connecting various equipment, see section 2.3. 7 Press the INPUT button on the projector or the INPUT SELECT (VIDEO or RGB) button on -screen display © 3M 1997 3M™ Multimedia Projector MP8640 11 3.2 Using the Projector 3 7 45 2 4 5 17 2 Note: Make all connected equipment.
...is sharp using the FOCUS button. 6 Turn on all cable connections and line hookups FIRST. 1 Turn the MAIN POWER switch of the projector on. • The ON indicator will light up and lamp ignition. 4 Adjust the screen size using the ZOOM button. 5 Adjust ... the remote to select the source of connecting various equipment, see section 2.3. 7 Press the INPUT button on the projector or the INPUT SELECT (VIDEO or RGB) button on -screen display © 3M 1997 3M™ Multimedia Projector MP8640 11 3.2 Using the Projector 3 7 45 2 4 5 17 2 Note: Make all connected equipment.
Operation Guide
Page 15
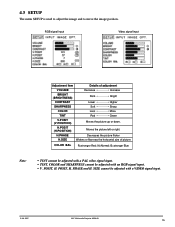
... the picture left or right. POSIT, H. SIZE cannot be adjusted with a VIDEO signal input. © 3M 1997 3M™ Multimedia Projector MP8640 15 4.3 SETUP The menu SETUP is used to adjust the image and to move the image position. POSIT, H. N=Normal; RGB signal input Video signal input Adjustment Item Details of picture COLOR BAL R=stronger Red...
... the picture left or right. POSIT, H. SIZE cannot be adjusted with a VIDEO signal input. © 3M 1997 3M™ Multimedia Projector MP8640 15 4.3 SETUP The menu SETUP is used to adjust the image and to move the image position. POSIT, H. N=Normal; RGB signal input Video signal input Adjustment Item Details of picture COLOR BAL R=stronger Red...
Operation Guide
Page 16
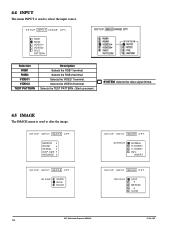
... INPUT IMAGE OPT. SETUP INPUT IMAGE OPT. BLANK WHITE BLUE BLACK SETUP INPUT IMAGE OPT. SIZE MESSAGE SETUP INPUT IMAGE OPT. REVEAL FAST MEDIUM SLOW 3M™ Multimedia Projector MP8640 16 © 3M 1997 Selects the VIDEO 2 terminal. Selects the VIDEO 1 terminal. SETUP INPUT IMAGE OPT. MIRROR BLANK REVEAL DISP.
... INPUT IMAGE OPT. SETUP INPUT IMAGE OPT. BLANK WHITE BLUE BLACK SETUP INPUT IMAGE OPT. SIZE MESSAGE SETUP INPUT IMAGE OPT. REVEAL FAST MEDIUM SLOW 3M™ Multimedia Projector MP8640 16 © 3M 1997 Selects the VIDEO 2 terminal. Selects the VIDEO 1 terminal. SETUP INPUT IMAGE OPT. MIRROR BLANK REVEAL DISP.

Operation Guide
Page 17
...the stick switch. Display Size Source 640 X 480 800 X 600 1024 X 768 Option Normal Large Normal Large Normal Large Video Normal Large Description Displays in a 640x480 window centered on screen. Expands 640x480 to 800x600 screen. MESSAGE TURN ON TURN OFF ...: INTERT Inverts the picture vertically. Note: For XGA inputs, "REVEAL" does not work. Turn off the on screen. Displays video in 640x480 window centered on -screen message. Expands video to fill 800x600 screen © 3M 1997 3M™ Multimedia Projector MP8640 17 Selects the blank color. See chart below....
...the stick switch. Display Size Source 640 X 480 800 X 600 1024 X 768 Option Normal Large Normal Large Normal Large Video Normal Large Description Displays in a 640x480 window centered on screen. Expands 640x480 to 800x600 screen. MESSAGE TURN ON TURN OFF ...: INTERT Inverts the picture vertically. Note: For XGA inputs, "REVEAL" does not work. Turn off the on screen. Displays video in 640x480 window centered on -screen message. Expands video to fill 800x600 screen © 3M 1997 3M™ Multimedia Projector MP8640 17 Selects the blank color. See chart below....
Operation Guide
Page 19
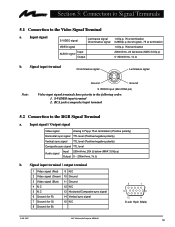
... Horizontal/Composite sync signal 6 Ground (for R) 14 Vertical sync signal 7 Ground (for G) 15 N.C 8 Ground (for B) D-sub 15pin (Male) © 3M 1997 3M™ Multimedia Projector MP8640 19 Input signal S-VIDEO signal Luminance signal Chrominance signal VIDEO signal Input AUDIO signal Output 1.0Vp-p, 75 Ω termination 0.286Vp-p (burst signal), 75 Ω termination 1.0Vp-p, 75Ω termination 200mVrms...
... Horizontal/Composite sync signal 6 Ground (for R) 14 Vertical sync signal 7 Ground (for G) 15 N.C 8 Ground (for B) D-sub 15pin (Male) © 3M 1997 3M™ Multimedia Projector MP8640 19 Input signal S-VIDEO signal Luminance signal Chrominance signal VIDEO signal Input AUDIO signal Output 1.0Vp-p, 75 Ω termination 0.286Vp-p (burst signal), 75 Ω termination 1.0Vp-p, 75Ω termination 200mVrms...
Operation Guide
Page 25
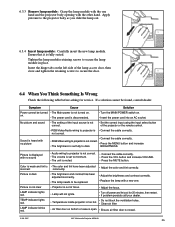
...Remove lamp module: Grasp the lamp module with the one . Picture is displayed with no picture • Connect the cable correctly. • RGB/Video wiring to projector is not correct. • Press the MENU button and increase • The brightness is set to secure the door. 6.4 When You Think Something... out of the lamp access door, then close and tighten the retaining screws to minimum. • The unit is closed. © 3M 1997 3M™ Multimedia Projector MP8640 25 Insert the hinge tabs on . • Insert the power cord into an AC socket. Picture is not clear •...
...Remove lamp module: Grasp the lamp module with the one . Picture is displayed with no picture • Connect the cable correctly. • RGB/Video wiring to projector is not correct. • Press the MENU button and increase • The brightness is set to secure the door. 6.4 When You Think Something... out of the lamp access door, then close and tighten the retaining screws to minimum. • The unit is closed. © 3M 1997 3M™ Multimedia Projector MP8640 25 Insert the hinge tabs on . • Insert the power cord into an AC socket. Picture is not clear •...

Operation Guide
Page 26
...projector Model Name MP8640 Display system 3 beam poly-silicon LCD Liquid crystal panel Panel size Drive system Number of pixels 1.3 inches (33 mm) TFT active matrix 480,000 pixels (V600 × H800) per panel. 1.44 million pixels total with basic packout) 3M™ Multimedia Projector MP8640 26 © 3M....0" (D) 414 mm (W) x 150 mm (H) x 305 mm (D) Weight 18 lbs. (8.1 kg) Input/Output terminal video signal input terminal S VIDEO : Mini DIN4-pin terminal VIDEO : RCA Jack terminal AUDIO : RCA Jack terminal RGB input/output RGB signal : D-sub 15pin (Female) signal terminal AUDIO...
...projector Model Name MP8640 Display system 3 beam poly-silicon LCD Liquid crystal panel Panel size Drive system Number of pixels 1.3 inches (33 mm) TFT active matrix 480,000 pixels (V600 × H800) per panel. 1.44 million pixels total with basic packout) 3M™ Multimedia Projector MP8640 26 © 3M....0" (D) 414 mm (W) x 150 mm (H) x 305 mm (D) Weight 18 lbs. (8.1 kg) Input/Output terminal video signal input terminal S VIDEO : Mini DIN4-pin terminal VIDEO : RCA Jack terminal AUDIO : RCA Jack terminal RGB input/output RGB signal : D-sub 15pin (Female) signal terminal AUDIO...


