
Operating Guide
Page 3
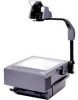
Projection Mirror 3. Focus Knob 4. Post Lock 6. Top Cover 11. Stage 13. Lamp Interlock Switch 7. Carry Handle 9. Technical assistance -- and Canada, please call us for -- Service locations If you need product assistance or service, contact your dealer or: 800-328-1371 3M 9000 Series Operator's Guide Page 1 Post Assembly 5. Cord Wrap * On some models the switch is located inside the top cover. Projection Head 2. Top Cover Release 10. Product information -- only...
Projection Mirror 3. Focus Knob 4. Post Lock 6. Top Cover 11. Stage 13. Lamp Interlock Switch 7. Carry Handle 9. Technical assistance -- and Canada, please call us for -- Service locations If you need product assistance or service, contact your dealer or: 800-328-1371 3M 9000 Series Operator's Guide Page 1 Post Assembly 5. Cord Wrap * On some models the switch is located inside the top cover. Projection Head 2. Top Cover Release 10. Product information -- only...
Operating Guide
Page 4
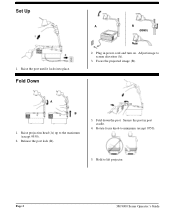
Raise the post until it locks into place. Plug in post cradle. 4. Adjust image to lift projector. Hold to screen elevation (A). 3. A B 1. Fold down the post. Secure the post in power cord and turn on. Fold Down 2. Focus the projected image (B). Page 2 3M 9000 Series Operator's Guide Rotate focus knob to the maximum (except 9550). 2. Raise projection head (A) up to minimum (except 9550). 5. Set Up A B (9550) 1. Release the post lock (B). 3.
Raise the post until it locks into place. Plug in post cradle. 4. Adjust image to lift projector. Hold to screen elevation (A). 3. A B 1. Fold down the post. Secure the post in power cord and turn on. Fold Down 2. Focus the projected image (B). Page 2 3M 9000 Series Operator's Guide Rotate focus knob to the maximum (except 9550). 2. Raise projection head (A) up to minimum (except 9550). 5. Set Up A B (9550) 1. Release the post lock (B). 3.
Operating Guide
Page 5
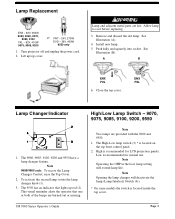
... 9550 has an indicator that one or both of the lamps are burned out or missing. This visual reminder alerts the operator that lights up top cover. ! Install new lamp. 5. The High-Low lamp switch (3) * is recommended for normal use. Low is located inside the top cover. 3M 9000 Series Operator's Guide Page 3 High is located on the top front control panel. 2. Turn projector off and unplug the power cord. 2. Note Opening the lamp changer will extend lamp life. Lamp Replacement ENX...
... 9550 has an indicator that one or both of the lamps are burned out or missing. This visual reminder alerts the operator that lights up top cover. ! Install new lamp. 5. The High-Low lamp switch (3) * is recommended for normal use. Low is located inside the top cover. 3M 9000 Series Operator's Guide Page 3 High is located on the top front control panel. 2. Turn projector off and unplug the power cord. 2. Note Opening the lamp changer will extend lamp life. Lamp Replacement ENX...
Operating Guide
Page 6
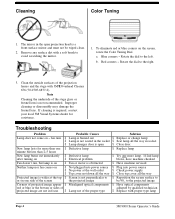
... socket S Seat lamp all the way Projected image is wider at the wall outlet S Check power supply S Top cover not down all the way S Close top cover all the way in the open S Close door New lamp lasts for assistance. Clean the outside surfaces of the proper type S Replace with proper type lamp Page 4 3M 9000 Series Operator's Guide If 2nd lamp blows, have machine checked Fan doesn't run, but...
... socket S Seat lamp all the way Projected image is wider at the wall outlet S Check power supply S Top cover not down all the way S Close top cover all the way in the open S Close door New lamp lasts for assistance. Clean the outside surfaces of the proper type S Replace with proper type lamp Page 4 3M 9000 Series Operator's Guide If 2nd lamp blows, have machine checked Fan doesn't run, but...


