
User Guide
Page 3
... the Web Configuration Manager on a Windows 2000 machine 27 USING THE LOCAL CONFIGURATION MANAGER Initializing the IntelliJack 31 Setting Location Information Setting the Group Name Setting the IP Address Setting Advanced Options 33 Changing the Password Configuring for SNMP USING THE CENTRAL CONFIGURATION MANAGER Discovering IntelliJacks on Your Network 35 Viewing Device Properties 39 General Tab 40 Network Identification Port Information Product Information Hardware Settings Tab 42 Switch Status Power Status Statistics & Log Tab 45 General Counters RMON Counters Saving to a Log File
... the Web Configuration Manager on a Windows 2000 machine 27 USING THE LOCAL CONFIGURATION MANAGER Initializing the IntelliJack 31 Setting Location Information Setting the Group Name Setting the IP Address Setting Advanced Options 33 Changing the Password Configuring for SNMP USING THE CENTRAL CONFIGURATION MANAGER Discovering IntelliJacks on Your Network 35 Viewing Device Properties 39 General Tab 40 Network Identification Port Information Product Information Hardware Settings Tab 42 Switch Status Power Status Statistics & Log Tab 45 General Counters RMON Counters Saving to a Log File

User Guide
Page 4
... & VLAN Configuration Tab 52 Port-Based Settings Other VLAN Settings Security Configuration Tab 55 Device Password 802.1X SNMP Configuration Tab 58 Advanced Configuration Tab 59 Event Alerts Port-Based Configuration (Flow Control, AutoMDI(X), Data Rate Control) Restoring to Base Configurations 61 Finding Computers Connected to IntelliJacks 64 Upgrading the NJ225 Firmware 65 Viewing Log Files 68 Viewing and Canceling Scheduled Firmware Upgrades 69 TROUBLESHOOTING THE NJ225 Troubleshooting Matrix 71 TECHNICAL SUPPORT Where To Go For Help 73 Contact Us 74 PRODUCT SPECIFICATIONS...
... & VLAN Configuration Tab 52 Port-Based Settings Other VLAN Settings Security Configuration Tab 55 Device Password 802.1X SNMP Configuration Tab 58 Advanced Configuration Tab 59 Event Alerts Port-Based Configuration (Flow Control, AutoMDI(X), Data Rate Control) Restoring to Base Configurations 61 Finding Computers Connected to IntelliJacks 64 Upgrading the NJ225 Firmware 65 Viewing Log Files 68 Viewing and Canceling Scheduled Firmware Upgrades 69 TROUBLESHOOTING THE NJ225 Troubleshooting Matrix 71 TECHNICAL SUPPORT Where To Go For Help 73 Contact Us 74 PRODUCT SPECIFICATIONS...

User Guide
Page 5
... over an Ethernet cable, allowing a device to separate network segments through one Ethernet port. Management features include: • Device discovery • Port status (state, duplex, speed) • Statistics • Port control (port state, flow control, AutoMDI(X), frame rate limit) • 802.1P QoS/Priority • 802.1Q compatible VLAN • VLAN tag add/remove • Firmware upgrade • Rate limiting All ports feature 10/100 Mbps auto-negotiation. Consult the 3Com web site for more information. Power to the IntelliJack is...
... over an Ethernet cable, allowing a device to separate network segments through one Ethernet port. Management features include: • Device discovery • Port status (state, duplex, speed) • Statistics • Port control (port state, flow control, AutoMDI(X), frame rate limit) • 802.1P QoS/Priority • 802.1Q compatible VLAN • VLAN tag add/remove • Firmware upgrade • Rate limiting All ports feature 10/100 Mbps auto-negotiation. Consult the 3Com web site for more information. Power to the IntelliJack is...

User Guide
Page 6
... (green LEDs). 2 Port LEDs and corresponding port numbers Indicate network status of each of the four RJ-45 PAN ports. 3 RJ-45 LED Indicates the status of the LAN connection (white cable, green LED). For more information, see "Checking the LEDs" on page 13. 4 Power LED Indicates NJ225 power status (green). This is connected to-and forwarding power to your network does not support Power Over Ethernet (PoE). 2 CHAPTER 1: INSTALLING THE INTELLIJACK About the NJ225 • MAC filtering • 802.1x port security • User-configured VLAN IDs for management packets...
... (green LEDs). 2 Port LEDs and corresponding port numbers Indicate network status of each of the four RJ-45 PAN ports. 3 RJ-45 LED Indicates the status of the LAN connection (white cable, green LED). For more information, see "Checking the LEDs" on page 13. 4 Power LED Indicates NJ225 power status (green). This is connected to-and forwarding power to your network does not support Power Over Ethernet (PoE). 2 CHAPTER 1: INSTALLING THE INTELLIJACK About the NJ225 • MAC filtering • 802.1x port security • User-configured VLAN IDs for management packets...
User Guide
Page 7
... for mounting into plastic: n M3 x 30mm (2x) n M3 x 40mm (2x) • Machine screws for the NJ225 9 Switched port cable 10 Pass-through LAN cable Connects the NJ225 switched RJ-45ports to your product at www.3com.com or by calling 1-877-949-3266. Connects directly to the Ethernet LAN. Component Ethernet Multi-port Midspan Power Supply Ethernet Multi-port Endspan Power Supply Purpose For providing Power Over Ethernet to power up to 24 IntelliJack devices...
... for mounting into plastic: n M3 x 30mm (2x) n M3 x 40mm (2x) • Machine screws for the NJ225 9 Switched port cable 10 Pass-through LAN cable Connects the NJ225 switched RJ-45ports to your product at www.3com.com or by calling 1-877-949-3266. Connects directly to the Ethernet LAN. Component Ethernet Multi-port Midspan Power Supply Ethernet Multi-port Endspan Power Supply Purpose For providing Power Over Ethernet to power up to 24 IntelliJack devices...

User Guide
Page 11
... provide a secure mounting surface for the IntelliJack. NOTE: The NJ225 is designed to local safety and regulatory codes during installation: n ANSI/TIA/EIA-568 Commercial Building Telecommunications Cabling Standard n ANSI/TIA/EIA-569 Commercial Building Standard for more information. However, some switches that supports Power Over Ethernet. • Over the network via a 3Com multi-port midspan power supply (3CNJPSE24). • Over the network via a single-port Ethernet power supply. •...
... provide a secure mounting surface for the IntelliJack. NOTE: The NJ225 is designed to local safety and regulatory codes during installation: n ANSI/TIA/EIA-568 Commercial Building Telecommunications Cabling Standard n ANSI/TIA/EIA-569 Commercial Building Standard for more information. However, some switches that supports Power Over Ethernet. • Over the network via a 3Com multi-port midspan power supply (3CNJPSE24). • Over the network via a single-port Ethernet power supply. •...

User Guide
Page 12
... installation, determine which type of power supplies that support the IntelliJack, go to www.3com.com. Failure to do so may result in damage to the pass-through port on the network that is provided or approved by 3Com for use . Using an Integrated Switch with Power Over Ethernet To use Power Over Ethernet, you must have a switch on the IntelliJack, but it . NOTE: The black cable can also be connected to an Ethernet...
... installation, determine which type of power supplies that support the IntelliJack, go to www.3com.com. Failure to do so may result in damage to the pass-through port on the network that is provided or approved by 3Com for use . Using an Integrated Switch with Power Over Ethernet To use Power Over Ethernet, you must have a switch on the IntelliJack, but it . NOTE: The black cable can also be connected to an Ethernet...

User Guide
Page 13
... an Ethernet multi-port midspan power supply and will not provide power to the IntelliJack. Using a Single-port Ethernet Power Supply To use a single-port Ethernet power supply, connect the power supply to the network hub or switch and to the IntelliJack white cable, as shown in the following illustration. Installing the NJ225 9 Connect the network second data/voice/power cable (if available) to the IntelliJack black cable, as shown in the following illustration. NOTE: The black cable can also be connected to a data port on the IntelliJack...
... an Ethernet multi-port midspan power supply and will not provide power to the IntelliJack. Using a Single-port Ethernet Power Supply To use a single-port Ethernet power supply, connect the power supply to the network hub or switch and to the IntelliJack white cable, as shown in the following illustration. Installing the NJ225 9 Connect the network second data/voice/power cable (if available) to the IntelliJack black cable, as shown in the following illustration. NOTE: The black cable can also be connected to a data port on the IntelliJack...

User Guide
Page 35
... "IntelliJack" and "NJ225" refer to either the NJ225 or the NJ225FX. 1 The first step is to connect your computer to the NJ225 that you must click the Query button to refresh the window. If you connect to another NJ225, you are installing. When it launches, you will appear at the top of the IntelliJack. Attach an Ethernet cable from a computer running the Local Configuration Manager software to...
... "IntelliJack" and "NJ225" refer to either the NJ225 or the NJ225FX. 1 The first step is to connect your computer to the NJ225 that you must click the Query button to refresh the window. If you connect to another NJ225, you are installing. When it launches, you will appear at the top of the IntelliJack. Attach an Ethernet cable from a computer running the Local Configuration Manager software to...
User Guide
Page 37
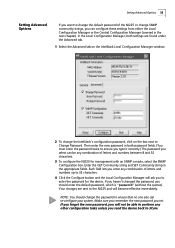
... IntelliJack Local Configuration Manager window. 2 To change the password to enter the password for management with an SNMP console, select the SNMP Configuration box. NOTE: You should enter the default password, which is "password" (without the quotes). If you haven't changed the password, you can re-configure your system. Make sure you remember the new password you to ensure that no one else can configure these settings from either the Local Configuration Manager...
... IntelliJack Local Configuration Manager window. 2 To change the password to enter the password for management with an SNMP console, select the SNMP Configuration box. NOTE: You should enter the default password, which is "password" (without the quotes). If you haven't changed the password, you can re-configure your system. Make sure you remember the new password you to ensure that no one else can configure these settings from either the Local Configuration Manager...

User Guide
Page 54
... the configuration (speed/duplex) of the IntelliJack's ports by checking the box next to modify. Forwarding (Enable) is plugged into. It automatically configures a networked device based on the speed and duplex of the window has buttons labeled Load and Save. If you want , up to 128 characters. 5 Change or set the Group Name, check the box next to that field and entering up to 128 characters. 6 Configure the DHCP setting to...
... the configuration (speed/duplex) of the IntelliJack's ports by checking the box next to modify. Forwarding (Enable) is plugged into. It automatically configures a networked device based on the speed and duplex of the window has buttons labeled Load and Save. If you want , up to 128 characters. 5 Change or set the Group Name, check the box next to that field and entering up to 128 characters. 6 Configure the DHCP setting to...

User Guide
Page 57
... create. Since VLANs are forwarded according to default switching rules (i.e., based on the destination MAC address). In this mode, ingress frames are forwarded through this port on this port without a VLAN tag or with a different VLAN ID are used to separate network traffic to make it ensures that important traffic is 802.1p Priority 0 or 1. Frames ingressed into this port are forwarded within the VLAN. The default setting is the common practice. Changing Device Configuration 53...
... create. Since VLANs are forwarded according to default switching rules (i.e., based on the destination MAC address). In this mode, ingress frames are forwarded through this port on this port without a VLAN tag or with a different VLAN ID are used to separate network traffic to make it ensures that important traffic is 802.1p Priority 0 or 1. Frames ingressed into this port are forwarded within the VLAN. The default setting is the common practice. Changing Device Configuration 53...

User Guide
Page 59
... to set . The default setting for Port Authorize Mode is Disable 802.1X. 802.1X is "password"), and either enable or disable local configuration. Changing Device Configuration 55 Security Configuration 21 Select the Security Configuration tab to 3Com. 802.1X 23 To change the device password (the default password is a standard for a specific port, select that port's tab and make the changes by clicking the box and selecting an option from the drop list.
... to set . The default setting for Port Authorize Mode is Disable 802.1X. 802.1X is "password"), and either enable or disable local configuration. Changing Device Configuration 55 Security Configuration 21 Select the Security Configuration tab to 3Com. 802.1X 23 To change the device password (the default password is a standard for a specific port, select that port's tab and make the changes by clicking the box and selecting an option from the drop list.
User Guide
Page 60
... their MAC addresses are listed in the ATU. 802.1X with 802.1X disabled and voice traffic will put the MAC address of the devices on your network. 25 When 802.1x is 3600 seconds. In this port is acting as a normal Ethernet switch; When reauthentication is enabled, the default period is enabled in the VLAN table to determine if packets entering the port should be forwarded. NOTE: When a port...
... their MAC addresses are listed in the ATU. 802.1X with 802.1X disabled and voice traffic will put the MAC address of the devices on your network. 25 When 802.1x is 3600 seconds. In this port is acting as a normal Ethernet switch; When reauthentication is enabled, the default period is enabled in the VLAN table to determine if packets entering the port should be forwarded. NOTE: When a port...

User Guide
Page 64
... upstream switch the IntelliJack is connected to turn on Flow Control for either ingress or egress traffic. Manual MDI configuration (the default value) assumes that triggers unwanted broadcast storms. With the Data Rate Control, you are being sent to Off (the default setting) allows full passage of traffic regardless of event alerts as described below the Event Alert Level. You can change the Data Rate Control options for a specific port. The default settings allow unicast traffic...
... upstream switch the IntelliJack is connected to turn on Flow Control for either ingress or egress traffic. Manual MDI configuration (the default value) assumes that triggers unwanted broadcast storms. With the Data Rate Control, you are being sent to Off (the default setting) allows full passage of traffic regardless of event alerts as described below the Event Alert Level. You can change the Data Rate Control options for a specific port. The default settings allow unicast traffic...

User Guide
Page 65
... a result, this window is the default setting. Changing Device Configuration 61 With Data Rate Control settings, you can reduce the network traffic speed on the IntelliJack to automatically negotiate a speed and duplex that matches your current network. Even though there are using the Configuration Management software with an NJ225FX. 41 You can change the LAN Port Speed and Duplex settings. However, you can select the 1536 byte option. The standard maximum size of an Ethernet frame is in...
... a result, this window is the default setting. Changing Device Configuration 61 With Data Rate Control settings, you can reduce the network traffic speed on the IntelliJack to automatically negotiate a speed and duplex that matches your current network. Even though there are using the Configuration Management software with an NJ225FX. 41 You can change the LAN Port Speed and Duplex settings. However, you can select the 1536 byte option. The standard maximum size of an Ethernet frame is in...

User Guide
Page 66
62 CHAPTER 4: USING THE CENTRAL CONFIGURATION MANAGER Global Setting Power Forward Local Configuration SNMP SET SNMP Traps Event Alert ATU Table VTU Table All RADIUS settings 802.1X Supplicant Status 802.1X Supplicant User Name and Password Default Value Auto detection Enable Enable Disabled Level 2 Blank Blank Blank Disabled Blank Port Setting State Link Flow Control MDI[X] Multicast Limit Priority Lookup Port Priority VLAN ID 802.1Q VLAN Mode Data Rate Limit Maximum Data Rate Default Value Forwarding Auto negotiation Off Force MDI 3% Tag & IPV4 0 or 1 1 Disable VLANs All frames No limit...
62 CHAPTER 4: USING THE CENTRAL CONFIGURATION MANAGER Global Setting Power Forward Local Configuration SNMP SET SNMP Traps Event Alert ATU Table VTU Table All RADIUS settings 802.1X Supplicant Status 802.1X Supplicant User Name and Password Default Value Auto detection Enable Enable Disabled Level 2 Blank Blank Blank Disabled Blank Port Setting State Link Flow Control MDI[X] Multicast Limit Priority Lookup Port Priority VLAN ID 802.1Q VLAN Mode Data Rate Limit Maximum Data Rate Default Value Forwarding Auto negotiation Off Force MDI 3% Tag & IPV4 0 or 1 1 Disable VLANs All frames No limit...

User Guide
Page 76
... the IntelliJack. Troubleshooting the NJ225 Event/Message Green LEDs on Ports 1-4 are not on Amber LED on Port 4is not on Power LED is blinking continuously Authentication Failure Timeout Attributes Error General Error Description Network device has no connection to IntelliJack Power is properly connected to the network device. I Confirm that you were performing. I NOTE: This error should not appear to 7 watts. I Contact 3Com Technical Support. I Make sure the cable is firmly connected to Port 4 of...
... the IntelliJack. Troubleshooting the NJ225 Event/Message Green LEDs on Ports 1-4 are not on Amber LED on Port 4is not on Power LED is blinking continuously Authentication Failure Timeout Attributes Error General Error Description Network device has no connection to IntelliJack Power is properly connected to the network device. I Confirm that you were performing. I NOTE: This error should not appear to 7 watts. I Contact 3Com Technical Support. I Make sure the cable is firmly connected to Port 4 of...

User Guide
Page 77
..., Repair Services, and Service Request. First time 73 B Obtaining Support 3Com provides easy access to technical support information through a variety of publication. Value-added services can include 24x7 telephone technical support, software upgrades, onsite assistance or advance hardware replacement. In order to access these services. This appendix describes these Software Updates you must first register your networking projects. Expert assessment and implementation services are available to your product at www.3com.com Troubleshoot...
..., Repair Services, and Service Request. First time 73 B Obtaining Support 3Com provides easy access to technical support information through a variety of publication. Value-added services can include 24x7 telephone technical support, software upgrades, onsite assistance or advance hardware replacement. In order to access these services. This appendix describes these Software Updates you must first register your networking projects. Expert assessment and implementation services are available to your product at www.3com.com Troubleshoot...
User Guide
Page 78
... model name, part number, and serial number I A list of system hardware and software, including rev level I Diagnostic error messages I Details about recent configuration changes, if applicable To send a product directly to 3Com for a user name and password. You will find a current directory of support telephone numbers posted on the outside of the package, will need to apply for your region, use the appropriate telephone number, URL or e-mail address...
... model name, part number, and serial number I A list of system hardware and software, including rev level I Diagnostic error messages I Details about recent configuration changes, if applicable To send a product directly to 3Com for a user name and password. You will find a current directory of support telephone numbers posted on the outside of the package, will need to apply for your region, use the appropriate telephone number, URL or e-mail address...


