
Installation Guide
Page 7
... an instruction simply says "type." This guide also provides troubleshooting and support information for configuring, using, and managing the switches. ABOUT THIS GUIDE Conventions This guide describes the 3Com® Switch 7700 and how to software and product documentation: http://www.3com.com Table 1 lists icon conventions that are used throughout this guide. This guide is intended for Qualified Service personnel...
... an instruction simply says "type." This guide also provides troubleshooting and support information for configuring, using, and managing the switches. ABOUT THIS GUIDE Conventions This guide describes the 3Com® Switch 7700 and how to software and product documentation: http://www.3com.com Table 1 lists icon conventions that are used throughout this guide. This guide is intended for Qualified Service personnel...
Installation Guide
Page 8
... information necessary for managing your Switch 7700 using the supported protocols and CLI commands. ■ Switch 7700 Release Notes - These documents are used to manage your Switch 7700. ■ Switch 7700 Configuration Guide- Examples: From the Help menu, select Contents. Click OK. Boldface type is defined in Adobe Acrobat Reader Portable Document Format (PDF) on the 3Com World Wide Web site...
... information necessary for managing your Switch 7700 using the supported protocols and CLI commands. ■ Switch 7700 Release Notes - These documents are used to manage your Switch 7700. ■ Switch 7700 Configuration Guide- Examples: From the Help menu, select Contents. Click OK. Boldface type is defined in Adobe Acrobat Reader Portable Document Format (PDF) on the 3Com World Wide Web site...

Installation Guide
Page 32
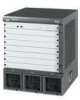
...9632; Configuration terminal, such as a PC ■ Additional equipment for the selected interface modules Installing the Chassis You can install the Switch 7700 in a standard, 19-inch cabinet or on the switch. At least two people are required to move the switch. 2 Put the switch on a...Switch 7700 in the cabinet: Cabinet 1 Carry the switch to the left side of the chassis (opposite the fan frame). 2 Insert the wiring channel into the cabinet. 3 Fix the switch in the front and back of the switch of the cabinet. Installing on a Workbench To install the switch on the tray or the guides...
...9632; Configuration terminal, such as a PC ■ Additional equipment for the selected interface modules Installing the Chassis You can install the Switch 7700 in a standard, 19-inch cabinet or on the switch. At least two people are required to move the switch. 2 Put the switch on a...Switch 7700 in the cabinet: Cabinet 1 Carry the switch to the left side of the chassis (opposite the fan frame). 2 Insert the wiring channel into the cabinet. 3 Fix the switch in the front and back of the switch of the cabinet. Installing on a Workbench To install the switch on the tray or the guides...

Installation Guide
Page 36
... An AUX cable is used to connect the Switch 7700 to the Switch 7700. Always wear the antistatic wrist strap when installing the fan. The other end has both a DB-9-hole connector and a DB-25-hole connector for connection to plug into the switch at the configuration terminal. Installing Cables This section describes how to... frame from the pack. 3 Hold the ejector levers on the fan frame with both hands and push them outward. 4 Align the fan with the guides in the chassis and slide it gently into the slot. 5 Push the fan until its positioning pin touches the hole in the chassis. 6 Push ...
... An AUX cable is used to connect the Switch 7700 to the Switch 7700. Always wear the antistatic wrist strap when installing the fan. The other end has both a DB-9-hole connector and a DB-25-hole connector for connection to plug into the switch at the configuration terminal. Installing Cables This section describes how to... frame from the pack. 3 Hold the ejector levers on the fan frame with both hands and push them outward. 4 Align the fan with the guides in the chassis and slide it gently into the slot. 5 Push the fan until its positioning pin touches the hole in the chassis. 6 Push ...


