

User Guide
Page 3
... Documentation. End User License Agreement IMPORTANT: READ BEFORE YOU DOWNLOAD, INSTALL, OR USE THIS SOFTWARE 3COM END USER SOFTWARE LICENSE AGREEMENT YOU SHOULD CAREFULLY READ THE FOLLOWING TERMS AND CONDITIONS BEFORE DOWNLOADING, INSTALLING AND/OR USING THIS SOFTWARE, THE USE OF WHICH IS LICENSED BY 3COM CORPORATION ("3COM") TO ITS CUSTOMERS FOR THEIR USE ONLY AS SET FORTH BELOW. You may not derive or attempt to derive the source code of the Software with respect to use . Each copy...
... Documentation. End User License Agreement IMPORTANT: READ BEFORE YOU DOWNLOAD, INSTALL, OR USE THIS SOFTWARE 3COM END USER SOFTWARE LICENSE AGREEMENT YOU SHOULD CAREFULLY READ THE FOLLOWING TERMS AND CONDITIONS BEFORE DOWNLOADING, INSTALLING AND/OR USING THIS SOFTWARE, THE USE OF WHICH IS LICENSED BY 3COM CORPORATION ("3COM") TO ITS CUSTOMERS FOR THEIR USE ONLY AS SET FORTH BELOW. You may not derive or attempt to derive the source code of the Software with respect to use . Each copy...
User Guide
Page 4
... under the terms of the end-user license(s) that are further controlled for export as encryption items and may be subject to additional export or import regulations in other technical data (collectively "Product") are used by, or exported or reexported to (i) any time by U.S. EXPORT: The product, Software, Documentation and/or other countries. or other government export control regulations from time to time; (iii) to any form. TRADE...
... under the terms of the end-user license(s) that are further controlled for export as encryption items and may be subject to additional export or import regulations in other technical data (collectively "Product") are used by, or exported or reexported to (i) any time by U.S. EXPORT: The product, Software, Documentation and/or other countries. or other government export control regulations from time to time; (iii) to any form. TRADE...

User Guide
Page 6
... Cut/Copy/Paste a Location ...17 4.1.8 Moving a Location ...18 4.1.9 Placing Locations on a Location Folder with an attached image 18 4.1.10 Renaming a Location...19 Renaming a Location Folder...19 Renaming a Location Node ...20 4.1.11 Deleting a Location ...20 4.1.12 Modifying Location Properties ...20 4.2 DEVICES LIST...22 CHAPTER 5 MENU AND TOOLBAR OPTIONS ...24 5.1.1 Menu Items ...24 File Menu...24 Edit Menu ...25 View Menu ...26 Draw Menu ...27 Drawing a Polygon ...28 Drawing a Curved Polygon...28 Tools Menu ...29 Help Menu ...30 5.1.2 Updating the License...30 v 3Com ® AirProtect...
... Cut/Copy/Paste a Location ...17 4.1.8 Moving a Location ...18 4.1.9 Placing Locations on a Location Folder with an attached image 18 4.1.10 Renaming a Location...19 Renaming a Location Folder...19 Renaming a Location Node ...20 4.1.11 Deleting a Location ...20 4.1.12 Modifying Location Properties ...20 4.2 DEVICES LIST...22 CHAPTER 5 MENU AND TOOLBAR OPTIONS ...24 5.1.1 Menu Items ...24 File Menu...24 Edit Menu ...25 View Menu ...26 Draw Menu ...27 Drawing a Polygon ...28 Drawing a Curved Polygon...28 Tools Menu ...29 Help Menu ...30 5.1.2 Updating the License...30 v 3Com ® AirProtect...

User Guide
Page 7
... Application Environment...47 5.5.6 Waterfall Curve Repository ...47 Adding a Waterfall Curve ...47 Modifying a Waterfall Curve ...49 Deleting a Waterfall Curve...50 5.5.7 Import Planner Settings...50 5.5.8 Export Planner Settings...51 5.5.9 Location Properties ...52 Location Properties: Dimensions Tab ...52 Location Properties: Calculations Tab ...53 Location Properties: Local Material Repository Tab ...54 5.5.10 Renumber Devices ...55 CHAPTER 6 WLAN PLANNING WIZARD ...56 6.1 STEPS IN WLAN PLANNING ...56 Coverage Planning...59 Capacity Planning ...61 6.2 AUTO DEVICE...
... Application Environment...47 5.5.6 Waterfall Curve Repository ...47 Adding a Waterfall Curve ...47 Modifying a Waterfall Curve ...49 Deleting a Waterfall Curve...50 5.5.7 Import Planner Settings...50 5.5.8 Export Planner Settings...51 5.5.9 Location Properties ...52 Location Properties: Dimensions Tab ...52 Location Properties: Calculations Tab ...53 Location Properties: Local Material Repository Tab ...54 5.5.10 Renumber Devices ...55 CHAPTER 6 WLAN PLANNING WIZARD ...56 6.1 STEPS IN WLAN PLANNING ...56 Coverage Planning...59 Capacity Planning ...61 6.2 AUTO DEVICE...

User Guide
Page 8
... 7.3.8 Selecting Protocols...85 7.3.9 Calculate/Calibrate Button ...86 7.3.10 Color Palette...86 7.4 STATUS BAR ...87 7.4.1 Cursor Location (X, Y) ...87 7.4.2 RSSI Display...87 7.4.3 Layout Dimensions...87 7.4.4 Current Mode ...87 7.4.5 Interference ...87 7.4.6 SINR ...87 7.5 DEVICE LIBRARY...88 7.6 DEVICE PROPERTIES...89 7.6.1 Access Point Properties...89 7.6.2 Sensor Properties ...91 7.7 VIEWING SIGNAL STRENGTH...92 7.8 STATISTICS ...92 7.9 SAVING THE FILE ...95 7.10 SAVING THE PROJECT FILE...95 CHAPTER 8 SETTINGS...97 8.1 SETTINGS: INVOKING FROM TOOLS MENU...
... 7.3.8 Selecting Protocols...85 7.3.9 Calculate/Calibrate Button ...86 7.3.10 Color Palette...86 7.4 STATUS BAR ...87 7.4.1 Cursor Location (X, Y) ...87 7.4.2 RSSI Display...87 7.4.3 Layout Dimensions...87 7.4.4 Current Mode ...87 7.4.5 Interference ...87 7.4.6 SINR ...87 7.5 DEVICE LIBRARY...88 7.6 DEVICE PROPERTIES...89 7.6.1 Access Point Properties...89 7.6.2 Sensor Properties ...91 7.7 VIEWING SIGNAL STRENGTH...92 7.8 STATISTICS ...92 7.9 SAVING THE FILE ...95 7.10 SAVING THE PROJECT FILE...95 CHAPTER 8 SETTINGS...97 8.1 SETTINGS: INVOKING FROM TOOLS MENU...

User Guide
Page 10
... security Sensors • Planning Sensors to ensure reliable location tracking of IT security in today's corporate and industrial environment. and devices such as Wi‐Fi compatible by the Sensors • Planning to enable live 24x7 RF monitoring • Troubleshooting remotely • Restructuring the whole plan especially while extending the existing office space or deploying new equipments 2 3Com ® AirProtect Planner User Guide You can lead to serious security...
... security Sensors • Planning Sensors to ensure reliable location tracking of IT security in today's corporate and industrial environment. and devices such as Wi‐Fi compatible by the Sensors • Planning to enable live 24x7 RF monitoring • Troubleshooting remotely • Restructuring the whole plan especially while extending the existing office space or deploying new equipments 2 3Com ® AirProtect Planner User Guide You can lead to serious security...

User Guide
Page 11
....11n devices from Planner Site Model for future RF planning Bill of Material (BoM) for 3Com ® AirProtect Enterprise Sensors (Sensors) BoM for APs and antennae ¾ Number and location of Sensors ¾ Number, location, and configuration of APs ¾ Antenna types and location RF Maps ¾ Security View: Coverage inside the Perimeter, Coverage beyond the Perimeter, Redundancy ¾ Access Points: Coverage, Spillage, Channel Allocation, Interference, and Redundancy Consolidated planning report...
....11n devices from Planner Site Model for future RF planning Bill of Material (BoM) for 3Com ® AirProtect Enterprise Sensors (Sensors) BoM for APs and antennae ¾ Number and location of Sensors ¾ Number, location, and configuration of APs ¾ Antenna types and location RF Maps ¾ Security View: Coverage inside the Perimeter, Coverage beyond the Perimeter, Redundancy ¾ Access Points: Coverage, Spillage, Channel Allocation, Interference, and Redundancy Consolidated planning report...
User Guide
Page 12
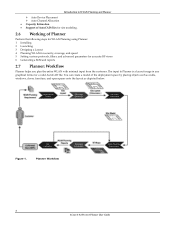
Planner Workflow 4 3Com ® AirProtect Planner User Guide The input to WLAN Planning and Planner ¾ Auto Device Placement ¾ Auto Channel Allocation • Capacity Estimation • Support of AutoCAD files for site modeling. 2.6 Working of the deployment space by placing objects such as walls, windows, doors, furniture, and open spaces onto the layout as depicted below. You can create a model of Planner Perform the following steps for WLAN Planning using Planner: 1 Installing 2 Launching 3 Designing...
Planner Workflow 4 3Com ® AirProtect Planner User Guide The input to WLAN Planning and Planner ¾ Auto Device Placement ¾ Auto Channel Allocation • Capacity Estimation • Support of AutoCAD files for site modeling. 2.6 Working of the deployment space by placing objects such as walls, windows, doors, furniture, and open spaces onto the layout as depicted below. You can create a model of Planner Perform the following steps for WLAN Planning using Planner: 1 Installing 2 Launching 3 Designing...

User Guide
Page 16
... Menu Items for more about managing layers of the Planner Layout Model for AutoCAD Planner supports AutoCAD files. Project Layout The new Planner project layout screen is divided into Planner, Planner automatically populates the Dimensions field. Planner supports the following versions of layers in the AutoCAD file, by default, and based on the floor map. Refer to re‐model these layers. On launching a new project, Planner creates the Locations tree with Location...
... Menu Items for more about managing layers of the Planner Layout Model for AutoCAD Planner supports AutoCAD files. Project Layout The new Planner project layout screen is divided into Planner, Planner automatically populates the Dimensions field. Planner supports the following versions of layers in the AutoCAD file, by default, and based on the floor map. Refer to re‐model these layers. On launching a new project, Planner creates the Locations tree with Location...

User Guide
Page 22
.... 4.1.3 Managing Layers The Manage Layers dialog box displays details of the .spm file is possible to discard action. Managing Layers of a node under a Cross Floor Location folder, right‐click a node and select Load Location Node. Then, Planner uses the same dimensions for a location node, the Manage Layers dialog box appears. Note: To modify the dimensions of an AutoCAD file 14 3Com ® AirProtect Planner User Guide However, you are the same. Working with...
.... 4.1.3 Managing Layers The Manage Layers dialog box displays details of the .spm file is possible to discard action. Managing Layers of a node under a Cross Floor Location folder, right‐click a node and select Load Location Node. Then, Planner uses the same dimensions for a location node, the Manage Layers dialog box appears. Note: To modify the dimensions of an AutoCAD file 14 3Com ® AirProtect Planner User Guide However, you are the same. Working with...

User Guide
Page 23
... this view: Click to view the enlarged view. • Restore to normal View: Click to restore the enlarged view to inform you import that AutoCAD file and verifies it . On the Manage Layers screen, if you to assign the default application environment. 15 3Com ® AirProtect Planner User Guide You can override the existing status of each layer by default. You cannot view a location layout unless you load it with the selection of layers. •...
... this view: Click to view the enlarged view. • Restore to normal View: Click to restore the enlarged view to inform you import that AutoCAD file and verifies it . On the Manage Layers screen, if you to assign the default application environment. 15 3Com ® AirProtect Planner User Guide You can override the existing status of each layer by default. You cannot view a location layout unless you load it with the selection of layers. •...

User Guide
Page 26
... under the selected location folder. Select Paste. Working with an attached image Planner enables you want to paste the location selected in the above steps until you reach the destination folder under which you to place locations on . If you want to copy that folder in the right pane. 3 To view details about the location, hold the mouse cursor over the green colored bullets. 18 3Com ® AirProtect Planner User Guide
... under the selected location folder. Select Paste. Working with an attached image Planner enables you want to paste the location selected in the above steps until you reach the destination folder under which you to place locations on . If you want to copy that folder in the right pane. 3 To view details about the location, hold the mouse cursor over the green colored bullets. 18 3Com ® AirProtect Planner User Guide

User Guide
Page 33
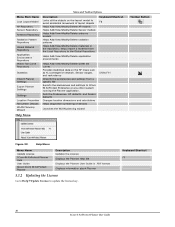
If the node is part of a Cross Floor location folder, you can later import the whole project into a .zip file so that you can generate a report for the currently loaded node. Lists the last four opened projects Closes the Planner application Keyboard Shortcut Ctrl+N Ctrl+O Ctrl+S Ctrl+E Ctrl+G Edit Menu Toolbar Button Figure 26. Edit Menu 25 3Com ® AirProtect Planner User Guide Menu and Toolbar Options Menu Item Name New Open Open Demo Project Close Close Project...
If the node is part of a Cross Floor location folder, you can later import the whole project into a .zip file so that you can generate a report for the currently loaded node. Lists the last four opened projects Closes the Planner application Keyboard Shortcut Ctrl+N Ctrl+O Ctrl+S Ctrl+E Ctrl+G Edit Menu Toolbar Button Figure 26. Edit Menu 25 3Com ® AirProtect Planner User Guide Menu and Toolbar Options Menu Item Name New Open Open Demo Project Close Close Project...
User Guide
Page 38
...174; AirProtect Planner Help User Guide About 3Com ® AirProtect Planner Description Updates the License Displays the Planner Help file Displays the Planner User Guide in the repository; Menu and Toolbar Options Menu Item Name Lock Layout Model AP Repository Sensor Repository Antenna Repository Radiation Pattern Repository Global Material Repository Application Environment Repository Water Fall Curve Repository Statistics Import Planner Settings Export Planner Settings Settings Location Properties Renumber Devices WLAN Planning Wizard Description Locks all the objects on the RF...
...174; AirProtect Planner Help User Guide About 3Com ® AirProtect Planner Description Updates the License Displays the Planner Help file Displays the Planner User Guide in the repository; Menu and Toolbar Options Menu Item Name Lock Layout Model AP Repository Sensor Repository Antenna Repository Radiation Pattern Repository Global Material Repository Application Environment Repository Water Fall Curve Repository Statistics Import Planner Settings Export Planner Settings Settings Location Properties Renumber Devices WLAN Planning Wizard Description Locks all the objects on the RF...

User Guide
Page 45
... dialog box, select the Add this material in the Local Material Repository. AP Repository The Access Point Repository dialog box displays a list of available APs, their manufacturer, model, and number of the currently loaded .spm file. You can do not copy it to save and add the new material to choose the desired color from the Color dialog box. • Border Color: Border color for the material...
... dialog box, select the Add this material in the Local Material Repository. AP Repository The Access Point Repository dialog box displays a list of available APs, their manufacturer, model, and number of the currently loaded .spm file. You can do not copy it to save and add the new material to choose the desired color from the Color dialog box. • Border Color: Border color for the material...

User Guide
Page 58
... the planning team members can choose to import any of environments and all workstations have the same set of the parameters. Select Import Planner Settings from the Tools menu. Deleting a Waterfall Curve Click and confirm the deletion of the waterfall curve. 5.5.7 Import Planner Settings The Import option allows you to the Add Waterfall Curve dialog box. The Import Planner Settings dialog box appears. 50 3Com ® AirProtect Planner User Guide Waterfall...
... the planning team members can choose to import any of environments and all workstations have the same set of the parameters. Select Import Planner Settings from the Tools menu. Deleting a Waterfall Curve Click and confirm the deletion of the waterfall curve. 5.5.7 Import Planner Settings The Import option allows you to the Add Waterfall Curve dialog box. The Import Planner Settings dialog box appears. 50 3Com ® AirProtect Planner User Guide Waterfall...

User Guide
Page 96
.... Planner creates an instance of that the Client sees in the Planner application. Note: Planner shows the free space reach of a device in the Settings: Sensor Defaults section. These devices are pre‐configured with the properties that Sensor. The Sensors tree on the Layout Model Figure 116. The Device Library dialog box displays the available APs and Sensors. To change the default Sensor properties...
.... Planner creates an instance of that the Client sees in the Planner application. Note: Planner shows the free space reach of a device in the Settings: Sensor Defaults section. These devices are pre‐configured with the properties that Sensor. The Sensors tree on the Layout Model Figure 116. The Device Library dialog box displays the available APs and Sensors. To change the default Sensor properties...
User Guide
Page 101
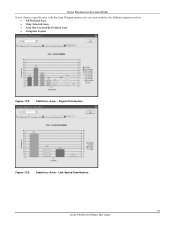
Link Speed Distribution 93 3Com ® AirProtect Planner User Guide Statistics: Area - Signal Distribution Figure 123. Device Placement on the Layout Model If you choose a specific area with the Area Polygon option, you can view statistics for different regions such as: • All Defined Area • Only Selected Area • Area Not Covered By Defined Area • Complete Layout Figure 122. Statistics: Area -
Link Speed Distribution 93 3Com ® AirProtect Planner User Guide Statistics: Area - Signal Distribution Figure 123. Device Placement on the Layout Model If you choose a specific area with the Area Polygon option, you can view statistics for different regions such as: • All Defined Area • Only Selected Area • Area Not Covered By Defined Area • Complete Layout Figure 122. Statistics: Area -
User Guide
Page 110
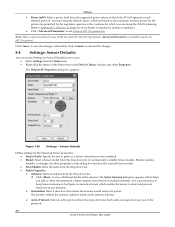
... Prefix: Specify the text to prefix to set advance 802.11n parameters. Click to be dipole or omni‐directional, which helps you are numbered. • Model: Select a Sensor model from the drop‐down list of commercially available Sensor models. The Default AP Properties dialog box appears. Sensor Defaults Define settings for Sensor Defaults in two ways: • Select Settings from the Tools menu. • Right‐...
... Prefix: Specify the text to prefix to set advance 802.11n parameters. Click to be dipole or omni‐directional, which helps you are numbered. • Model: Select a Sensor model from the drop‐down list of commercially available Sensor models. The Default AP Properties dialog box appears. Sensor Defaults Define settings for Sensor Defaults in two ways: • Select Settings from the Tools menu. • Right‐...

User Guide
Page 121
...The maximum number of spatial streams is limited by installing 802.11b gear at the medium access control and physical layers (for wireless local area networks that 802.11g APs will work with ...3Com ® AirProtect Planner User Guide Spatial multiplexing is backwards compatible with 802.11b, which means that promises higher data rates and longer range as the original 802.11 standard. 802.11g 802.11n MIMO configuration Channel width Guard Interval (GI) Appendix D: Glossary of Terms Wireless Protocol Wireless Protocol Multiple-Input-MultipleOutput configuration 802.11b supports...
...The maximum number of spatial streams is limited by installing 802.11b gear at the medium access control and physical layers (for wireless local area networks that 802.11g APs will work with ...3Com ® AirProtect Planner User Guide Spatial multiplexing is backwards compatible with 802.11b, which means that promises higher data rates and longer range as the original 802.11 standard. 802.11g 802.11n MIMO configuration Channel width Guard Interval (GI) Appendix D: Glossary of Terms Wireless Protocol Wireless Protocol Multiple-Input-MultipleOutput configuration 802.11b supports...

