User Guide
Page 18
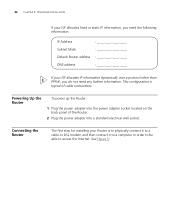
... to a cable or DSL modem and then connect it to a computer in order to be able to access the Internet. See Figure 5: 22 CHAPTER 2: HARDWARE INSTALLATION If your ISP allocates fixed or static IP information, you need the following information: IP Address Subnet Mask Default Router address DNS address If your Router is typical of the Router. 2 Plug...
... to a cable or DSL modem and then connect it to a computer in order to be able to access the Internet. See Figure 5: 22 CHAPTER 2: HARDWARE INSTALLATION If your ISP allocates fixed or static IP information, you need the following information: IP Address Subnet Mask Default Router address DNS address If your Router is typical of the Router. 2 Plug...
User Guide
Page 31
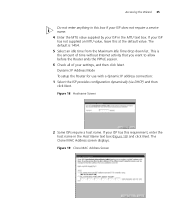
...a host name. The Clone MAC Address screen displays. The default is the amount of time without Internet activity that you want to allow before the Router ends the PPPoE session. 6 Check all of your ISP has this at the default value. If your settings, and then click Next. Figure ...19 Clone MAC Address Screen Dynamic IP Address Mode To setup the Router for use with a dynamic IP address connection: 1 Select the ISP provides configuration dynamically (via DHCP) ...
...a host name. The Clone MAC Address screen displays. The default is the amount of time without Internet activity that you want to allow before the Router ends the PPPoE session. 6 Check all of your ISP has this at the default value. If your settings, and then click Next. Figure ...19 Clone MAC Address Screen Dynamic IP Address Mode To setup the Router for use with a dynamic IP address connection: 1 Select the ISP provides configuration dynamically (via DHCP) ...
User Guide
Page 41
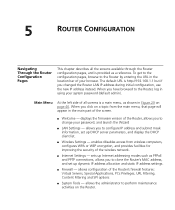
...the main part of your browser. The default URL is http://192.168.1.1 but if you to change your system password (default admin). allows configuration of the wireless network. ■ Internet Settings - allows the administrator to the Router by entering the URL in the location... up Internet addressing modes such as PPPoE and PPTP connections, allows you changed the Router LAN IP address during initial configuration, use the new IP address instead. 5 ROUTER CONFIGURATION Navigating Through the Router Configuration Pages This chapter describes all screens is a main menu, as shown in ...
...the main part of your browser. The default URL is http://192.168.1.1 but if you to change your system password (default admin). allows configuration of the wireless network. ■ Internet Settings - allows the administrator to the Router by entering the URL in the location... up Internet addressing modes such as PPPoE and PPTP connections, allows you changed the Router LAN IP address during initial configuration, use the new IP address instead. 5 ROUTER CONFIGURATION Navigating Through the Router Configuration Pages This chapter describes all screens is a main menu, as shown in ...

User Guide
Page 45
...of all of your settings, and then click Apply. The default IP address of the Router is used to specify the LAN IP address of your Router, and to configure the DHCP server. 1 Select Unit Configuration and then specify the Router IP Address and Subnet Mask in your network. Alternatively, you ...can change the address range by changing the last digit(s) of the IP Pool Start Address, or the IP Pool End Address, or both wired and wireless clients. The DHCP server will automatically...
...of all of your settings, and then click Apply. The default IP address of the Router is used to specify the LAN IP address of your Router, and to configure the DHCP server. 1 Select Unit Configuration and then specify the Router IP Address and Subnet Mask in your network. Alternatively, you ...can change the address range by changing the last digit(s) of the IP Pool Start Address, or the IP Pool End Address, or both wired and wireless clients. The DHCP server will automatically...

User Guide
Page 59
... filled in with a dynamic IP address connection: 1 Select Dynamic IP Address (automatically allocated) in the Host Name text box. 3 If you use 'Cable', your ISP may be obtained automatically from your MAC address. Some ISP srequire a host name. To setup the Router for use your ISP has ...2 Enter the Host Name(optional). LAN Settings 63 Dynamic IP Address Figure 35 Connection Parameters Screen - Dynamic IP If this screen, but may use with the MAC address of the Router. This field is selected by default and is selected, your IP Address, Subnet Mask, and DNS Address will need to...
... filled in with a dynamic IP address connection: 1 Select Dynamic IP Address (automatically allocated) in the Host Name text box. 3 If you use 'Cable', your ISP may be obtained automatically from your MAC address. Some ISP srequire a host name. To setup the Router for use your ISP has ...2 Enter the Host Name(optional). LAN Settings 63 Dynamic IP Address Figure 35 Connection Parameters Screen - Dynamic IP If this screen, but may use with the MAC address of the Router. This field is selected by default and is selected, your IP Address, Subnet Mask, and DNS Address will need to...
User Guide
Page 62
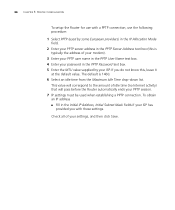
...European providers) in the IP Allocation Mode field. 2 Enter your PPTP server address in the PPTP Password text box. 5 Enter the MTU value supplied by your ISP. This value will correspond to the amount of idle time (no Internet activity) that will pass before the Router automatically ends your ISP has... provided you do not know this is 1460. 6 Select an idle time from the Maximum Idle Time drop-down list. The default is typically the address of your settings, and then click Save. ...
...European providers) in the IP Allocation Mode field. 2 Enter your PPTP server address in the PPTP Password text box. 5 Enter the MTU value supplied by your ISP. This value will correspond to the amount of idle time (no Internet activity) that will pass before the Router automatically ends your ISP has... provided you do not know this is 1460. 6 Select an idle time from the Maximum Idle Time drop-down list. The default is typically the address of your settings, and then click Save. ...

User Guide
Page 63
...Settings 67 Check with a Heart Beat Signal connection, use with your ISP. This value will pass before the Router automatically ends your settings, and then click Save. To set up the Router for use the following procedure: 1 Select Heart Beat Signal (For Australia only) in the Heart Beat Signal ...Heart Beat Signal User Name text box. 4 Enter your Heart Beat Signal password in the IP Allocation Mode field. 2 Enter the Host Name(optional). If your ISP has this , leave it at the default value. Check all of idle time(no Internet activity)! that will correspond to make sure they...
...Settings 67 Check with a Heart Beat Signal connection, use with your ISP. This value will pass before the Router automatically ends your settings, and then click Save. To set up the Router for use the following procedure: 1 Select Heart Beat Signal (For Australia only) in the Heart Beat Signal ...Heart Beat Signal User Name text box. 4 Enter your Heart Beat Signal password in the IP Allocation Mode field. 2 Enter the Host Name(optional). If your ISP has this , leave it at the default value. Check all of idle time(no Internet activity)! that will correspond to make sure they...

User Guide
Page 72
... ROUTER CONFIGURATION To activate Content Filtering: 1 Select Firewall form the main menu, then select the Content Filter tab. Figure63!Content Filter Screen 2 Make sure the Enable Content Filter check box is 3000 milliseconds (3 seconds). 5 Select Allow or Deny for each displayed category, as required. The default ...is checked. 3 Select the Content Filter Server that you select custom entry, enter the server IP address in the text box. 4 Select the Server Timeout value in milliseconds. Click Save...
... ROUTER CONFIGURATION To activate Content Filtering: 1 Select Firewall form the main menu, then select the Content Filter tab. Figure63!Content Filter Screen 2 Make sure the Enable Content Filter check box is 3000 milliseconds (3 seconds). 5 Select Allow or Deny for each displayed category, as required. The default ...is checked. 3 Select the Content Filter Server that you select custom entry, enter the server IP address in the text box. 4 Select the Server Timeout value in milliseconds. Click Save...

User Guide
Page 75
... Screen Firewall 79 Select the Configuration tab to re-establish communication with the Router. The Router LAN IP address will lose all your computer, and then click RESTORE to download and save the current Router configuration. You will revert to 192.168.1.1, and the DHCP server on your... computer to display the Configuration screen . Reset to Factory Default If you want to reset...
... Screen Firewall 79 Select the Configuration tab to re-establish communication with the Router. The Router LAN IP address will lose all your computer, and then click RESTORE to download and save the current Router configuration. You will revert to 192.168.1.1, and the DHCP server on your... computer to display the Configuration screen . Reset to Factory Default If you want to reset...
User Guide
Page 79
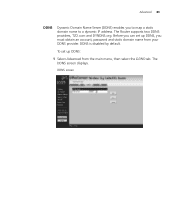
DDNS is disabled by default. The Router supports two DDNS providers, TZO.com and DYNDNS.org. To set up DDNS: 1 Select Advanced from your DDNS provider. The DDNS screen displays. DDNS screen Before you to map a static domain name to a dynamic IP address. Advanced 83 DDNS Dynamic Domain Name Server (DDNS) enables you can set up DDNS, you must obtain an account, password and static domain name from the main menu, then select the DDNS tab.
DDNS is disabled by default. The Router supports two DDNS providers, TZO.com and DYNDNS.org. To set up DDNS: 1 Select Advanced from your DDNS provider. The DDNS screen displays. DDNS screen Before you to map a static domain name to a dynamic IP address. Advanced 83 DDNS Dynamic Domain Name Server (DDNS) enables you can set up DDNS, you must obtain an account, password and static domain name from the main menu, then select the DDNS tab.

User Guide
Page 82
... on your ISP assigns you multiple IP addresses or you leave this feature disabled for maximum security. ■ Allow PING from a whole subnet - This option allows any Internet Host - 86 CHAPTER 5: ROUTER CONFIGURATION 3Com recommends that you need NAT disabled for an advanced system configuration. By default the Router has PING disabled in order to...
... on your ISP assigns you multiple IP addresses or you leave this feature disabled for maximum security. ■ Allow PING from a whole subnet - This option allows any Internet Host - 86 CHAPTER 5: ROUTER CONFIGURATION 3Com recommends that you need NAT disabled for an advanced system configuration. By default the Router has PING disabled in order to...

User Guide
Page 90
... the cable/DSL modem is OK. ■ Ensure that the correct MAC address is 192.168.1.1 (the address of the form 192.168.1.xxx (where xxx is in the Router to obtain a new IP address from the Router. If these are not configured to the Router, then use the Release and Renew functions to... ensure that you still cannot browse to use the Clone MAC Address feature in the range 2-254), the subnet mask is 255.255.255.0, and the default Router ...
... the cable/DSL modem is OK. ■ Ensure that the correct MAC address is 192.168.1.1 (the address of the form 192.168.1.xxx (where xxx is in the Router to obtain a new IP address from the Router. If these are not configured to the Router, then use the Release and Renew functions to... ensure that you still cannot browse to use the Clone MAC Address feature in the range 2-254), the subnet mask is 255.255.255.0, and the default Router ...

User Guide
Page 95
...Defaults? DHCP is disabled, and the LAN IP address is available on the computer, enter the following the upload, it may be faulty. The latest software is set to the Router. 4 Using the Web browser on 3Com's Web site at: www.3com.com. 1 Remove power from the Router and disconnect the Cable/DSL... modem and all your network. Enter the path and filename of your Router to the Microcode Recovery utility in the location...
...Defaults? DHCP is disabled, and the LAN IP address is available on the computer, enter the following the upload, it may be faulty. The latest software is set to the Router. 4 Using the Web browser on 3Com's Web site at: www.3com.com. 1 Remove power from the Router and disconnect the Cable/DSL... modem and all your network. Enter the path and filename of your Router to the Microcode Recovery utility in the location...


