

User Guide
Page 5
... 92 Automating Updates 93 Detecting Rogue Access Points 94 Viewing Detected Rogue Access Points 96 6 TROUBLESHOOTING Basic Connection Checks 97 Cannot Connect to the Wireless Access Point to Configure It 97 Forgotten Password and Reset to Factory Defaults 98 Wireless Station Cannot Connect to the LAN via the Access Point 98 A TECHNICAL SPECIFICATIONS Hardware Specifications 99 Wireless Specifications 100 Software Specifications 102 B COMMAND...
... 92 Automating Updates 93 Detecting Rogue Access Points 94 Viewing Detected Rogue Access Points 96 6 TROUBLESHOOTING Basic Connection Checks 97 Cannot Connect to the Wireless Access Point to Configure It 97 Forgotten Password and Reset to Factory Defaults 98 Wireless Station Cannot Connect to the LAN via the Access Point 98 A TECHNICAL SPECIFICATIONS Hardware Specifications 99 Wireless Specifications 100 Software Specifications 102 B COMMAND...

User Guide
Page 26
...administrative tasks such as changing the password to a power source Overview of Setup and Management Tasks The following : 1 Power off the Access Point. 2 Press the Reset button, while powering on the device. 18 CHAPTER 1: INTRODUCING THE OFFICECONNECT WIRELESS ACCESS POINT Table 5 Back Panel Ports and...available in Chapter 6 starting on connecting to factory defaults - Step-by-step procedures for , performing, and verifying the installation is available in Chapter 5 starting on the network to associate with it. 1 Install the Access Point - Use a standard LAN cable (with RJ-...
...administrative tasks such as changing the password to a power source Overview of Setup and Management Tasks The following : 1 Power off the Access Point. 2 Press the Reset button, while powering on the device. 18 CHAPTER 1: INTRODUCING THE OFFICECONNECT WIRELESS ACCESS POINT Table 5 Back Panel Ports and...available in Chapter 6 starting on connecting to factory defaults - Step-by-step procedures for , performing, and verifying the installation is available in Chapter 5 starting on the network to associate with it. 1 Install the Access Point - Use a standard LAN cable (with RJ-...
User Guide
Page 32
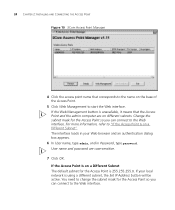
...CHAPTER 2: INSTALLING AND CONNECTING THE ACCESS POINT Figure 10 3Com Access Point Manager 4 Click the access point name that the Access Point and the admin computer are case-sensitive. 7 Click OK. If the Access Point Is on different subnets. Change the subnet mask for the Access Point so you can connect to the...button is unavailable, it means that corresponds to the name on a Different Subnet". User name and password are on a Different Subnet The default subnet for the Access Point so you can connect to the Web interface. If your Web browser and an authentication dialog box ...
...CHAPTER 2: INSTALLING AND CONNECTING THE ACCESS POINT Figure 10 3Com Access Point Manager 4 Click the access point name that the Access Point and the admin computer are case-sensitive. 7 Click OK. If the Access Point Is on different subnets. Change the subnet mask for the Access Point so you can connect to the...button is unavailable, it means that corresponds to the name on a Different Subnet". User name and password are on a Different Subnet The default subnet for the Access Point so you can connect to the Web interface. If your Web browser and an authentication dialog box ...
User Guide
Page 87
To prevent unauthorized users from gaining access to the Web interface, 3Com recommends that you : ■ Change the default logon account and change the admin password periodically ■ Configure admin connections 5 PERFORMING ADDITIONAL ADMINISTRATIVE TASKS Configuring Administrator Access This chapter provides information on other tasks that you can perform after setting up and configuring the Access Point and wireless stations.
To prevent unauthorized users from gaining access to the Web interface, 3Com recommends that you : ■ Change the default logon account and change the admin password periodically ■ Configure admin connections 5 PERFORMING ADDITIONAL ADMINISTRATIVE TASKS Configuring Administrator Access This chapter provides information on other tasks that you can perform after setting up and configuring the Access Point and wireless stations.
User Guide
Page 88
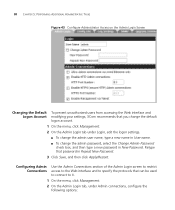
... TASKS Figure 43 Configure Administrator Access on the Admin Login Screen Changing the Default To prevent unauthorized users from accessing the Web interface and Logon Account modifying your settings, 3Com recommends that you change the admin password, select the Change Admin Password check box, and then type a new password in Repeat New Password. 3 Click Save, and then click...
... TASKS Figure 43 Configure Administrator Access on the Admin Login Screen Changing the Default To prevent unauthorized users from accessing the Web interface and Logon Account modifying your settings, 3Com recommends that you change the admin password, select the Change Admin Password check box, and then type a new password in Repeat New Password. 3 Click Save, and then click...
User Guide
Page 89
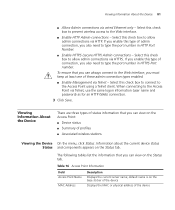
...Displays the MAC or physical address of profiles ■ Associated wireless stations Viewing the Device On the menu, click Status. Table 16 Access Point Information Field Access Point Name MAC Address Description Displays the current server name; default name is on the Status tab. The following tables list ...Admin connections - Viewing Information About the Device 81 ■ Allow Admin connections via Telnet, use the same logon information (user name and password) as for an HTTP (Web) connection. 3 Click Save. If you enable this check box to the Web interface, you can always ...
...Displays the MAC or physical address of profiles ■ Associated wireless stations Viewing the Device On the menu, click Status. Table 16 Access Point Information Field Access Point Name MAC Address Description Displays the current server name; default name is on the Status tab. The following tables list ...Admin connections - Viewing Information About the Device 81 ■ Allow Admin connections via Telnet, use the same logon information (user name and password) as for an HTTP (Web) connection. 3 Click Save. If you enable this check box to the Web interface, you can always ...

User Guide
Page 106
... . 6 When the configuration wizard has completed, you have forgotten the password, follow the steps below to reset the Access Point to its factory default configuration. Wireless Station Cannot Connect to the LAN via the Access Point Check the following: ■ The SSID and WEP settings on the wireless station match the settings on because you may need to...
... . 6 When the configuration wizard has completed, you have forgotten the password, follow the steps below to reset the Access Point to its factory default configuration. Wireless Station Cannot Connect to the LAN via the Access Point Check the following: ■ The SSID and WEP settings on the wireless station match the settings on because you may need to...

User Guide
Page 113
... the user name and password. 2 Enter your logon name and password. Once connected, you can be executed at the CLI may delete the settings on either the wired or wireless local network. You can be on the Access Point. Use the CLI to configure the Access Point only if you are ..., the computer that you are using its default IP address (192.168.0.228), enter Telnet 192.168.0.228. Connecting to the CLI via Telnet: 1 From the command prompt, telnet to the Access Point's IP address. For example, if the Access Point is password. B COMMAND LINE REFERENCE This appendix describes ...
... the user name and password. 2 Enter your logon name and password. Once connected, you can be executed at the CLI may delete the settings on either the wired or wireless local network. You can be on the Access Point. Use the CLI to configure the Access Point only if you are ..., the computer that you are using its default IP address (192.168.0.228), enter Telnet 192.168.0.228. Connecting to the CLI via Telnet: 1 From the command prompt, telnet to the Access Point's IP address. For example, if the Access Point is password. B COMMAND LINE REFERENCE This appendix describes ...
User Guide
Page 115
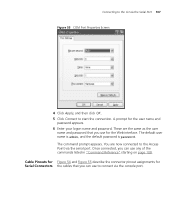
Once connected, you use for the Web interface. The command prompt appears. The default user name is admin, and the default password is password. A prompt for Serial Connectors the cables that you can use any of the commands listed in "Command Reference" starting on page 108. Cable Pinouts for ... 53 COM Port Properties Screen 4 Click Apply, and then click OK. 5 Click Connect to connect via the serial port. These are now connected to the Access Point via the console port. You are the same as the user name and password that you can use to start the connection.
Once connected, you use for the Web interface. The command prompt appears. The default user name is admin, and the default password is password. A prompt for Serial Connectors the cables that you can use any of the commands listed in "Command Reference" starting on page 108. Cable Pinouts for ... 53 COM Port Properties Screen 4 Click Apply, and then click OK. 5 Click Connect to connect via the serial port. These are now connected to the Access Point via the console port. You are the same as the user name and password that you can use to start the connection.

User Guide
Page 124
116 APPENDIX B: COMMAND LINE REFERENCE Table 24 Console Commands Command set overRidetxpower set operationMode set password set passphrase set power set quietAckCtsAllow set quietDuration set quietOffset set radiusname set radiusport set radiussecret set rate set regulatorydomain set remoteAP... Set software retry Set ANI parameter for spur immunity level Set service set ID Set SSID suppress mode SuperG features Set Access Point's system name Set Telnet mode Set Telnet timeout Set time zone settings Set vendor default firmware update parameters Set watchdog mode Set WDS mode Set encryption mode
116 APPENDIX B: COMMAND LINE REFERENCE Table 24 Console Commands Command set overRidetxpower set operationMode set password set passphrase set power set quietAckCtsAllow set quietDuration set quietOffset set radiusname set radiusport set radiussecret set rate set regulatorydomain set remoteAP... Set software retry Set ANI parameter for spur immunity level Set service set ID Set SSID suppress mode SuperG features Set Access Point's system name Set Telnet mode Set Telnet timeout Set time zone settings Set vendor default firmware update parameters Set watchdog mode Set WDS mode Set encryption mode

User Guide
Page 158
...PoE 7 support 7 point-to Web interface 22 installing 19 overview 18 troubleshooting 97 technical specifications 99 hardware 99 software 102 wireless 100 troubleshooting basic checks 97 connection issues 97, 98 forgotten password 98 trusted wireless stations manually adding 46 U See PoE powering on 21 using PoE... controller setup 63 required services 64 setting up Microsoft IAS 63 requirements installation 19 wireless stations 19 Reset button 18 resetting to factory defaults 88, 98 rogue access points detecting 94 viewing detected 96 RTS/CTS threshold 58 S security information 139 security ...
...PoE 7 support 7 point-to Web interface 22 installing 19 overview 18 troubleshooting 97 technical specifications 99 hardware 99 software 102 wireless 100 troubleshooting basic checks 97 connection issues 97, 98 forgotten password 98 trusted wireless stations manually adding 46 U See PoE powering on 21 using PoE... controller setup 63 required services 64 setting up Microsoft IAS 63 requirements installation 19 wireless stations 19 Reset button 18 resetting to factory defaults 88, 98 rogue access points detecting 94 viewing detected 96 RTS/CTS threshold 58 S security information 139 security ...


