
Getting Started Guide
Page 1
SuperStack® 3 Switch 4200 Series Getting Started Guide 3C17300 3C17302 3C17304 http://www.3com.com/ Part No. DUA1730-0AAA02 Published October 2002
SuperStack® 3 Switch 4200 Series Getting Started Guide 3C17300 3C17302 3C17304 http://www.3com.com/ Part No. DUA1730-0AAA02 Published October 2002

Getting Started Guide
Page 2
...as a "commercial item" as defined in FAR 2.101(a) and as such is provided with only such rights as provided in 3Com's standard commercial license for the Software. You agree not to remove or deface any portion of any legend provided on the part of...resulting in a directory file named LICENSE.TXT or !LICENSE.TXT. No part of Adobe Systems Incorporated. 3Com Corporation 5400 Bayfront Plaza Santa Clara, California 95052-8145 Copyright © 2002, 3Com Technologies. Novell and NetWare are registered trademarks of this documentation may not be environmentally friendly in this ...
...as a "commercial item" as defined in FAR 2.101(a) and as such is provided with only such rights as provided in 3Com's standard commercial license for the Software. You agree not to remove or deface any portion of any legend provided on the part of...resulting in a directory file named LICENSE.TXT or !LICENSE.TXT. No part of Adobe Systems Incorporated. 3Com Corporation 5400 Bayfront Plaza Santa Clara, California 95052-8145 Copyright © 2002, 3Com Technologies. Novell and NetWare are registered trademarks of this documentation may not be environmentally friendly in this ...
Getting Started Guide
Page 3
Front View Detail 13 10BASE-T/ 100BASE-TX Ports 14 10/100/1000BASE-T Ports 14 GBIC Ports 14 LEDs 15 Switch 4200 Series - Rear View Detail 17 Power Socket 17 Redundant Power System Socket 17 Console Port 17 Default Settings 18 2 INSTALLING THE SWITCH Package Contents 20 Choosing a Suitable Site 20 Rack-mounting 21 Placing Units On Top of Hardware Features 12 Switch 4200 Series - CONTENTS ABOUT THIS GUIDE Conventions 8 Related Documentation 9 Accessing Online Documentation 10 Product Registration 10 Documentation Comments 10 1 INTRODUCING THE SUPERSTACK 3 SWITCH 4200 SERIES About the Switch...
Front View Detail 13 10BASE-T/ 100BASE-TX Ports 14 10/100/1000BASE-T Ports 14 GBIC Ports 14 LEDs 15 Switch 4200 Series - Rear View Detail 17 Power Socket 17 Redundant Power System Socket 17 Console Port 17 Default Settings 18 2 INSTALLING THE SWITCH Package Contents 20 Choosing a Suitable Site 20 Rack-mounting 21 Placing Units On Top of Hardware Features 12 Switch 4200 Series - CONTENTS ABOUT THIS GUIDE Conventions 8 Related Documentation 9 Accessing Online Documentation 10 Product Registration 10 Documentation Comments 10 1 INTRODUCING THE SUPERSTACK 3 SWITCH 4200 SERIES About the Switch...
Getting Started Guide
Page 4
... 34 Manually Configuring IP Information 35 Connecting to a Front Panel Port 35 Connecting to the Console Port 38 Viewing Automatically Configured IP Information 42 Using 3Com Network Supervisor 42 Connecting to the Console Port 42 Methods of Managing a Switch 45 Command Line Interface Management 45 Web Interface Management 46 SNMP Management...
... 34 Manually Configuring IP Information 35 Connecting to a Front Panel Port 35 Connecting to the Console Port 38 Viewing Automatically Configured IP Information 42 Using 3Com Network Supervisor 42 Connecting to the Console Port 42 Methods of Managing a Switch 45 Command Line Interface Management 45 Web Interface Management 46 SNMP Management...
Getting Started Guide
Page 5
... SPECIFICATIONS Switch 4226T (3C17300) 71 Switch 4250T (3C17302) 73 Switch 4228G (3C17304) 74 D TECHNICAL SUPPORT Online Technical Services 75 World Wide Web Site 75 3Com Knowledgebase Web Services 76 3Com FTP Site 76 Support from Your Network Supplier 76 Support from 3Com 77 Internet Support 77 Telephone Support 77 Returning Products for Repair 79
... SPECIFICATIONS Switch 4226T (3C17300) 71 Switch 4250T (3C17302) 73 Switch 4228G (3C17304) 74 D TECHNICAL SUPPORT Online Technical Services 75 World Wide Web Site 75 3Com Knowledgebase Web Services 76 3Com FTP Site 76 Support from Your Network Supplier 76 Support from 3Com 77 Internet Support 77 Telephone Support 77 Returning Products for Repair 79

Getting Started Guide
Page 6
INDEX REGULATORY NOTICES
INDEX REGULATORY NOTICES
Getting Started Guide
Page 7
... for use a SuperStack® 3 Switch 4200 in Adobe Acrobat Reader Portable Document Format (PDF) or HTML on the 3Com World Wide Web site: http://www.3com.com/ The guide is intended for use with your product differ from the information in this guide apply to install and ...-TX ports, 2 10/100/1000BASE-T ports ■ Switch 4250T (3C17302) - 48 10BASE-T/100BASE-TX ports, 2 10/100/1000BASE-T ports ■ Switch 4228G (3C17304) - 24 10BASE-T/100BASE-TX ports, 2 10/100/1000BASE-T ports and 2 GBIC ports All procedures described in this guide, follow the instructions in the release notes.
... for use a SuperStack® 3 Switch 4200 in Adobe Acrobat Reader Portable Document Format (PDF) or HTML on the 3Com World Wide Web site: http://www.3com.com/ The guide is intended for use with your product differ from the information in this guide apply to install and ...-TX ports, 2 10/100/1000BASE-T ports ■ Switch 4250T (3C17302) - 48 10BASE-T/100BASE-TX ports, 2 10/100/1000BASE-T ports ■ Switch 4228G (3C17304) - 24 10BASE-T/100BASE-TX ports, 2 10/100/1000BASE-T ports and 2 GBIC ports All procedures described in this guide, follow the instructions in the release notes.

Getting Started Guide
Page 8
Examples: From the Help menu, select Contents. Click OK. If you must press two or more keys simultaneously, the key names are used throughout this example, you must evaluate the syntax provided and then supply the appropriate values for . Syntax The word "syntax" means that you must supply a password for the placeholders that appear in the text. ■ Identify menu names, menu commands, and software button names. Example: To change your password, use the following command: The words "enter" and "type" Keyboard key names bridge port detail When you see the word "...
Examples: From the Help menu, select Contents. Click OK. If you must press two or more keys simultaneously, the key names are used throughout this example, you must evaluate the syntax provided and then supply the appropriate values for . Syntax The word "syntax" means that you must supply a password for the placeholders that appear in the text. ■ Identify menu names, menu commands, and software button names. Example: To change your password, use the following command: The words "enter" and "type" Keyboard key names bridge port detail When you see the word "...
Getting Started Guide
Page 9
... is supplied on the CD-ROM that enable you may find useful, such as: ■ Documentation accompanying the Advanced Redundant Power system. ■ Documentation accompanying 3Com Network Supervisor. Related Documentation 9 Related Documentation In addition to this guide, each Switch documentation set includes the following: ■ SuperStack 3 Switch Implementation Guide This guide...
... is supplied on the CD-ROM that enable you may find useful, such as: ■ Documentation accompanying the Advanced Redundant Power system. ■ Documentation accompanying 3Com Network Supervisor. Related Documentation 9 Related Documentation In addition to this guide, each Switch documentation set includes the following: ■ SuperStack 3 Switch Implementation Guide This guide...
Getting Started Guide
Page 10
...maintain the structure of the files. Please e-mail comments about this document to you will help make our documentation more useful to 3Com at: pddtechpubs_comments@3com.com Please include the following online Documentation documentation: ■ SuperStack 3 Switch Implementation Guide (PDF format) ■ SuperStack 3 ...Guide (HTML format) 1 To access the documentation insert the CD-ROM into your SuperStack 3 Switch 4200 on the 3Com Web site: http://3com.com/register Documentation Comments Your suggestions are very important to us. 10 ABOUT THIS GUIDE Accessing Online The CD-ROM ...
...maintain the structure of the files. Please e-mail comments about this document to you will help make our documentation more useful to 3Com at: pddtechpubs_comments@3com.com Please include the following online Documentation documentation: ■ SuperStack 3 Switch Implementation Guide (PDF format) ■ SuperStack 3 ...Guide (HTML format) 1 To access the documentation insert the CD-ROM into your SuperStack 3 Switch 4200 on the 3Com Web site: http://3com.com/register Documentation Comments Your suggestions are very important to us. 10 ABOUT THIS GUIDE Accessing Online The CD-ROM ...
Getting Started Guide
Page 11
Front View Detail ■ Switch 4200 Series - 1 INTRODUCING THE SUPERSTACK 3 SWITCH 4200 SERIES This chapter contains introductory information about the Switch 4200 Series and how it can be used in your network. It covers summaries of hardware and software features and also the following topics: ■ About the Switch 4200 Series ■ Switch 4200 Series - Rear View Detail ■ Default Settings
Front View Detail ■ Switch 4200 Series - 1 INTRODUCING THE SUPERSTACK 3 SWITCH 4200 SERIES This chapter contains introductory information about the Switch 4200 Series and how it can be used in your network. It covers summaries of hardware and software features and also the following topics: ■ About the Switch 4200 Series ■ Switch 4200 Series - Rear View Detail ■ Default Settings
Getting Started Guide
Page 12
Summary of : ■ 24 or 48 10BASE-T/100BASE-TX ports ■ 2 10/100/1000BASE-T ports ■ 2 GBIC ports (Switch 4228G only) The Switch provides high-performance workgroups with a backbone to server connection. Full duplex on 1000BASE-T ports and full duplex on GBIC ports Flow Control In full duplex operation all ports are supported Smart Auto-sensing Supported on all ports except GBIC ports which consists of Hardware Features Table 3 summarizes the hardware features that are single speed ports. Table 3 Hardware features Feature Switch 4200 Series Addresses ■ Up to...
Summary of : ■ 24 or 48 10BASE-T/100BASE-TX ports ■ 2 10/100/1000BASE-T ports ■ 2 GBIC ports (Switch 4228G only) The Switch provides high-performance workgroups with a backbone to server connection. Full duplex on 1000BASE-T ports and full duplex on GBIC ports Flow Control In full duplex operation all ports are supported Smart Auto-sensing Supported on all ports except GBIC ports which consists of Hardware Features Table 3 summarizes the hardware features that are single speed ports. Table 3 Hardware features Feature Switch 4200 Series Addresses ■ Up to...
Getting Started Guide
Page 13
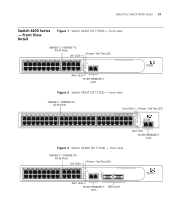
... 3 15 4 16 5 17 6 18 7 19 8 20 9 21 10 22 11 23 12 24 Power/ Self Test 1 25 / Up 26 / Down 2 3 Alert 4 Unit 27 27 28 3C17304 Superstack 3 Switch 4228G 28 Alert LED 10/100/1000BASE-T ports GBIC ports front view 10BASE-T / 100BASE-TX RJ-45 Ports Unit LEDs Power / Self Test... 45 22 46 23 47 24 48 Power/ Self Test 1 Up Down 2 3 Alert 4 Unit 49 50 Alert LED 10/100/1000BASE-T ports Figure 3 Switch 4228G (3C17304) - Front View Detail Figure 1 Switch 4226T (3C17300) - front view 10BASE-T / 100BASE-TX RJ-45 Ports Unit LEDs Power / Self Test LED 1 13 2 14 3 15 4 16...
... 3 15 4 16 5 17 6 18 7 19 8 20 9 21 10 22 11 23 12 24 Power/ Self Test 1 25 / Up 26 / Down 2 3 Alert 4 Unit 27 27 28 3C17304 Superstack 3 Switch 4228G 28 Alert LED 10/100/1000BASE-T ports GBIC ports front view 10BASE-T / 100BASE-TX RJ-45 Ports Unit LEDs Power / Self Test... 45 22 46 23 47 24 48 Power/ Self Test 1 Up Down 2 3 Alert 4 Unit 49 50 Alert LED 10/100/1000BASE-T ports Figure 3 Switch 4228G (3C17304) - Front View Detail Figure 1 Switch 4226T (3C17300) - front view 10BASE-T / 100BASE-TX RJ-45 Ports Unit LEDs Power / Self Test LED 1 13 2 14 3 15 4 16...
Getting Started Guide
Page 14
They cannot be used as Auto MDIX (cross-over). These ports provide 10/100/1000 Mbps full duplex connections to the appropriate speed. These ports require either straight-through or cross-over Category 5 twisted pair cable. 10/100/1000BASE-T Ports The Switch has two auto-negotiating 10/100/1000BASE-T ports configured as standard traditional telephone sockets, or to connect the unit to operate in MDI or MDIX mode. The 10/100/1000BASE-T ports will auto-negotiate to other Gigabit Ethernet devices. The maximum segment length is enabled, these ports can automatically ...
They cannot be used as Auto MDIX (cross-over). These ports provide 10/100/1000 Mbps full duplex connections to the appropriate speed. These ports require either straight-through or cross-over Category 5 twisted pair cable. 10/100/1000BASE-T Ports The Switch has two auto-negotiating 10/100/1000BASE-T ports configured as standard traditional telephone sockets, or to connect the unit to operate in MDI or MDIX mode. The 10/100/1000BASE-T ports will auto-negotiate to other Gigabit Ethernet devices. The maximum segment length is enabled, these ports can automatically ...
Getting Started Guide
Page 15
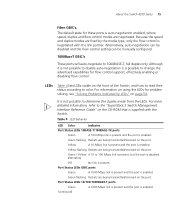
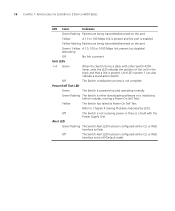
For more detailed information, refer to disable auto-negotiation it is enabled. Yellow flashing Packets are being transmitted/received on the port. alternating Off No link is auto-negotiation enabled, where speed, duplex and flow control modes are being transmitted/received on the CD-ROM that is enabled. The default state for these ports is present. Although it is not possible to the "SuperStack 3 Switch Management Interface Reference Guide" on the port. Green flashing Packets are negotiated. Yellow A 10 Mbps link is present and the port is possible to ...
For more detailed information, refer to disable auto-negotiation it is enabled. Yellow flashing Packets are being transmitted/received on the port. alternating Off No link is auto-negotiation enabled, where speed, duplex and flow control modes are being transmitted/received on the CD-ROM that is enabled. The default state for these ports is present. Although it is not possible to the "SuperStack 3 Switch Management Interface Reference Guide" on the port. Green flashing Packets are negotiated. Yellow A 10 Mbps link is present and the port is possible to ...
Getting Started Guide
Page 16
Yellow A 10 or 100 Mbps link is present and the port is powered-up and operating normally. Unit LED number 1 can also indicate a stand-alone Switch. Yellow The Switch has failed its Power On Self Test. Green / Yellow A 10, 100 or 1000 Mbps link present but disabled. Power/Self Test LED Green The Switch is enabled. Off The Switch is not receiving power or there is a fault with other Switch 4200 Series units the LED indicates the position of the unit in the stack and that a link is present. Unit LEDs 1-4 Green When the Switch forms a stack with the Power Supply Unit....
Yellow A 10 or 100 Mbps link is present and the port is powered-up and operating normally. Unit LED number 1 can also indicate a stand-alone Switch. Yellow The Switch has failed its Power On Self Test. Green / Yellow A 10, 100 or 1000 Mbps link present but disabled. Power/Self Test LED Green The Switch is enabled. Off The Switch is not receiving power or there is a fault with other Switch 4200 Series units the LED indicates the position of the unit in the stack and that a link is present. Unit LEDs 1-4 Green When the Switch forms a stack with the Power Supply Unit....

Getting Started Guide
Page 17
rear view - Console Port The console port allows you can use this socket System Socket to connect a Switch 4200 to connect a terminal and perform remote or local out-of-band management. Rear View Detail Supply Data Warning Label Console (max) 19200,8,1,N Power Socket Redundant Power System Socket Console Port Power Socket The Switch automatically adjusts its power setting to auto-baud, 8 data bits, no parity and 1 stop bit. The console port uses a standard null modem cable and is set to any supply voltage in the range 90-240 VAC. Redundant Power To protect against internal ...
rear view - Console Port The console port allows you can use this socket System Socket to connect a Switch 4200 to connect a terminal and perform remote or local out-of-band management. Rear View Detail Supply Data Warning Label Console (max) 19200,8,1,N Power Socket Redundant Power System Socket Console Port Power Socket The Switch automatically adjusts its power setting to auto-baud, 8 data bits, no parity and 1 stop bit. The console port uses a standard null modem cable and is set to any supply voltage in the range 90-240 VAC. Redundant Power To protect against internal ...
Getting Started Guide
Page 18
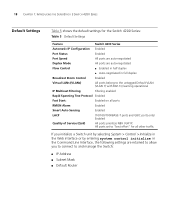
If you to connect to the untagged Default VLAN (VLAN 1) with 802.1Q learning operational IP Multicast Filtering Filtering enabled Rapid Spanning Tree Protocol Enabled Fast Start: Enabled on all other traffic. 18 CHAPTER 1: INTRODUCING THE SUPERSTACK 3 SWITCH 4200 SERIES Default Settings Table 5 shows the default settings for all ports RMON Alarm Enabled Smart Auto-Sensing Enabled LACP (10/100/1000BASE-T ports and GBIC ports only) Enabled Quality of Service (QoS) All ports prioritize NBX VoIP IP. All ports set to "best effort" for the Switch 4200 Series: Table 5 ...
If you to connect to the untagged Default VLAN (VLAN 1) with 802.1Q learning operational IP Multicast Filtering Filtering enabled Rapid Spanning Tree Protocol Enabled Fast Start: Enabled on all other traffic. 18 CHAPTER 1: INTRODUCING THE SUPERSTACK 3 SWITCH 4200 SERIES Default Settings Table 5 shows the default settings for all ports RMON Alarm Enabled Smart Auto-Sensing Enabled LACP (10/100/1000BASE-T ports and GBIC ports only) Enabled Quality of Service (QoS) All ports prioritize NBX VoIP IP. All ports set to "best effort" for the Switch 4200 Series: Table 5 ...
Getting Started Guide
Page 19
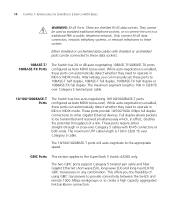
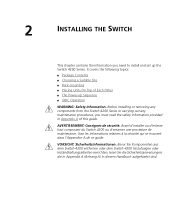
2 INSTALLING THE SWITCH This chapter contains the information you must read the safety information provided in diesem Handbuch aufgefuehrt sind. It covers the following topics: ■ Package Contents ■ Choosing a Suitable Site ■ Rack-mounting ■ Placing Units On Top of this guide. AVERTISSEMENT: Consignes de sécurité. Before installing or removing any components from the Switch 4200 Series or carrying out any maintenance procedures, you need to install and set up Sequence ■ GBIC Operation WARNING: Safety Information. VORSICHT: ...
2 INSTALLING THE SWITCH This chapter contains the information you must read the safety information provided in diesem Handbuch aufgefuehrt sind. It covers the following topics: ■ Package Contents ■ Choosing a Suitable Site ■ Rack-mounting ■ Placing Units On Top of this guide. AVERTISSEMENT: Consignes de sécurité. Before installing or removing any components from the Switch 4200 Series or carrying out any maintenance procedures, you need to install and set up Sequence ■ GBIC Operation WARNING: Safety Information. VORSICHT: ...
Getting Started Guide
Page 20
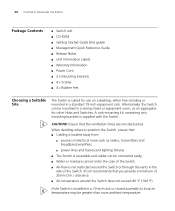
...; 4 x Screws ■ 4 x Rubber feet Choosing a Suitable Site The Switch is not restricted around the Switch or through the vents in the side of the Switch. 3Com recommends that you provide a minimum of 25mm (1in.) clearance. ■ Air temperature around the Switch does not exceed 40 °C (104 °F). Alternatively, the Switch...
...; 4 x Screws ■ 4 x Rubber feet Choosing a Suitable Site The Switch is not restricted around the Switch or through the vents in the side of the Switch. 3Com recommends that you provide a minimum of 25mm (1in.) clearance. ■ Air temperature around the Switch does not exceed 40 °C (104 °F). Alternatively, the Switch...