User Guide
Page 3
... SFP Transceiver 17 Removing an SFP Transceiver 18 Performing Spot Checks 19 3 CONNECTING TO THE WEB INTERFACE Requirements for Accessing the Web Interface 21 Running the Discovery Application 21 Logging On to the Web Interface 23 Navigating Around the Web Interface 23 Main Menu 23 Buttons 24 Device Mimic 24 Accessing the Interface Without Using Discovery 25 DHCP Assigned IP Address 25 Manually Assigned (Static) IP Address 25 4 CONFIGURING THE SWITCH Configuration Overview 27 Viewing Switch Information 27 Changing the Admin Password...
... SFP Transceiver 17 Removing an SFP Transceiver 18 Performing Spot Checks 19 3 CONNECTING TO THE WEB INTERFACE Requirements for Accessing the Web Interface 21 Running the Discovery Application 21 Logging On to the Web Interface 23 Navigating Around the Web Interface 23 Main Menu 23 Buttons 24 Device Mimic 24 Accessing the Interface Without Using Discovery 25 DHCP Assigned IP Address 25 Manually Assigned (Static) IP Address 25 4 CONFIGURING THE SWITCH Configuration Overview 27 Viewing Switch Information 27 Changing the Admin Password...

User Guide
Page 4
... Advanced Port Configuration 33 Configuring VLANs 33 Creating a VLAN 34 Modify VLANs 34 Delete VLANs 35 Forwarding Tagged/Untagged Frames 35 Sample VLAN Configurations 35 Configuring Trunking 37 Guidelines for creating Trunks 37 Defining the Members of a Trunk 37 Modifying Trunk Settings and Deleting a Trunk 38 Viewing the Trunk Summary 38 Viewing Statistics 39 Monitoring Traffic 39 Running Cable Diagnostic 40 Using the System Tools 41 Restart 41 Configuration 41 Resetting to Factory Defaults 42 Backing Up and Restoring Configuration 42 Upgrade 42 Spanning Tree 43 Support 44 5 TROUBLESHOOTING...
... Advanced Port Configuration 33 Configuring VLANs 33 Creating a VLAN 34 Modify VLANs 34 Delete VLANs 35 Forwarding Tagged/Untagged Frames 35 Sample VLAN Configurations 35 Configuring Trunking 37 Guidelines for creating Trunks 37 Defining the Members of a Trunk 37 Modifying Trunk Settings and Deleting a Trunk 38 Viewing the Trunk Summary 38 Viewing Statistics 39 Monitoring Traffic 39 Running Cable Diagnostic 40 Using the System Tools 41 Restart 41 Configuration 41 Resetting to Factory Defaults 42 Backing Up and Restoring Configuration 42 Upgrade 42 Spanning Tree 43 Support 44 5 TROUBLESHOOTING...
User Guide
Page 9
... Steckdosen anschließen. The SFP port supports full duplex mode only. If auto-negotiation is disabled for 1000BASE-T) are numbered 45-48 on how to read their status according to create a high-capacity aggregated link backbone connection. The four SFP ports support fiber Gigabit Ethernet short-wave (SX) and long-wave (LX) SFP transceivers in half duplex mode (even if the attached device is the SFP port. SFP ports are automatically determined by the capabilities...
... Steckdosen anschließen. The SFP port supports full duplex mode only. If auto-negotiation is disabled for 1000BASE-T) are numbered 45-48 on how to read their status according to create a high-capacity aggregated link backbone connection. The four SFP ports support fiber Gigabit Ethernet short-wave (SX) and long-wave (LX) SFP transceivers in half duplex mode (even if the attached device is the SFP port. SFP ports are automatically determined by the capabilities...
User Guide
Page 16
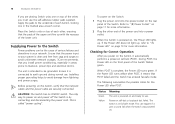
... from sags and surges to "(8) Power Socket" on , the Power LED lights up with the recesses of the other, you must use the self-adhesive rubber pads supplied. Refer to avoid unforeseen network outages. 3Com recommends that POST failed and the Switch has entered fail-safe mode. The Switch is in areas prone to blackout, power dips and electrical storms. The unit is intended to be...
... from sags and surges to "(8) Power Socket" on , the Power LED lights up with the recesses of the other, you must use the self-adhesive rubber pads supplied. Refer to avoid unforeseen network outages. 3Com recommends that POST failed and the Switch has entered fail-safe mode. The Switch is in areas prone to blackout, power dips and electrical storms. The unit is intended to be...
User Guide
Page 17
... SFP transceiver that the power cord is correct at the time of publication: ■ 3CSFP91 SFP (SX) ■ 3CSFP92 SFP (LX) To access the latest list of approved SFP transceivers for the Switch on the 3Com Web site, enter this transceiver to connect the Switch directly to Factory Defaults" on page 42. CAUTION: Resetting the Switch to its factory defaults erases all your 3Com network supplier If POST fails, try powering on the Switch...
... SFP transceiver that the power cord is correct at the time of publication: ■ 3CSFP91 SFP (SX) ■ 3CSFP92 SFP (LX) To access the latest list of approved SFP transceivers for the Switch on the 3Com Web site, enter this transceiver to connect the Switch directly to Factory Defaults" on page 42. CAUTION: Resetting the Switch to its factory defaults erases all your 3Com network supplier If POST fails, try powering on the Switch...
User Guide
Page 21
... the Web Interface ■ Navigating Around the Web Interface ■ Accessing the Interface Without Using Discovery Requirements for detecting and connecting to the Switch on the network. The following : ■ The Discovery application, which is included on 3Com Baseline Switch 2848-SFP Plus CD-ROM that is supplied with options to configure, modify, and upgrade the Switch. The Discovery application can use to set the admin password, change the IP address that is connected to the Switch and...
... the Web Interface ■ Navigating Around the Web Interface ■ Accessing the Interface Without Using Discovery Requirements for detecting and connecting to the Switch on the network. The following : ■ The Discovery application, which is included on 3Com Baseline Switch 2848-SFP Plus CD-ROM that is supplied with options to configure, modify, and upgrade the Switch. The Discovery application can use to set the admin password, change the IP address that is connected to the Switch and...
User Guide
Page 25
... Web interface the next time you do not configure the Switch's IP address settings, it will assign to itself . DHCP Assigned IP Address If you set the IP address mode to DHCP, check the DHCP server for the IP address that is assigned to the Switch, and then using Discovery. If you want to configure the Switch. ■ Enable or disable the port ■ Enable or disable flow control ■ Configure the speed duplex settings ■ Set the priority of the port Accessing the Interface Without Using...
... Web interface the next time you do not configure the Switch's IP address settings, it will assign to itself . DHCP Assigned IP Address If you set the IP address mode to DHCP, check the DHCP server for the IP address that is assigned to the Switch, and then using Discovery. If you want to configure the Switch. ■ Enable or disable the port ■ Enable or disable flow control ■ Configure the speed duplex settings ■ Set the priority of the port Accessing the Interface Without Using...
User Guide
Page 27
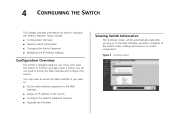
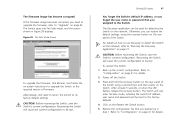
... of the Switch's basic settings and versions of current components. Topics include: ■ Configuration Overview ■ Viewing Switch Information ■ Changing the Admin Password ■ Modifying the IP Address Settings Configuration Overview The Switch is shipped ready for use. Figure 8 Summary Screen You only need to configure the Switch's features. If you only want the Switch to function as a basic layer 2 switch, you do not need to access the Web interface if...
... of the Switch's basic settings and versions of current components. Topics include: ■ Configuration Overview ■ Viewing Switch Information ■ Changing the Admin Password ■ Modifying the IP Address Settings Configuration Overview The Switch is shipped ready for use. Figure 8 Summary Screen You only need to configure the Switch's features. If you only want the Switch to function as a basic layer 2 switch, you do not need to access the Web interface if...
User Guide
Page 28
... hardware (board) on the Switch. ■ Management Software Information - Shows the serial number, total number of ports, and the version of the Switch. blank (no password) To ensure that unauthorized users do not access the Web interface, 3Com recommends that you can fill out to identify the Switch. This takes you to save your changes. ■ IP Information - Changing the Admin Password To prevent unauthorized users from accessing the Web interface and modifying the Switch's settings, the interface is password...
... hardware (board) on the Switch. ■ Management Software Information - Shows the serial number, total number of ports, and the version of the Switch. blank (no password) To ensure that unauthorized users do not access the Web interface, 3Com recommends that you can fill out to identify the Switch. This takes you to save your changes. ■ IP Information - Changing the Admin Password To prevent unauthorized users from accessing the Web interface and modifying the Switch's settings, the interface is password...
User Guide
Page 29
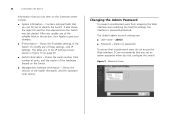
... MAC address and default IP address of steps: 1 The Switch tries to the Web interface. The Change Administration Password screen appears. 2 In Old Password, type your first time to access this screen or if you power on the Switch for the first time, it , refer to "Forgotten Password" on how to regain access to configure itself . either by DHCP or by manually assigning a static IP address. To detect its MAC address. To set it automatically uses the default IP address...
... MAC address and default IP address of steps: 1 The Switch tries to the Web interface. The Change Administration Password screen appears. 2 In Old Password, type your first time to access this screen or if you power on the Switch for the first time, it , refer to "Forgotten Password" on how to regain access to configure itself . either by DHCP or by manually assigning a static IP address. To detect its MAC address. To set it automatically uses the default IP address...
User Guide
Page 30
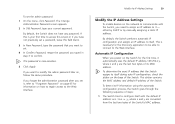
... Setting Options Status Meaning Management VLAN Indicates the VLAN from a computer that Web interface from which the Web interface can be 169.254.1.2. If you create other network devices. Figure 10 IP Settings Screen 2 Configure the Switch's IP settings. 30 CONFIGURING THE SWITCH For example, if the MAC address is 08004E000102, the IP address would therefore become 169.254.1.3. 3 The Switch repeats step 2 until an unused IP address is found. 3Com recommends using DHCP or assigning a static...
... Setting Options Status Meaning Management VLAN Indicates the VLAN from a computer that Web interface from which the Web interface can be 169.254.1.2. If you create other network devices. Figure 10 IP Settings Screen 2 Configure the Switch's IP settings. 30 CONFIGURING THE SWITCH For example, if the MAC address is 08004E000102, the IP address would therefore become 169.254.1.3. 3 The Switch repeats step 2 until an unused IP address is found. 3Com recommends using DHCP or assigning a static...
User Guide
Page 31
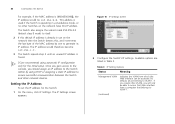
... port to help you have a DHCP server on the port. Configure Port Settings 31 Configure Port Settings Using the Web interface, you can also view the current connection status of the port. Physical port number ■ Label - Select this port, you can process. This option is only available if IP Address Mode is set the speed/duplex of each port. Optional name for VLAN 1. IP Address Mode IP Address Subnet Mask Default Gateway MAC Address Specify how the Switch will get its flow control settings and to save your changes...
... port to help you have a DHCP server on the port. Configure Port Settings 31 Configure Port Settings Using the Web interface, you can also view the current connection status of the port. Physical port number ■ Label - Select this port, you can process. This option is only available if IP Address Mode is set the speed/duplex of each port. Optional name for VLAN 1. IP Address Mode IP Address Subnet Mask Default Gateway MAC Address Specify how the Switch will get its flow control settings and to save your changes...
User Guide
Page 34
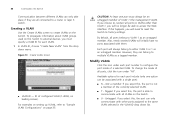
...). Creating a VLAN Use the Create VLANs screen to create VLANs on page 35. To propagate information about VLAN groups used on the Switch. ■ U - By default, all ports belong to VLAN 1 as an untagged member. Each port will no longer be associated with all connected to a router or layer 3 switch. To change the mode of the currently selected VLAN. ■ T - Untagged. For examples on setting up VLANs, refer to "Sample VLAN Configurations" on the Switch. 34 CONFIGURING THE SWITCH Communication...
...). Creating a VLAN Use the Create VLANs screen to create VLANs on page 35. To propagate information about VLAN groups used on the Switch. ■ U - By default, all ports belong to VLAN 1 as an untagged member. Each port will no longer be associated with all connected to a router or layer 3 switch. To change the mode of the currently selected VLAN. ■ T - Untagged. For examples on setting up VLANs, refer to "Sample VLAN Configurations" on the Switch. 34 CONFIGURING THE SWITCH Communication...
User Guide
Page 37
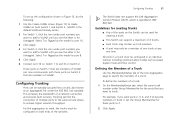
... support the Link Aggregation Control Protocol (LACP), which is the default VLAN and already exists.) 2 For Switch 1, click the icon under the IEEE 802.1ad standard. Guidelines for creating Trunks ■ Any of the ports on the Switch can be used for Untagged. For example, if you want to achieve higher network throughput. For link aggregation to work, the trunks must be statically grouped into a trunk, also known as speed, duplex mode and flow control. All ports...
... support the Link Aggregation Control Protocol (LACP), which is the default VLAN and already exists.) 2 For Switch 1, click the icon under the IEEE 802.1ad standard. Guidelines for creating Trunks ■ Any of the ports on the Switch can be used for Untagged. For example, if you want to achieve higher network throughput. For link aggregation to work, the trunks must be statically grouped into a trunk, also known as speed, duplex mode and flow control. All ports...
User Guide
Page 41
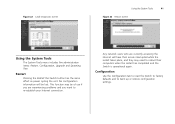
..., Configuration, Upgrade and Spanning Tree. Any network users who are currently accessing the Internet will be of use if you are experiencing problems and you want to reboot their computers when the restart has completed and the Switch is operational again. No configuration information will have their access interrupted while the restart takes place, and they may be lost. Configuration Use the Configuration tab to reset the Switch to factory defaults...
..., Configuration, Upgrade and Spanning Tree. Any network users who are currently accessing the Internet will be of use if you are experiencing problems and you want to reboot their computers when the restart has completed and the Switch is operational again. No configuration information will have their access interrupted while the restart takes place, and they may be lost. Configuration Use the Configuration tab to reset the Switch to factory defaults...
User Guide
Page 45
... Switch, with suggested courses of the Switch. See "Resetting to Factory Defaults" on basic LED checks, refer to the following topics in Chapter 1: ■ (3) Link/Activity Status LEDs ■ (4) Module Active LEDs ■ (5) SFP Port Status LEDs ■ (6) Power LED For information on page 42 for your local technical support representative. 5 TROUBLESHOOTING This chapter lists some issues that you will need to access the Web interface, use the Discovery application to automatically detect the IP address and connect...
... Switch, with suggested courses of the Switch. See "Resetting to Factory Defaults" on basic LED checks, refer to the following topics in Chapter 1: ■ (3) Link/Activity Status LEDs ■ (4) Module Active LEDs ■ (5) SFP Port Status LEDs ■ (6) Power LED For information on page 42 for your local technical support representative. 5 TROUBLESHOOTING This chapter lists some issues that you will need to access the Web interface, use the Discovery application to automatically detect the IP address and connect...
User Guide
Page 47
... network. CAUTION: Before recovering the Switch, save the Switch's current configuration. After at least 5 seconds, or when the LED flashes, release the recovery button. Otherwise, you can be lost . The firmware image has become corrupted If the firmware image becomes corrupted, you need to upgrade the firmware, refer to "Upgrade" on -screen instructions to upgrade the Switch to the required version of firmware. Recovering the Switch will cause the current configuration to its factory default settings...
... network. CAUTION: Before recovering the Switch, save the Switch's current configuration. After at least 5 seconds, or when the LED flashes, release the recovery button. Otherwise, you can be lost . The firmware image has become corrupted If the firmware image becomes corrupted, you need to upgrade the firmware, refer to "Upgrade" on -screen instructions to upgrade the Switch to the required version of firmware. Recovering the Switch will cause the current configuration to its factory default settings...
User Guide
Page 50
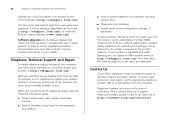
... quickly to technical support and repair services. A link to software downloads can be returned to 3Com for assistance, please have the following information ready: ■ Product model name, part number, and serial number ■ Proof of purchase, if you have not pre-registered your reseller. Contact Us 3Com offers telephone, e-mail and Internet access to ensure you get full use the appropriate telephone number, URL or e-mail address...
... quickly to technical support and repair services. A link to software downloads can be returned to 3Com for assistance, please have the following information ready: ■ Product model name, part number, and serial number ■ Proof of purchase, if you have not pre-registered your reseller. Contact Us 3Com offers telephone, e-mail and Internet access to ensure you get full use the appropriate telephone number, URL or e-mail address...
User Guide
Page 67
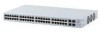
... default mask 30 B bandwidth 59 Baseline Switch 2848-SFP 53 C category 3 cables 60 category 5 cables 60 category 5e cables 60 category 6 cables 60 changing the admin password 28 client 60 configuration overview 27 conventions text, About This Guide 6 CSA statement 65 D DHCP 60 diagram front panel 8 Discovery 21 dynamic host control protocol 60 E Ethernet 60 F Fast Ethernet 60 FCC statement 65 Feedback about this User Guide 6 firmware upgrading 42 forgotten default IP address 47 password 47 user...
... default mask 30 B bandwidth 59 Baseline Switch 2848-SFP 53 C category 3 cables 60 category 5 cables 60 category 5e cables 60 category 6 cables 60 changing the admin password 28 client 60 configuration overview 27 conventions text, About This Guide 6 CSA statement 65 D DHCP 60 diagram front panel 8 Discovery 21 dynamic host control protocol 60 E Ethernet 60 F Fast Ethernet 60 FCC statement 65 Feedback about this User Guide 6 firmware upgrading 42 forgotten default IP address 47 password 47 user...
User Guide
Page 68
... 17 removing 18 spot checks 19 subnet mask 63 support 44 Switch changing the password 28 positioning 13 restarting 41 switch defined 63 system tools 41 T TCP/IP 61 defined 63 technical specifications 53 traffic 63 troubleshooting LED-related issues 45 POST failed 17 U upgrading firmware 42 user name default 28 V viewing individual port statistics 39 statisitcs 39 VLANs creating 34 deleting 35 modifying 34 W Web interface accessing directly 25 accessing using discovery 21 buttons 24 logging on...
... 17 removing 18 spot checks 19 subnet mask 63 support 44 Switch changing the password 28 positioning 13 restarting 41 switch defined 63 system tools 41 T TCP/IP 61 defined 63 technical specifications 53 traffic 63 troubleshooting LED-related issues 45 POST failed 17 U upgrading firmware 42 user name default 28 V viewing individual port statistics 39 statisitcs 39 VLANs creating 34 deleting 35 modifying 34 W Web interface accessing directly 25 accessing using discovery 21 buttons 24 logging on...


