User Guide
Page 3
...THE BASELINE SWITCH Overview of the Baseline Switch 2226 Plus 7 Features and Capabilities 7 Autosensing of MDI/MDIX Connections 7 Autonegotiating 10/100 Mbps Ports 7 SFP Ports 8 Traffic Prioritization 8 Physical Features 9 Front Panel 9 Rear Panel 12 Package Contents 12 2 INSTALLING THE SWITCH Before You Begin 13 Positioning the Switch 13 Aufstellen des Switch ... Spot Checks 19 3 CONNECTING TO THE WEB INTERFACE Requirements for Accessing the Web Interface 21 Running the Discovery Application 21 Logging On to the Web Interface 22 Navigating the Web Interface 23 Menu 23 Buttons 24 Accessing the ...
...THE BASELINE SWITCH Overview of the Baseline Switch 2226 Plus 7 Features and Capabilities 7 Autosensing of MDI/MDIX Connections 7 Autonegotiating 10/100 Mbps Ports 7 SFP Ports 8 Traffic Prioritization 8 Physical Features 9 Front Panel 9 Rear Panel 12 Package Contents 12 2 INSTALLING THE SWITCH Before You Begin 13 Positioning the Switch 13 Aufstellen des Switch ... Spot Checks 19 3 CONNECTING TO THE WEB INTERFACE Requirements for Accessing the Web Interface 21 Running the Discovery Application 21 Logging On to the Web Interface 22 Navigating the Web Interface 23 Menu 23 Buttons 24 Accessing the ...

User Guide
Page 12
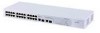
12 CHAPTER 1: INTRODUCING THE BASELINE SWITCH (6) Duplex LEDs The second and fourth (bottom) row of Status LEDs, which contains this User Guide and the 3Com Discovery application ■ One warranty flyer Before installing and using the Switch, verify that is supplied with four self-..., apply the pads to each marked corner area on page 43. For more informa- Package Contents The 3Com Baseline Switch 2226 Plus package includes the following items: ■ One 3Com Baseline Switch 2226 Plus unit ■ One power cord ■ Four standard height, self-adhesive rubber pads ■ ...
12 CHAPTER 1: INTRODUCING THE BASELINE SWITCH (6) Duplex LEDs The second and fourth (bottom) row of Status LEDs, which contains this User Guide and the 3Com Discovery application ■ One warranty flyer Before installing and using the Switch, verify that is supplied with four self-..., apply the pads to each marked corner area on page 43. For more informa- Package Contents The 3Com Baseline Switch 2226 Plus package includes the following items: ■ One 3Com Baseline Switch 2226 Plus unit ■ One power cord ■ Four standard height, self-adhesive rubber pads ■ ...

User Guide
Page 21
... the Web interface and configure the Switch. The following topics are available on 3Com Baseline Switch 2226 Plus CD-ROM that is supplied with your Switch ■ A computer that is connected to the Switch and that has a Web browser Running the Discovery Application The 3Com Baseline Switch 2226 Plus CD-ROM contains, among others, the Discovery application. Discovery should start automatically, go to the...
... the Web interface and configure the Switch. The following topics are available on 3Com Baseline Switch 2226 Plus CD-ROM that is supplied with your Switch ■ A computer that is connected to the Switch and that has a Web browser Running the Discovery Application The 3Com Baseline Switch 2226 Plus CD-ROM contains, among others, the Discovery application. Discovery should start automatically, go to the...

User Guide
Page 22
When detection is the logon screen. Logging On to the Switch, and then click Next. Discovery searches the network for 3Com devices. The Completing the 3Com Discovery Application screen appears. 4 Click Finish. If the computer has only one adapter, click Next. ... Figure 5 Welcome Screen of Discovery Figure 6 Discovered Devices Screen 2 If the computer has multiple network adapters, select the adapter that appears is complete, the Discovered Devices screen displays detected network devices. 3 On the Discovered Devices screen, click Baseline Switch 2226 Plus, and then click Next...
When detection is the logon screen. Logging On to the Switch, and then click Next. Discovery searches the network for 3Com devices. The Completing the 3Com Discovery Application screen appears. 4 Click Finish. If the computer has only one adapter, click Next. ... Figure 5 Welcome Screen of Discovery Figure 6 Discovered Devices Screen 2 If the computer has multiple network adapters, select the adapter that appears is complete, the Discovered Devices screen displays detected network devices. 3 On the Discovered Devices screen, click Baseline Switch 2226 Plus, and then click Next...
User Guide
Page 24
...log off the Web interface Buttons Depending on each individual port Allows you to perform port traffic monitoring on the Switch. Displays 3Com contact information and describes how to use that is currently displayed. Click to display the context-sensitive help information for... ■ Cancel - Accessing the Interface Without Using Discovery The Discovery application works by automatically detecting the IP address that IP address to the Switch, and then using Discovery. To monitor a port, you do not configure the Switch's IP address settings, it will assign to DHCP,...
...log off the Web interface Buttons Depending on each individual port Allows you to perform port traffic monitoring on the Switch. Displays 3Com contact information and describes how to use that is currently displayed. Click to display the context-sensitive help information for... ■ Cancel - Accessing the Interface Without Using Discovery The Discovery application works by automatically detecting the IP address that IP address to the Switch, and then using Discovery. To monitor a port, you do not configure the Switch's IP address settings, it will assign to DHCP,...
User Guide
Page 25
For example, if you want to the Switch, start your Web browser, and then type http://192.168.0.123. For example, if the DHCP server assigned the IP address 192.168.0.123 to configure the Switch. Manually Assigned (Static) IP Address If you assigned a static IP address to the Switch, you need to use that IP address to access the Web interface the next time you assigned the Switch the IP address 192.168.0.123, start your Web browser, and then type http://192.168.0.123. Accessing the Interface Without Using Discovery 25
For example, if you want to the Switch, start your Web browser, and then type http://192.168.0.123. For example, if the DHCP server assigned the IP address 192.168.0.123 to configure the Switch. Manually Assigned (Static) IP Address If you assigned a static IP address to the Switch, you need to use that IP address to access the Web interface the next time you assigned the Switch the IP address 192.168.0.123, start your Web browser, and then type http://192.168.0.123. Accessing the Interface Without Using Discovery 25
User Guide
Page 29
... the password that the Switch assigns to itself with the Switch, you typed in a standalone mode, or no other switches on the network, then the Switch detects this, and increments the last byte of steps: 1 The Switch tries to the Web interface. Automatic IP Configuration When you power on the Switch for the Discovery application to be...
... the password that the Switch assigns to itself with the Switch, you typed in a standalone mode, or no other switches on the network, then the Switch detects this, and increments the last byte of steps: 1 The Switch tries to the Web interface. Automatic IP Configuration When you power on the Switch for the Discovery application to be...
User Guide
Page 43
...factory defaults. If you encounter an issue that you may encounter while installing, using Discovery, and then pressing the RESET button on . The Switch will need to 3 of this procedure. ■ Powering off the Switch, and then power it back on, while keeping the Recovery button pressed. 3 ... that is not listed here and you cannot solve it, check the 3Com Knowledgebase at http://knowledgebase.3com.com before contacting your settings. See "Automatic IP Configuration" on page 29 for illustration. 2 Power off the Switch, and then powering it back on the Fail-Safe Mode screen (see...
...factory defaults. If you encounter an issue that you may encounter while installing, using Discovery, and then pressing the RESET button on . The Switch will need to 3 of this procedure. ■ Powering off the Switch, and then power it back on, while keeping the Recovery button pressed. 3 ... that is not listed here and you cannot solve it, check the 3Com Knowledgebase at http://knowledgebase.3com.com before contacting your settings. See "Automatic IP Configuration" on page 29 for illustration. 2 Power off the Switch, and then powering it back on the Fail-Safe Mode screen (see...
User Guide
Page 44
...some issues that the workstation's network interface is installed and configured correctly. ■ The correct category of the Switch. Category 3 cables can log on to "Running the Discovery Application" on and operating correctly. ■ The cable is connected at the far end is installed and correctly ... Switch to the LEDs on using the Discovery application, refer to the Web interface again using the default admin account settings: ■ User name - The Link/Activity LED is on basic LED checks, refer to the interface. There is required for 100BASE-TX or 1000BASE-T. 3Com ...
...some issues that the workstation's network interface is installed and configured correctly. ■ The correct category of the Switch. Category 3 cables can log on to "Running the Discovery Application" on and operating correctly. ■ The cable is connected at the far end is installed and correctly ... Switch to the LEDs on using the Discovery application, refer to the Web interface again using the default admin account settings: ■ User name - The Link/Activity LED is on basic LED checks, refer to the interface. There is required for 100BASE-TX or 1000BASE-T. 3Com ...
User Guide
Page 67
... 61 C client 62 configuration overview 27 connecting network device 17 SFP transceivers 18 conventions notice icons, About This Guide 5 text, About This Guide 5 D DHCP 62 Discovery 21 dynamic host control protocol See DHCP E Ethernet 62 F fail-safe mode 43, 45 Fast Ethernet 62 flow control 33 forgotten IP address 44 forgotten...
... 61 C client 62 configuration overview 27 connecting network device 17 SFP transceivers 18 conventions notice icons, About This Guide 5 text, About This Guide 5 D DHCP 62 Discovery 21 dynamic host control protocol See DHCP E Ethernet 62 F fail-safe mode 43, 45 Fast Ethernet 62 flow control 33 forgotten IP address 44 forgotten...

User Guide
Page 68
... server defined 64 SFP ports 8, 11 SFP transceivers 18 approved (supported) 18 inserting 18 removing 19 speed/duplex 33 spot checks 19 subnet mask 64 switch defined 64 T TCP/IP 63 defined 64 traffic 65 monitoring 39 setting the priority 40 traffic prioritization 8, 40 IP phones 8 priority queuing 8 traffic priority levels... creating 34, 36 desktop 34 maximum supported 33 not a member 34 removing 36 sample configurations 35 uplink 34 W Web interface accessing directly 24 accessing using Discovery 21 buttons 24 connecting 21 logging on 22 menu 23 navigating 23 requirements for accessing 21
... server defined 64 SFP ports 8, 11 SFP transceivers 18 approved (supported) 18 inserting 18 removing 19 speed/duplex 33 spot checks 19 subnet mask 64 switch defined 64 T TCP/IP 63 defined 64 traffic 65 monitoring 39 setting the priority 40 traffic prioritization 8, 40 IP phones 8 priority queuing 8 traffic priority levels... creating 34, 36 desktop 34 maximum supported 33 not a member 34 removing 36 sample configurations 35 uplink 34 W Web interface accessing directly 24 accessing using Discovery 21 buttons 24 connecting 21 logging on 22 menu 23 navigating 23 requirements for accessing 21
