
Owner's Manual
Page 59
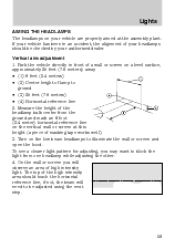
... will observe an area of high intensity light. On the wall or screen you may want to illuminate the wall or screen and open the hood. Vertical aim adjustment 1. Lights AIMING THE HEADLAMPS The headlamps on the vertical wall or screen at the assembly plant. Measure the height of the headlamp...
... will observe an area of high intensity light. On the wall or screen you may want to illuminate the wall or screen and open the hood. Vertical aim adjustment 1. Lights AIMING THE HEADLAMPS The headlamps on the vertical wall or screen at the assembly plant. Measure the height of the headlamp...
Owner's Manual
Page 60
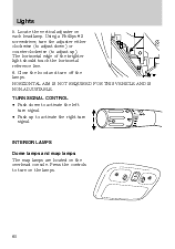
... down to activate the left turn on the overhead console. The horizontal edge of the brighter light should touch the horizontal reference line. 6. Close the hood and turn signal. INTERIOR LAMPS Dome lamps and map lamps The map lamps are located on the lamps. 60 Press the controls to activate the...
... down to activate the left turn on the overhead console. The horizontal edge of the brighter light should touch the horizontal reference line. 6. Close the hood and turn signal. INTERIOR LAMPS Dome lamps and map lamps The map lamps are located on the lamps. 60 Press the controls to activate the...
Owner's Manual
Page 64
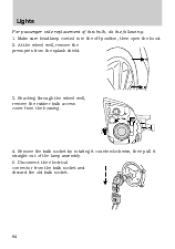
Make sure headlamp control is in the off position, then open the hood. 2. Reaching through the wheel well, remove the rubber bulb access cover from the bulb socket and discard the old bulb socket. 64 Lights For passenger side replacement of the lamp assembly. 5. Remove the bulb socket by rotating it counterclockwise, then pull it straight out of this bulb, do the following: 1. Disconnect the electrical connector from the housing. 4. At the wheel well, remove the press pins from the splash shield. 3.
Make sure headlamp control is in the off position, then open the hood. 2. Reaching through the wheel well, remove the rubber bulb access cover from the bulb socket and discard the old bulb socket. 64 Lights For passenger side replacement of the lamp assembly. 5. Remove the bulb socket by rotating it counterclockwise, then pull it straight out of this bulb, do the following: 1. Disconnect the electrical connector from the housing. 4. At the wheel well, remove the press pins from the splash shield. 3.
Owner's Manual
Page 65
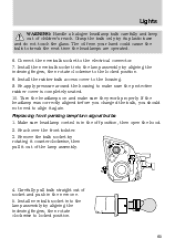
... out of children's reach. Lights WARNING: Handle a halogen headlamp bulb carefully and keep out of socket and push in the off position, then open the hood. 2. Grasp the bulb only by rotating it counterclockwise, then pull it again. Re-apply pressure around the housing to locked position. 65 Replacing front parking...
... out of children's reach. Lights WARNING: Handle a halogen headlamp bulb carefully and keep out of socket and push in the off position, then open the hood. 2. Grasp the bulb only by rotating it counterclockwise, then pull it again. Re-apply pressure around the housing to locked position. 65 Replacing front parking...
Owner's Manual
Page 94
... release to time out in three minutes. The turn off position. 94 Note: If any door or the trunk is not closed, or if the hood is in vehicles equipped with the perimeter alarm feature, the horn will chirp twice and the lamps will illuminate twice to indicate that this feature...
... release to time out in three minutes. The turn off position. 94 Note: If any door or the trunk is not closed, or if the hood is in vehicles equipped with the perimeter alarm feature, the horn will chirp twice and the lamps will illuminate twice to indicate that this feature...
Owner's Manual
Page 103
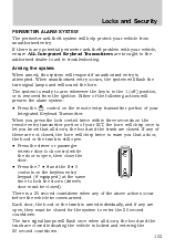
...the system to enter the 20 second countdown. Either of your • Press the Integrated Keyhead Transmitter. When you that all doors, the hood and the trunk are closed indicating the vehicle is removed from unauthorized entry. There is any of these are not closed, the horn will chirp.... When unauthorized entry occurs, the system will flash the turn signal lamps will flash once when all doors, the hood and the trunk are closed. Each door, the hood or the trunk is attempted. The turn signal lamps and will sound the horn. Locks and Security PERIMETER ALARM SYSTEM...
...the system to enter the 20 second countdown. Either of your • Press the Integrated Keyhead Transmitter. When you that all doors, the hood and the trunk are closed indicating the vehicle is removed from unauthorized entry. There is any of these are not closed, the horn will chirp.... When unauthorized entry occurs, the system will flash the turn signal lamps will flash once when all doors, the hood and the trunk are closed. Each door, the hood or the trunk is attempted. The turn signal lamps and will sound the horn. Locks and Security PERIMETER ALARM SYSTEM...
Owner's Manual
Page 104
... system will be armed. Pressing the power door unlock control within the 20 second prearmed mode will still be triggered if: • Any door, the hood or the trunk is opened without using the door key or the remote entry transmitter portion of your IKT. • The ignition is sounding. This...
... system will be armed. Pressing the power door unlock control within the 20 second prearmed mode will still be triggered if: • Any door, the hood or the trunk is opened without using the door key or the remote entry transmitter portion of your IKT. • The ignition is sounding. This...
Owner's Manual
Page 251
.... Turn the heater fan on both vehicles to flames, sparks, or lit cigarettes. Attempting to push-start capability. Use only a 12-volt supply to the hood of the transmission. Set the parking brake on in both vehicles and stay clear of the disabled vehicle as this could result in injury or...
.... Turn the heater fan on both vehicles to flames, sparks, or lit cigarettes. Attempting to push-start capability. Use only a 12-volt supply to the hood of the transmission. Set the parking brake on in both vehicles and stay clear of the disabled vehicle as this could result in injury or...

Owner's Manual
Page 274
Go to the front of the vehicle and release the auxiliary latch that is located under the bottom of the hood. 3. Inside the vehicle, pull the hood release handle located under the front center of the instrument panel near the steering column. 2. Maintenance and Specifications OPENING THE HOOD 1. Lift the hood and support it with the prop rod. 274
Go to the front of the vehicle and release the auxiliary latch that is located under the bottom of the hood. 3. Inside the vehicle, pull the hood release handle located under the front center of the instrument panel near the steering column. 2. Maintenance and Specifications OPENING THE HOOD 1. Lift the hood and support it with the prop rod. 274
Owner's Manual
Page 278
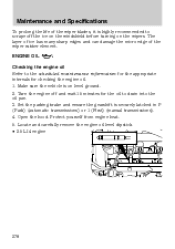
... scrape off and wait 15 minutes for the oil to the scheduled maintenance information for the appropriate intervals for checking the engine oil. 1. Open the hood. ENGINE OIL Checking the engine oil Refer to drain into the oil pan. 3. Maintenance and Specifications To prolong the life of the wiper rubber element...
... scrape off and wait 15 minutes for the oil to the scheduled maintenance information for the appropriate intervals for checking the engine oil. 1. Open the hood. ENGINE OIL Checking the engine oil Refer to drain into the oil pan. 3. Maintenance and Specifications To prolong the life of the wiper rubber element...
Owner's Manual
Page 314
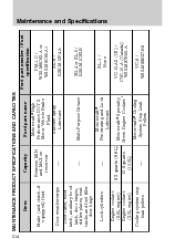
...-5 / ESB-M1C93-B MAINTENANCE PRODUCT SPECIFICATIONS AND CAPACITIES Item Brake (and clutch-if equipped) fluid Between MIN and MAX on reservoir Door weatherstrips Door latch, hood latch, auxiliary hood latch, door hinges, striker plates, seat tracks and fuel filler door hinge - Motorcraft Penetrating and Lock Lubricant Motorcraft Specialty Green Engine Coolant 1 Maintenance and...
...-5 / ESB-M1C93-B MAINTENANCE PRODUCT SPECIFICATIONS AND CAPACITIES Item Brake (and clutch-if equipped) fluid Between MIN and MAX on reservoir Door weatherstrips Door latch, hood latch, auxiliary hood latch, door hinges, striker plates, seat tracks and fuel filler door hinge - Motorcraft Penetrating and Lock Lubricant Motorcraft Specialty Green Engine Coolant 1 Maintenance and...
Owner's Manual
Page 321
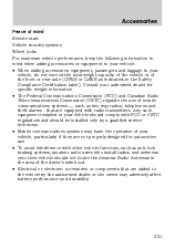
... Peace of mind Remote start Vehicle security systems Wheel locks For maximum vehicle performance, keep the following information in the area of the driver's side hood. • Electrical or electronic accessories or components that are added to your authorized dealer for automotive use of the front or rear axle (GVWR or...
... Peace of mind Remote start Vehicle security systems Wheel locks For maximum vehicle performance, keep the following information in the area of the driver's side hood. • Electrical or electronic accessories or components that are added to your authorized dealer for automotive use of the front or rear axle (GVWR or...
Owner's Manual
Page 327
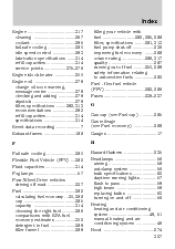
... beam ...58 replacing bulbs ...63 turning on and off ...56 Heating heating and air conditioning system ...48, 51 manual heating and air conditioning system ...46 Hood ...274 327 Index Engine ...317 cleaning ...267 coolant ...285 fail-safe cooling ...290 idle speed control ...283 lubrication specifications ...314 refill capacities ...314 service points...
... beam ...58 replacing bulbs ...63 turning on and off ...56 Heating heating and air conditioning system ...48, 51 manual heating and air conditioning system ...46 Hood ...274 327 Index Engine ...317 cleaning ...267 coolant ...285 fail-safe cooling ...290 idle speed control ...283 lubrication specifications ...314 refill capacities ...314 service points...


