
Owner's Manual
Page 59
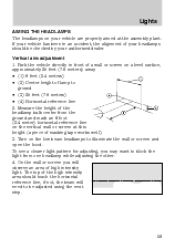
... your authorized dealer. Vertical aim adjustment 1. Measure the height of the headlamp bulb center from one headlamp while adjusting the other. 4. Turn on the vertical wall or screen at the assembly plant. The top of high intensity light. Lights AIMING THE HEADLAMPS The headlamps on a level surface, approximately 25 feet (7.6 meters) away. • (1) 8 feet (2.4 meters...
... your authorized dealer. Vertical aim adjustment 1. Measure the height of the headlamp bulb center from one headlamp while adjusting the other. 4. Turn on the vertical wall or screen at the assembly plant. The top of high intensity light. Lights AIMING THE HEADLAMPS The headlamps on a level surface, approximately 25 feet (7.6 meters) away. • (1) 8 feet (2.4 meters...
Owner's Manual
Page 62
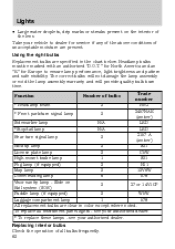
... an authorized "D.O.T." for North America and an "E" for service if any of the above conditions of all instrument panel lights - Function * Headlamp beam * Front park/turn signal lamp Sidemarker lamp *Stop/tail lamp Rear turn signal lamp Number of the lens Take your authorized dealer. ... these lamps - To replace all bulbs frequently. 62 see your authorized dealer. The correct bulbs will not damage the lamp assembly or void the lamp assembly warranty and will provide quality bulb burn time. Replacing interior bulbs Check the operation of unacceptable moisture are present. Slide on ...
... an authorized "D.O.T." for North America and an "E" for service if any of the above conditions of all instrument panel lights - Function * Headlamp beam * Front park/turn signal lamp Sidemarker lamp *Stop/tail lamp Rear turn signal lamp Number of the lens Take your authorized dealer. ... these lamps - To replace all bulbs frequently. 62 see your authorized dealer. The correct bulbs will not damage the lamp assembly or void the lamp assembly warranty and will provide quality bulb burn time. Replacing interior bulbs Check the operation of unacceptable moisture are present. Slide on ...
Owner's Manual
Page 63
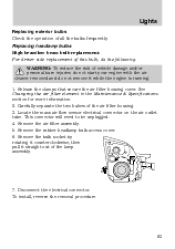
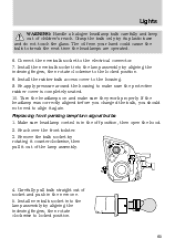
... connector will need to be unplugged. 4. Lights Replacing exterior bulbs Check the operation of the air filter housing. 3. Remove the air filter assembly. 5. Release the clamps that secure the air filter housing cover. To install, reverse the removal procedure. 63 Remove the bulb socket by ...headlamp bulbs High beam/low beam bulb replacement For driver side replacement of this bulb, do the following: WARNING: To reduce the risk of vehicle damage and/or personal burn injuries do not start your engine with the air cleaner removed and do not remove it straight out of the lamp assembly...
... connector will need to be unplugged. 4. Lights Replacing exterior bulbs Check the operation of the air filter housing. 3. Remove the air filter assembly. 5. Release the clamps that secure the air filter housing cover. To install, reverse the removal procedure. 63 Remove the bulb socket by ...headlamp bulbs High beam/low beam bulb replacement For driver side replacement of this bulb, do the following: WARNING: To reduce the risk of vehicle damage and/or personal burn injuries do not start your engine with the air cleaner removed and do not remove it straight out of the lamp assembly...
Owner's Manual
Page 64
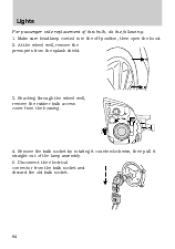
Disconnect the electrical connector from the housing. 4. Make sure headlamp control is in the off position, then open the hood. 2. Reaching through the wheel well, remove the rubber bulb access cover from the bulb socket and discard the old bulb socket. 64 At the wheel well, remove the press pins from the splash shield. 3. Lights For passenger side replacement of the lamp assembly. 5. Remove the bulb socket by rotating it counterclockwise, then pull it straight out of this bulb, do the following: 1.
Disconnect the electrical connector from the housing. 4. Make sure headlamp control is in the off position, then open the hood. 2. Reaching through the wheel well, remove the rubber bulb access cover from the bulb socket and discard the old bulb socket. 64 At the wheel well, remove the press pins from the splash shield. 3. Lights For passenger side replacement of the lamp assembly. 5. Remove the bulb socket by rotating it counterclockwise, then pull it straight out of this bulb, do the following: 1.
Owner's Manual
Page 65
... you should not need to the locked position. 8. Reach over the front bolster. 3. Make sure headlamp control is completely seated. 10. Install the new bulb socket into the lamp assembly by rotating it counterclockwise, then pull it again. Carefully pull bulb straight out of socket and push in... bulb to locked position. 65 Remove the bulb socket by aligning the indexing fingers, then rotate clockwise to break the next time the headlamps are operated. 6. Re-apply pressure around the housing to make sure they work properly. Grasp the bulb only by aligning the indexing ...
... you should not need to the locked position. 8. Reach over the front bolster. 3. Make sure headlamp control is completely seated. 10. Install the new bulb socket into the lamp assembly by rotating it counterclockwise, then pull it again. Carefully pull bulb straight out of socket and push in... bulb to locked position. 65 Remove the bulb socket by aligning the indexing fingers, then rotate clockwise to break the next time the headlamps are operated. 6. Re-apply pressure around the housing to make sure they work properly. Grasp the bulb only by aligning the indexing ...
Owner's Manual
Page 66
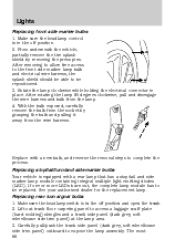
...rear lamp that has a stop /tail/turn signal bulbs 1. The most 66 Make sure the headlamp control is in the off position. 2. See your authorized dealer for the replacement lamp. Make sure the headlamp switch is in place. Lights Replacing front side marker bulbs 1. If one or more LEDs ...burn out, the complete lamp module has to complete the process. Lift out trunk floor carpeting panel to expose the lamp assembly. Carefully pull/push the trunk...
...rear lamp that has a stop /tail/turn signal bulbs 1. The most 66 Make sure the headlamp control is in the off position. 2. See your authorized dealer for the replacement lamp. Make sure the headlamp switch is in place. Lights Replacing front side marker bulbs 1. If one or more LEDs ...burn out, the complete lamp module has to complete the process. Lift out trunk floor carpeting panel to expose the lamp assembly. Carefully pull/push the trunk...
Owner's Manual
Page 67
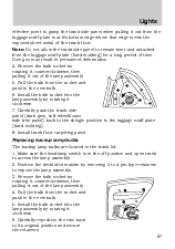
Remove the bulb socket by removing 3 to 4 pin-type retainers to expose the lamp assembly. 3. Make sure the headlamp switch is at it's bottom edge where that edge meets the exposed sheet metal of the lamp assembly. 5. Pull the bulb from the socket and push in the off position and open trunk... to access the lamp assembly. 2. Install trunk floor carpeting panel. Position the decklid trim ...
Remove the bulb socket by removing 3 to 4 pin-type retainers to expose the lamp assembly. 3. Make sure the headlamp switch is at it's bottom edge where that edge meets the exposed sheet metal of the lamp assembly. 5. Pull the bulb from the socket and push in the off position and open trunk... to access the lamp assembly. 2. Install trunk floor carpeting panel. Position the decklid trim ...
Owner's Manual
Page 68
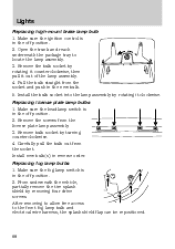
... lamp bulb 1. Install the bulb socket into the lamp assembly by rotating it counterclockwise, then pull it clockwise. Make sure the headlamp switch is in the off position. 2. Carefully pull the bulb out from the license plate lamp assembly. 3. Make sure the ignition control is in the off... position. 2. Remove the bulb socket by rotating it out of the lamp assembly. 4. Remove the screws ...
... lamp bulb 1. Install the bulb socket into the lamp assembly by rotating it counterclockwise, then pull it clockwise. Make sure the headlamp switch is in the off position. 2. Carefully pull the bulb out from the license plate lamp assembly. 3. Make sure the ignition control is in the off... position. 2. Remove the bulb socket by rotating it out of the lamp assembly. 4. Remove the screws ...


