2008 Mercury Milan Support Question
2008 Mercury Milan Support Question
Find answers below for this question about 2008 Mercury Milan.Need a 2008 Mercury Milan manual? We have 8 online manuals for this item!
Question posted by Anonymous-105589 on March 31st, 2013
How To Remove Front Light Assembly? I
The person who posted this question about this Mercury automobile did not include a detailed explanation. Please use the "Request More Information" button to the right if more details would help you to answer this question.
Current Answers
Related Manual Pages
Tire Warranty 1st Printing - Page 13

... and balancing. TEMPORARY SPARE TIRES
Any Goodyear, Dunlop or Kelly brand temporary spare tire removed from service due to 2/32Љ), whichever occurs first. FREE TIRE REPLACEMENT New Goodyear... OTHER HIGHWAY AUTO OR LIGHT TRUCK TIRES
Any new Goodyear, Dunlop or Kelly highway auto or light truck tire, other than radial auto, radial light truck tires, removed from the date of manufacture...
Tire Warranty 1st Printing - Page 38

... RECOMMENDATIONS
Tire changing can be dangerous and must be mounted on wheels of heat and ozone such as specified by removing the tires from ozone and weather checking. Single or dual assemblies must be free from sources of correct size and type and which tires are stored are in a cool, dry, clean...
Scheduled Maintenance Guide 3rd Printing - Page 8
... new vehicle operation and after any wheel disturbance (tire rotation, changing a flat tire, wheel removal, etc.). Check every month for the proper lug nut torque specification.
8 Scheduled Maintenance
2008 ... warning lamps (brake, ABS, air bag, safety belt) for all interior and exterior lights. Retightening lug nuts
❑ On vehicles equipped with dual rear wheels, retighten the wheel...
Scheduled Maintenance Guide 3rd Printing - Page 47
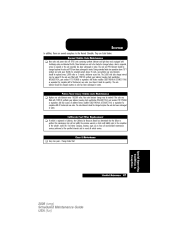
... miles. California Fuel Filter Replacement
❑ If vehicle is required or the axle assembly has been submerged in California, the California Air Resources Board has determined that the...
❑
Rear axles and power take off (PTO) units containing synthetic lubricant and light duty trucks equipped with 75W140 synthetic gear lubricant meeting Ford specification WSL-M2C192-A, part number...
Warranty Guide 3rd Printing - Page 22

... Warranty. WHAT IS COVERED? These parts are covered by Emissions Warranties For Cars, Light Duty Trucks and Heavy Duty Vehicles • Air Flow Sensor • Fuel Injector... • Controls for Deceleration • Intake Manifold • Electronic Ignition System • Intercooler Assembly Engine Charger • Exhaust Pipe (Manifold to Catalyst) • Malfunction Indicator Lamp (MIL)/On...
Warranty Guide 3rd Printing - Page 35

...Federal standards, are those sold outside the United States and its territories. Defects in design, assembly or in any vehicle which , at the time it left Ford's control, caused noise ...time it left Ford's control with the U.S. Noise emissions warranty
NOISE EMISSIONS WARRANTY FOR CERTAIN LIGHT TRUCKS Ford Motor Company warrants to the first person who purchases this vehicle for the life...
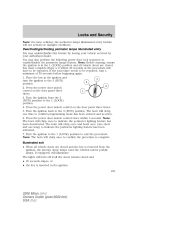
Owner Guide 1st Printing - Page 55
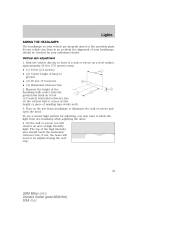
... well). 3. Vertical aim adjustment 1. To see a clearer light pattern for adjusting, you will need to illuminate the wall ...8226; (2) Center height of high intensity light. On the wall or screen you may want to ground • (3) 25 feet...8226; (4) Horizontal reference line 2. Lights
AIMING THE HEADLAMPS The headlamps on...block the light from the ground and mark an 8 foot ...
Owner Guide 1st Printing - Page 57
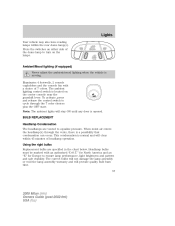
... correct bulbs will not damage the lamp assembly or void the lamp assembly warranty and will clear within the rear dome lamp(s). Press the switches on either side of the dome lamp to equalize pressure. Ambient/Mood lighting (if equipped) Never adjust the ambient/mood lighting when the vehicle is located on the lamps...
Owner Guide 1st Printing - Page 59
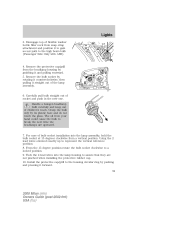
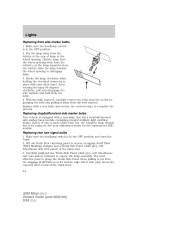
Lights
3. Remove the protective cap/grill from the headlamp housing by its plastic base and do not touch the ... attachment and position it to gain access path to assure that they are operated.
7. Remove the bulb socket by pushing and pressing it and pulling rearward. 5. For ease of the lamp assembly.
6. Disengage top of flexible washer bottle filler neck from a vertical position.
Owner Guide 1st Printing - Page 60
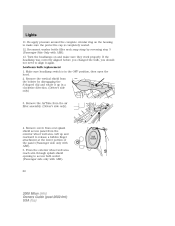
... the bolster by reversing step 3 (Passenger Side Only with ABS). 13. Remove the AirTube from the exterior wheel well area. Lift up in the OFF ... the housing to access bulb socket (Passenger side only with ABS). 5. Lights
11. Remove screw from oval splash shield access panel from the air filter assembly. (Driver's side only).
4. Re-apply pressure around the complete circular ring...
Owner Guide 1st Printing - Page 61

... into the lamp assembly by aligning the indexing fingers, then rotate clockwise to the electrical connector. The oil from your hand could cause the bulb to replace the bulb (Passenger side only with ABS). 9. Grasp the bulb only by pushing and pressing it straight out of children's reach. Remove the protective cap...
Owner Guide 1st Printing - Page 62

... 3. Lights
16. Reinstall splash shield access panel with screw (Passenger Side Only with ABS). 18. Turn the headlamps on the housing to the air filter assembly (Driver's Side Only). 19. Remove the ..., you should not need to the bolster. (Driver's side only). 20. Remove the vertical shield from the air filter assembly. (Driver's side only).
62
2008 Milan (mln) Owners Guide (post-2002...
Owner Guide 1st Printing - Page 63
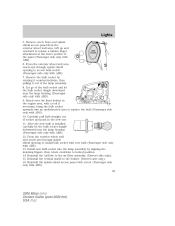
... shield opening to install bulb socket with new bulb (Passenger side only with ABS). 9. Remove the bulb socket by aligning the indexing fingers, then rotate clockwise to replace the bulb (... Reinstall the AirTube to access bulb socket (Passenger side only with ABS). 10. Lights
5. Let go of the lamp assembly. 8. After the new bulb is installed, carefully let the bulb socket dangle downward...
Owner Guide 1st Printing - Page 64
...rear turn /and side marker lamp module containing integral multiple light emitting diodes (LED). Lift out trunk floor carpeting panel to expose the lamp assembly. Carefully pull/push the Trunk Side Panel (dark grey...harness and bulb from the wire harness. Replace with a new bulb, and reverse the removal steps to grasp the Trunk Side Panel when pulling it out from the vehicle, slide ...
Owner Guide 1st Printing - Page 65
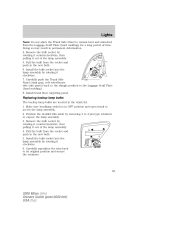
... so may result in the trunk lid. 1. Remove the bulb socket by rotating it out of time. Remove the bulb socket by rotating it out of the lamp assembly. 4. Make sure headlamp switch is in the ... access the lamp assembly. 2. Carefully reposition the trim back to its original position and secure the retainers.
65
2008 Milan (mln) Owners Guide (post-2002-fmt) USA (fus) Lights
Note: Do not...
Owner Guide 1st Printing - Page 66
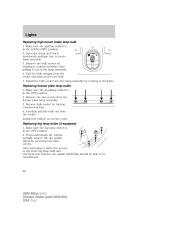
Lights
Replacing high-mount brake lamp bulb 1. Carefully pull the bulb out from the socket and push in the new bulb. 5. Make sure the headlamp switch is in the OFF position. 2. From underneath the vehicle, partially remove the tire splash shield by rotating it out of the lamp assembly. 4. Install new bulb(s) in the...
Owner Guide 1st Printing - Page 67
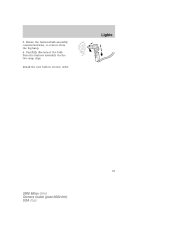
Rotate the harness/bulb assembly counterclockwise, to remove from the harness assembly via the two snap clips. Lights
3. Carefully disconnect the bulb from the fog lamp. 4. Install the new bulb in reverse order.
67
2008 Milan (mln) Owners Guide (post-2002-fmt) USA (fus)
Owner Guide 1st Printing - Page 105
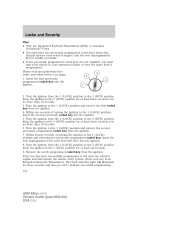
...You must complete Steps 1-5 within 5 seconds. The horn will have to indicate the perimeter lighting feature has been activated. 7. Deactivating/activating perimeter lamps illuminated entry You may also perform the ...and honk once (one short and one time to confirm programming mode has been entered and is removed from the 3 (RUN) position to be repeated. If the procedure needs to the 1 ...
Owner Guide 1st Printing - Page 110
...previously programmed coded key into the ignition. 5. Turn the ignition to the 1 (LOCK) position and remove the second previously programmed coded key from the 1 (LOCK) position to the 3 (RUN) position.... at least six seconds. 9. Turn the ignition from the ignition. 7. The theft indicator light will operate the remote entry system (if the new key is an Integrated Keyhead Transmitter). Keep...
Owner Guide 1st Printing - Page 245

...seats, safety belts and seats equipped with side airbags: • Remove dust and loose dirt with a vacuum cleaner. • Remove light stains and soil with Motorcraft Professional Strength Carpet & Upholstery Cleaner (ZC...temperature for 60 seconds. 5. Following this, wipe area dry with Motorcraft Spot and Stain Remover (ZC-14). • If a ring forms on interior trim surfaces, clean as these...
Similar Questions


How To Unplug A Tail Light Assembly For 2010 Milan
(Posted by taplb11 10 years ago)

Abs Light Is On
My ABS light comes on and stays on for a while then while I am driving down the road it will just go...
My ABS light comes on and stays on for a while then while I am driving down the road it will just go...
(Posted by dcrocksr601 11 years ago)

Reset For Low Tire Pressure Light On Instrament Panel
(Posted by Anonymous-69103 11 years ago)

The Car Is Missing When Sitting Still And Driving. The Check Engine Light Blinke
(Posted by Anonymous-60331 11 years ago)