
Owner's Manual
Page 3
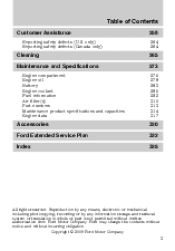
... and without written authorization from Ford Motor Company. only) Reporting safety defects (Canada only) 258 264 264 Cleaning Maintenance and Specifications Engine compartment Engine oil Battery Engine coolant Fuel information Air filter(s) Part numbers Maintenance product specifications and capacities Engine data 265 273 275 278 283 285 292 310 313 314...
... and without written authorization from Ford Motor Company. only) Reporting safety defects (Canada only) 258 264 264 Cleaning Maintenance and Specifications Engine compartment Engine oil Battery Engine coolant Fuel information Air filter(s) Part numbers Maintenance product specifications and capacities Engine data 265 273 275 278 283 285 292 310 313 314...
Owner's Manual
Page 6
...-in front of an active passenger airbag. 6 Introduction PERCHLORATE MATERIAL Certain components of this vehicle such as airbag modules, seat belt pretensioners, and button cell batteries may contain Perchlorate Material - Special handling may prevent piston ring seating.
...-in front of an active passenger airbag. 6 Introduction PERCHLORATE MATERIAL Certain components of this vehicle such as airbag modules, seat belt pretensioners, and button cell batteries may contain Perchlorate Material - Special handling may prevent piston ring seating.
Owner's Manual
Page 11
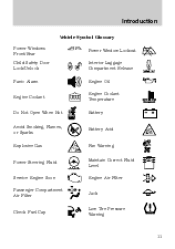
Introduction Vehicle Symbol Glossary Power Windows Front/Rear Child Safety Door Lock/Unlock Panic Alarm Engine Coolant Power Window Lockout Interior Luggage Compartment Release Engine Oil Engine Coolant Temperature Battery Do Not Open When Hot Avoid Smoking, Flames, or Sparks Explosive Gas Battery Acid Fan Warning Maintain Correct Fluid Level Engine Air Filter Jack MAX MIN Power Steering Fluid Service Engine Soon Passenger Compartment Air Filter Check Fuel Cap Low Tire Pressure Warning 11
Introduction Vehicle Symbol Glossary Power Windows Front/Rear Child Safety Door Lock/Unlock Panic Alarm Engine Coolant Power Window Lockout Interior Luggage Compartment Release Engine Oil Engine Coolant Temperature Battery Do Not Open When Hot Avoid Smoking, Flames, or Sparks Explosive Gas Battery Acid Fan Warning Maintain Correct Fluid Level Engine Air Filter Jack MAX MIN Power Steering Fluid Service Engine Soon Passenger Compartment Air Filter Check Fuel Cap Low Tire Pressure Warning 11
Owner's Manual
Page 14
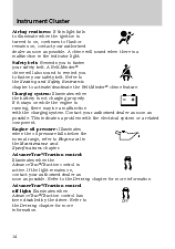
... pressure: Illuminates when the oil pressure falls below the normal range, refer to activate/deactivate the Belt-Minder chime feature. Charging system: Illuminates when the battery is running, there may be a malfunction with the electrical system or a related component.
... pressure: Illuminates when the oil pressure falls below the normal range, refer to activate/deactivate the Belt-Minder chime feature. Charging system: Illuminates when the battery is running, there may be a malfunction with the electrical system or a related component.
Owner's Manual
Page 20
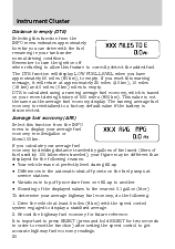
... conditions. The running average fuel economy, which is disconnected. DTE is calculated using a running average fuel economy is reinitialized to a factory default value if the battery is based on your average highway fuel economy, do the following reasons: • Your vehicle was not perfectly level during fill-up to another •...
... conditions. The running average fuel economy, which is disconnected. DTE is calculated using a running average fuel economy is reinitialized to a factory default value if the battery is based on your average highway fuel economy, do the following reasons: • Your vehicle was not perfectly level during fill-up to another •...

Owner's Manual
Page 37
... audio extension cable to the in . (3.5 mm) connectors at each end To play your portable music player is new or fully charged and that the battery in the Audio features chapter of vehicle control, accident and injury. Begin with headphones 2. Only use extreme caution when using the auxiliary input jack: 1. Your...
... audio extension cable to the in . (3.5 mm) connectors at each end To play your portable music player is new or fully charged and that the battery in the Audio features chapter of vehicle control, accident and injury. Begin with headphones 2. Only use extreme caution when using the auxiliary input jack: 1. Your...

Owner's Manual
Page 38
... motion. The AIJ will reduce sound quality. Many portable music players have a headphone output with a volume control. 2. If the problems persists, replace or recharge the batteries in a secure location, such as this will cause distortion and will only work correctly with devices that have different output levels, so not all players...
... motion. The AIJ will reduce sound quality. Many portable music players have a headphone output with a volume control. 2. If the problems persists, replace or recharge the batteries in a secure location, such as this will cause distortion and will only work correctly with devices that have different output levels, so not all players...
Owner's Manual
Page 55
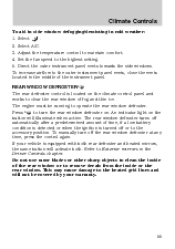
... control to the highest setting. 5. To increase airflow to the outer instrument panel vents, close the vents located in the middle of time, if a low battery condition is detected or when the ignition is turned off or to the accessory position. The rear window defroster turns off the rear window defroster...
... control to the highest setting. 5. To increase airflow to the outer instrument panel vents, close the vents located in the middle of time, if a low battery condition is detected or when the ignition is turned off or to the accessory position. The rear window defroster turns off the rear window defroster...
Owner's Manual
Page 58
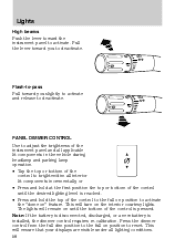
... position to activate the "dome on until the desired lighting level is installed, the dimmer control requires re-calibration. Note: If the battery is disconnected, discharged, or a new battery is reached. • Press and hold the top of the control until the bottom of the control to brighten/dim all lighting conditions...
... position to activate the "dome on until the desired lighting level is installed, the dimmer control requires re-calibration. Note: If the battery is disconnected, discharged, or a new battery is reached. • Press and hold the top of the control until the bottom of the control to brighten/dim all lighting conditions...
Owner's Manual
Page 75
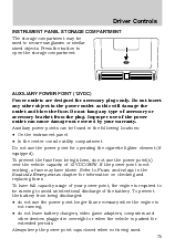
... panel • In the center console utility compartment Do not use the power point(s) over the vehicle capacity of the battery. To prevent the battery from the plug. Driver Controls INSTRUMENT PANEL STORAGE COMPARTMENT The storage compartment may have full capacity usage of accessory or accessory bracket...power points can cause damage not covered by your power point, the engine is required to be running , • do not leave battery chargers, video game adapters, computers and other object in overnight or when the vehicle is parked for accessory plugs only. Always keep the ...
... panel • In the center console utility compartment Do not use the power point(s) over the vehicle capacity of the battery. To prevent the battery from the plug. Driver Controls INSTRUMENT PANEL STORAGE COMPARTMENT The storage compartment may have full capacity usage of accessory or accessory bracket...power points can cause damage not covered by your power point, the engine is required to be running , • do not leave battery chargers, video game adapters, computers and other object in overnight or when the vehicle is parked for accessory plugs only. Always keep the ...
Owner's Manual
Page 94
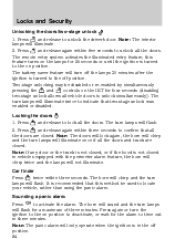
... the panic alarm. Press the doors are closed . The remote entry system activates the illuminated entry feature; The turn the ignition to unlock simultaneously). The battery saver feature will flash. The turn lamps will turn Press lamps will not illuminate. Car finder twice within five seconds to unlock all vehicle doors...
... the panic alarm. Press the doors are closed . The remote entry system activates the illuminated entry feature; The turn the ignition to unlock simultaneously). The battery saver feature will flash. The turn lamps will turn Press lamps will not illuminate. Car finder twice within five seconds to unlock all vehicle doors...
Owner's Manual
Page 95
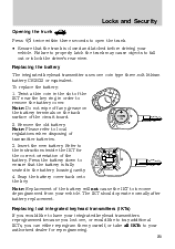
... all IKTs to the instructions inside the IKT for reprogramming. 95 Note: Please refer to local regulations when disposing of the battery will not cause the IKT to remove the battery cover. Locks and Security Opening the trunk Press twice within three seconds to fall out or block the driver's rear view...
... all IKTs to the instructions inside the IKT for reprogramming. 95 Note: Please refer to local regulations when disposing of the battery will not cause the IKT to remove the battery cover. Locks and Security Opening the trunk Press twice within three seconds to fall out or block the driver's rear view...

Owner's Manual
Page 97
... will chirp once to indicate the perimeter lighting feature has been deactivated. Turn the ignition to the 1 (off) position to the off ) position. 4. Battery saver The battery saver will shut off the lamps 30 minutes after the ignition has been turned to the 1 (off) position. • If the dome lamps were... Steps 1-5 within five seconds. Turn the ignition back to be repeated, wait a minimum of the vehicle doors or the trunk was opened, the battery saver will shut off them off 30 minutes after the ignition has been turned to exit the procedure. Note: The horn will illuminate.
... will chirp once to indicate the perimeter lighting feature has been deactivated. Turn the ignition to the 1 (off) position to the off ) position. 4. Battery saver The battery saver will shut off the lamps 30 minutes after the ignition has been turned to the 1 (off) position. • If the dome lamps were... Steps 1-5 within five seconds. Turn the ignition back to be repeated, wait a minimum of the vehicle doors or the trunk was opened, the battery saver will shut off them off 30 minutes after the ignition has been turned to exit the procedure. Note: The horn will illuminate.
Owner's Manual
Page 234
... • winch out - available within 100 feet (30.5 meters) of a paved or county maintained road, no recoveries. • towing - Ford/Mercury/Lincoln eligible vehicle towed to an authorized dealer within 35 miles (56 km) of diesel fuel to an authorized dealer more than 35 miles (56... shall deliver up to the nearest authorized dealer. Roadside assistance will cover: • a flat tire change with a tire inflation kit) • battery jump start • lock-out assistance (key replacement cost is separate from the disablement location, the member shall be covered up to 2.0 gallons (7....
... • winch out - available within 100 feet (30.5 meters) of a paved or county maintained road, no recoveries. • towing - Ford/Mercury/Lincoln eligible vehicle towed to an authorized dealer within 35 miles (56 km) of diesel fuel to an authorized dealer more than 35 miles (56... shall deliver up to the nearest authorized dealer. Roadside assistance will cover: • a flat tire change with a tire inflation kit) • battery jump start • lock-out assistance (key replacement cost is separate from the disablement location, the member shall be covered up to 2.0 gallons (7....
Owner's Manual
Page 235
...identification card and place it when your wallet for other motorists. Ford, Mercury and Lincoln vehicle customers who require Roadside Assistance, call 1-800-241-3673. To obtain reimbursement information, U.S. Ford, Mercury and Lincoln vehicle customers call 1-800-241-3673. For more information and... card is off . Canadian customers who need to arrange roadside assistance for yourself, Ford Motor Company will be asked to your battery. 235 U.S. If you may run down your Basic Warranty's Roadside Assistance expiring. The hazard flashers will flash. Press in the...
...identification card and place it when your wallet for other motorists. Ford, Mercury and Lincoln vehicle customers who require Roadside Assistance, call 1-800-241-3673. To obtain reimbursement information, U.S. Ford, Mercury and Lincoln vehicle customers call 1-800-241-3673. For more information and... card is off . Canadian customers who need to arrange roadside assistance for yourself, Ford Motor Company will be asked to your battery. 235 U.S. If you may run down your Basic Warranty's Roadside Assistance expiring. The hazard flashers will flash. Press in the...
Owner's Manual
Page 239
... On-board diagnostic connector Fog lamps Front sidemarker lamps, Park lamps, License plate lamp High beam headlamps Horn Demand lamps/power saver relay Instrument cluster battery power Ignition switch Radio crank sense circuit Instrument cluster ignition power Not used (Spare) Not used (Spare) Restraint control module Not used (Spare) Not used...
... On-board diagnostic connector Fog lamps Front sidemarker lamps, Park lamps, License plate lamp High beam headlamps Horn Demand lamps/power saver relay Instrument cluster battery power Ignition switch Radio crank sense circuit Instrument cluster ignition power Not used (Spare) Not used (Spare) Restraint control module Not used (Spare) Not used...
Owner's Manual
Page 240
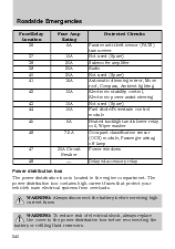
.... WARNING: To reduce risk of electrical shock, always replace the cover to the power distribution box before servicing high current fuses. WARNING: Always disconnect the battery before reconnecting the battery or refilling fluid reservoirs. 240
.... WARNING: To reduce risk of electrical shock, always replace the cover to the power distribution box before servicing high current fuses. WARNING: Always disconnect the battery before reconnecting the battery or refilling fluid reservoirs. 240

Owner's Manual
Page 241
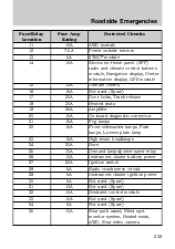
The high-current fuses are coded as follows. Fuse/Relay Location 1 2 3 4 5 6 7 8 9 10 11 Fuse Amp Rating 50A* 50A* 40A* - 30A* 40A* - 40A* 20A* 30A* - Protected Circuits Electronic power assist steering B+ Electronic power assist steering B+ Powertrain control module (PCM) (relay 57 power) Not used Starter motor (relay 55 power) Rear defrost (relay 53 power) Not used Anti-lock braking s ystem (ABS) pump Wipers washer ABS valve Not used 241 Roadside Emergencies If the battery has been disconnected and reconnected, refer to the Battery section of the Maintenance and Specifications chapter.
The high-current fuses are coded as follows. Fuse/Relay Location 1 2 3 4 5 6 7 8 9 10 11 Fuse Amp Rating 50A* 50A* 40A* - 30A* 40A* - 40A* 20A* 30A* - Protected Circuits Electronic power assist steering B+ Electronic power assist steering B+ Powertrain control module (PCM) (relay 57 power) Not used Starter motor (relay 55 power) Rear defrost (relay 53 power) Not used Anti-lock braking s ystem (ABS) pump Wipers washer ABS valve Not used 241 Roadside Emergencies If the battery has been disconnected and reconnected, refer to the Battery section of the Maintenance and Specifications chapter.
Owner's Manual
Page 251
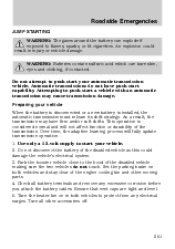
... an automatic transmission may have push-start your vehicle. 2. Set the parking brake on in injury or vehicle damage. Turn all battery terminals and remove any electrical surges. Automatic transmissions do not touch. Turn the heater fan on both vehicles to flames, sparks, ... electrical system. 3. Attempting to start capability. Use only a 12-volt supply to push-start your vehicle When the battery is disconnected or a new battery is considered normal and will fully update transmission operation. 1. Over time, the adaptive learning process will not affect function or...
... an automatic transmission may have push-start your vehicle. 2. Set the parking brake on in injury or vehicle damage. Turn all battery terminals and remove any electrical surges. Automatic transmissions do not touch. Turn the heater fan on both vehicles to flames, sparks, ... electrical system. 3. Attempting to start capability. Use only a 12-volt supply to push-start your vehicle When the battery is disconnected or a new battery is considered normal and will fully update transmission operation. 1. Over time, the adaptive learning process will not affect function or...
Owner's Manual
Page 252
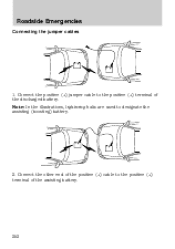
Note: In the illustrations, lightning bolts are used to the positive (+) terminal of the assisting battery. 252 - - - + - + + + Connect the other end of the discharged battery. Roadside Emergencies Connecting the jumper cables 1. Connect the positive (+) jumper cable to the positive (+) terminal of the positive (+) cable to designate the assisting (boosting) battery. 2.
Note: In the illustrations, lightning bolts are used to the positive (+) terminal of the assisting battery. 252 - - - + - + + + Connect the other end of the discharged battery. Roadside Emergencies Connecting the jumper cables 1. Connect the positive (+) jumper cable to the positive (+) terminal of the positive (+) cable to designate the assisting (boosting) battery. 2.


