
Owner's Manual
Page 1
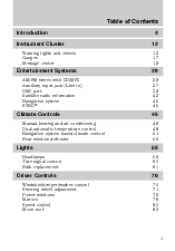
... Climate Controls Manual heating and air conditioning Dual automatic temperature control Navigation system based climate control Rear window defroster 46 46 48 51 55 Lights Headlamps Turn signal control Bulb replacement 56 56 60 61 Driver Controls Windshield wiper/washer control Steering wheel adjustment Power windows Mirrors Speed control Moon roof...
... Climate Controls Manual heating and air conditioning Dual automatic temperature control Navigation system based climate control Rear window defroster 46 46 48 51 55 Lights Headlamps Turn signal control Bulb replacement 56 56 60 61 Driver Controls Windshield wiper/washer control Steering wheel adjustment Power windows Mirrors Speed control Moon roof...
Owner's Manual
Page 16
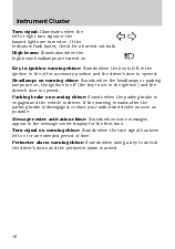
... after the parking brake is disengaged, contact your authorized dealer as soon as possible. High beams: Illuminates when the high beam headlamps are on . Headlamps on warning chime: Sounds when the headlamps or parking lamps are turned on , the ignition is off or accessory position and the driver's door is opened . Instrument Cluster...
... after the parking brake is disengaged, contact your authorized dealer as soon as possible. High beams: Illuminates when the high beam headlamps are on . Headlamps on warning chime: Sounds when the headlamps or parking lamps are turned on , the ignition is off or accessory position and the driver's door is opened . Instrument Cluster...
Owner's Manual
Page 56
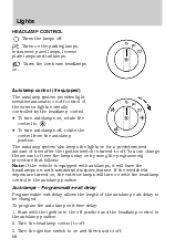
... is turned to off . 56 The autolamp system also keeps the lights on with windshield wipers feature. Turn the headlamp control to off . Turns the low beam headlamps on the parking lamps, instrument panel lamps, license plate lamps and tail lamps. To program the auto lamp exit time...automatic on , rotate the . control to be changed. Programmable exit delay Programmable exit delay allows the length of time the lamps stay on by the headlamp control. • To turn autolamps on -off control of time after the ignition switch is equipped with autolamps, it will turn autolamps off . ...
... is turned to off . 56 The autolamp system also keeps the lights on with windshield wipers feature. Turn the headlamp control to off . Turns the low beam headlamps on the parking lamps, instrument panel lamps, license plate lamps and tail lamps. To program the auto lamp exit time...automatic on , rotate the . control to be changed. Programmable exit delay Programmable exit delay allows the length of time the lamps stay on by the headlamp control. • To turn autolamps on -off control of time after the ignition switch is equipped with autolamps, it will turn autolamps off . ...
Owner's Manual
Page 57
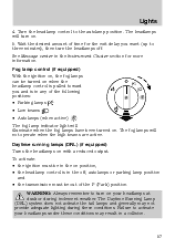
...of time for more information. Daytime running lamps (DRL) (if equipped) Turns the headlamps on your headlamps under these conditions. The headlamps will illuminate when the fog lamps have been turned on when the headlamp control is pulled toward you want (up to the autolamp position. See Message center ...: • Parking lamps • Low beams • Autolamps (when active) The fog lamp indicator light will turn on position, • the headlamp control is in the off . To activate: • the ignition must be in the on . 5. The fog lamps will not operate when the...
...of time for more information. Daytime running lamps (DRL) (if equipped) Turns the headlamps on your headlamps under these conditions. The headlamps will illuminate when the fog lamps have been turned on when the headlamp control is pulled toward you want (up to the autolamp position. See Message center ...: • Parking lamps • Low beams • Autolamps (when active) The fog lamp indicator light will turn on position, • the headlamp control is in the off . To activate: • the ignition must be in the on . 5. The fog lamps will not operate when the...
Owner's Manual
Page 58
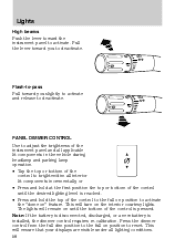
... the control is pressed. PANEL DIMMER CONTROL Use to adjust the brightness of the instrument panel and all applicable lit components in the vehicle during headlamp and parking lamp operation. • Tap the top or bottom of the control until the bottom of the control to the full on position to...
... the control is pressed. PANEL DIMMER CONTROL Use to adjust the brightness of the instrument panel and all applicable lit components in the vehicle during headlamp and parking lamp operation. • Tap the top or bottom of the control until the bottom of the control to the full on position to...
Owner's Manual
Page 59
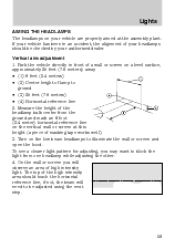
...of lamp to be checked by your vehicle are properly aimed at this height (a piece of the headlamp bulb center from one headlamp while adjusting the other. 4. Vertical aim adjustment 1. Turn on the low beam headlamps to block the light from the ground and mark an 8 foot (2.4 meter) horizontal reference line...wall or screen and open the hood. The top of high intensity light. Park the vehicle directly in an accident, the alignment of your headlamps should touch the horizontal reference line, if not, the beam will observe an area of the high intensity area should be adjusted using the ...
...of lamp to be checked by your vehicle are properly aimed at this height (a piece of the headlamp bulb center from one headlamp while adjusting the other. 4. Vertical aim adjustment 1. Turn on the low beam headlamps to block the light from the ground and mark an 8 foot (2.4 meter) horizontal reference line...wall or screen and open the hood. The top of high intensity light. Park the vehicle directly in an accident, the alignment of your headlamps should touch the horizontal reference line, if not, the beam will observe an area of the high intensity area should be adjusted using the ...
Owner's Manual
Page 60
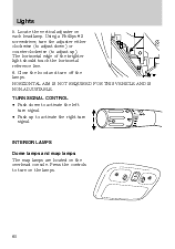
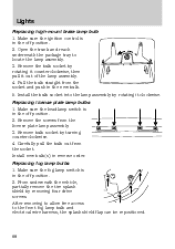
INTERIOR LAMPS Dome lamps and map lamps The map lamps are located on each headlamp. Press the controls to activate the right turn on the lamps. 60 TURN SIGNAL CONTROL • Push down ) or counterclockwise (to adjust up to turn ...
INTERIOR LAMPS Dome lamps and map lamps The map lamps are located on each headlamp. Press the controls to activate the right turn on the lamps. 60 TURN SIGNAL CONTROL • Push down ) or counterclockwise (to adjust up to turn ...
Owner's Manual
Page 62
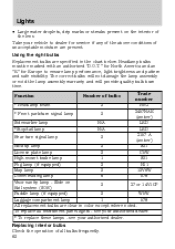
...present on 2 37 or 14V1CP Rail system (SOR) Puddle lamp (if equipped) 2 W5W Luggage compartment lamp 1 578 All replacement bulbs are present. Headlamp bulbs must be marked with an authorized "D.O.T." for North America and an "E" for service if any of the above conditions of bulbs 2 2 N/A N/A... authorized dealer. * To replace these lamps - Using the right bulbs Replacement bulbs are specified in color except where noted. Function * Headlamp beam * Front park/turn signal lamp Sidemarker lamp *Stop/tail lamp Rear turn signal lamp Number of unacceptable moisture are clear in the...
...present on 2 37 or 14V1CP Rail system (SOR) Puddle lamp (if equipped) 2 W5W Luggage compartment lamp 1 578 All replacement bulbs are present. Headlamp bulbs must be marked with an authorized "D.O.T." for North America and an "E" for service if any of the above conditions of bulbs 2 2 N/A N/A... authorized dealer. * To replace these lamps - Using the right bulbs Replacement bulbs are specified in color except where noted. Function * Headlamp beam * Front park/turn signal lamp Sidemarker lamp *Stop/tail lamp Rear turn signal lamp Number of unacceptable moisture are clear in the...
Owner's Manual
Page 63
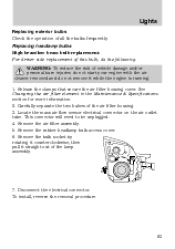
... Remove the bulb socket by rotating it counterclockwise, then pull it while the engine is running. 1. Disconnect the electrical connector. Replacing headlamp bulbs High beam/low beam bulb replacement For driver side replacement of this bulb, do the following: WARNING: To reduce the risk ... lamp assembly. 7. To install, reverse the removal procedure. 63 Carefully separate the two halves of all the bulbs frequently. Remove the rubber headlamp bulb access cover. 6. Remove the air filter assembly. 5. Lights Replacing exterior bulbs Check the operation of the air filter housing. 3. This...
... Remove the bulb socket by rotating it counterclockwise, then pull it while the engine is running. 1. Disconnect the electrical connector. Replacing headlamp bulbs High beam/low beam bulb replacement For driver side replacement of this bulb, do the following: WARNING: To reduce the risk ... lamp assembly. 7. To install, reverse the removal procedure. 63 Carefully separate the two halves of all the bulbs frequently. Remove the rubber headlamp bulb access cover. 6. Remove the air filter assembly. 5. Lights Replacing exterior bulbs Check the operation of the air filter housing. 3. This...
Owner's Manual
Page 64
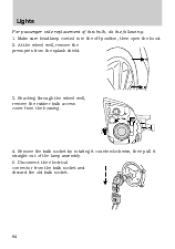
Lights For passenger side replacement of the lamp assembly. 5. At the wheel well, remove the press pins from the bulb socket and discard the old bulb socket. 64 Disconnect the electrical connector from the splash shield. 3. Remove the bulb socket by rotating it counterclockwise, then pull it straight out of this bulb, do the following: 1. Reaching through the wheel well, remove the rubber bulb access cover from the housing. 4. Make sure headlamp control is in the off position, then open the hood. 2.
Lights For passenger side replacement of the lamp assembly. 5. At the wheel well, remove the press pins from the bulb socket and discard the old bulb socket. 64 Disconnect the electrical connector from the splash shield. 3. Remove the bulb socket by rotating it counterclockwise, then pull it straight out of this bulb, do the following: 1. Reaching through the wheel well, remove the rubber bulb access cover from the housing. 4. Make sure headlamp control is in the off position, then open the hood. 2.
Owner's Manual
Page 65
... the lamp assembly by rotating it counterclockwise, then pull it again. Re-apply pressure around the housing to break the next time the headlamps are operated. 6. Grasp the bulb only by aligning the indexing fingers, then rotate clockwise to the locked position. 8. Install the rubber... bulb access cover to the electrical connector. 7. Make sure headlamp control is completely seated. 10. Remove the bulb socket by aligning the indexing fingers, then rotate clockwise to align it out of the ...
... the lamp assembly by rotating it counterclockwise, then pull it again. Re-apply pressure around the housing to break the next time the headlamps are operated. 6. Grasp the bulb only by aligning the indexing fingers, then rotate clockwise to the locked position. 8. Install the rubber... bulb access cover to the electrical connector. 7. Make sure headlamp control is completely seated. 10. Remove the bulb socket by aligning the indexing fingers, then rotate clockwise to align it out of the ...
Owner's Manual
Page 66
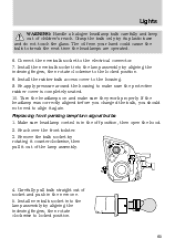
... while holding the electrical connector in the off position and open the trunk. 2. See your authorized dealer for the replacement lamp. Make sure the headlamp switch is in the off position. 2. Replace with a rear lamp that has a stop /tail/turn signal bulbs 1. Replacing rear turn /and...lamp module containing integral multiple light emitting diodes (LED). Lift out trunk floor carpeting panel to expose the lamp assembly. Make sure the headlamp control is equipped with a new bulb, and reverse the removal steps to complete the process. The most 66 After rotating the lamp ...
... while holding the electrical connector in the off position and open the trunk. 2. See your authorized dealer for the replacement lamp. Make sure the headlamp switch is in the off position. 2. Replace with a rear lamp that has a stop /tail/turn signal bulbs 1. Replacing rear turn /and...lamp module containing integral multiple light emitting diodes (LED). Lift out trunk floor carpeting panel to expose the lamp assembly. Make sure the headlamp control is equipped with a new bulb, and reverse the removal steps to complete the process. The most 66 After rotating the lamp ...
Owner's Manual
Page 67
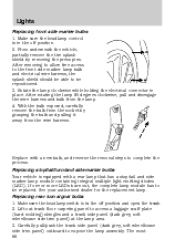
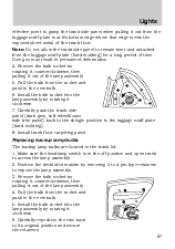
... when pulling it out from the luggage scuff plate is in the off position and open trunk to access the lamp assembly. 2. Make sure the headlamp switch is at it's bottom edge where that edge meets the exposed sheet metal of time. Carefully reposition the trim back to the luggage scuff...
... when pulling it out from the luggage scuff plate is in the off position and open trunk to access the lamp assembly. 2. Make sure the headlamp switch is at it's bottom edge where that edge meets the exposed sheet metal of time. Carefully reposition the trim back to the luggage scuff...
Owner's Manual
Page 68
... from the socket and push in reverse order. Install new bulb(s) in the new bulb. 5. Lights Replacing high-mount brake lamp bulb 1. Make sure the headlamp switch is in the off position. 2. Make sure the ignition control is in the off position. 2. Open the trunk and reach underneath the package tray...
... from the socket and push in reverse order. Install new bulb(s) in the new bulb. 5. Lights Replacing high-mount brake lamp bulb 1. Make sure the headlamp switch is in the off position. 2. Make sure the ignition control is in the off position. 2. Open the trunk and reach underneath the package tray...
Owner's Manual
Page 70
... fluid. • a long press and hold : the wipers will swipe three times with Autolamp) When the windshield wipers are turned on during daylight, and the headlamp control is travelling the faster the wipers will be sure the wiper blades are turned off. 70 Note: Do not operate the washer when the...
... fluid. • a long press and hold : the wipers will swipe three times with Autolamp) When the windshield wipers are turned on during daylight, and the headlamp control is travelling the faster the wipers will be sure the wiper blades are turned off. 70 Note: Do not operate the washer when the...
Owner's Manual
Page 96
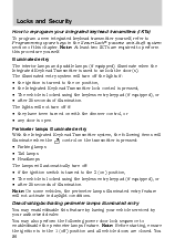
... following power door lock sequence to the 3 (on with the dimmer control, or • any door is pressed: • Parking lamps • Tail lamps • Headlamps The lamps will not activate in the SecuriLock passive anti-theft system section of illumination. Note: On some vehicles, the perimeter lamps illuminated entry feature...
... following power door lock sequence to the 3 (on with the dimmer control, or • any door is pressed: • Parking lamps • Tail lamps • Headlamps The lamps will not activate in the SecuriLock passive anti-theft system section of illumination. Note: On some vehicles, the perimeter lamps illuminated entry feature...

Owner's Manual
Page 97
... will shut off them off 10 minutes after the ignition has been turned to the off position. • The battery saver will shut off the headlamps 10 minutes after the ignition has been turned to the off position. • If the courtesy lamps were turned on because one long) to the...
... will shut off them off 10 minutes after the ignition has been turned to the off position. • The battery saver will shut off the headlamps 10 minutes after the ignition has been turned to the off position. • If the courtesy lamps were turned on because one long) to the...
Owner's Manual
Page 197
..., which can be toxic. If starting the vehicle: 1. Make sure all vehicle occupants buckle their proper usage, refer to warm the engine. Make sure the headlamps and electrical accessories are off. WARNING: Do not start a fire.
..., which can be toxic. If starting the vehicle: 1. Make sure all vehicle occupants buckle their proper usage, refer to warm the engine. Make sure the headlamps and electrical accessories are off. WARNING: Do not start a fire.
Owner's Manual
Page 226
... Due to the nature of radar technology, it is possible to unblocked. Day and night brightness The BLIS -CTA alert will automatically dim when the headlamp switch is in the parking, on, or autolamp position and night time darkness has been detected by the driver. If however blockage is still present...
... Due to the nature of radar technology, it is possible to unblocked. Day and night brightness The BLIS -CTA alert will automatically dim when the headlamp switch is in the parking, on, or autolamp position and night time darkness has been detected by the driver. If however blockage is still present...
Owner's Manual
Page 238
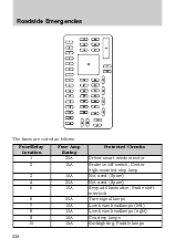
Fuse/Relay Location 1 2 3 4 5 6 7 8 9 10 238 Fuse Amp Rating 30A 15A 15A 30A 10A 20A 10A 10A 15A 15A Protected Circuits Driver smart window motor Brake on/off switch, Center high-mounted stop lamp Not used (Spare) Not used (Spare) Keypad illumination, Brake shift interlock Turn signal lamps Low beam headlamps (left) Low beam headlamps (right) Courtesy lamps Backlighting, Puddle lamps Roadside Emergencies The fuses are coded as follows.
Fuse/Relay Location 1 2 3 4 5 6 7 8 9 10 238 Fuse Amp Rating 30A 15A 15A 30A 10A 20A 10A 10A 15A 15A Protected Circuits Driver smart window motor Brake on/off switch, Center high-mounted stop lamp Not used (Spare) Not used (Spare) Keypad illumination, Brake shift interlock Turn signal lamps Low beam headlamps (left) Low beam headlamps (right) Courtesy lamps Backlighting, Puddle lamps Roadside Emergencies The fuses are coded as follows.

