Owner's Manual
Page 1
... new Honda, and how to handle them. Taking Care of the warranties covering your car ever needs body repairs. Driving ...217 The proper way to the dealer. Technical Information ...361 ID numbers, dimensions, capacities, and technical information. 2003 Accord Sedan Online Reference Owner's Manual Use these links (and links throughout this reference. Instruments and Controls ...55 Instrument panel indicator and gauge, and how to navigate through this manual) to use dashboard and steering column controls...
... new Honda, and how to handle them. Taking Care of the warranties covering your car ever needs body repairs. Driving ...217 The proper way to the dealer. Technical Information ...361 ID numbers, dimensions, capacities, and technical information. 2003 Accord Sedan Online Reference Owner's Manual Use these links (and links throughout this reference. Instruments and Controls ...55 Instrument panel indicator and gauge, and how to navigate through this manual) to use dashboard and steering column controls...
Owner's Manual
Page 2
... the environment. Your selection of driving pleasure. Maintaining your car according to the schedules given in your Honda dealer's staff is to read this owner's manual in this manual, you read this manual helps to answer any time. California Proposition 65 Warning WARNING: This product contains or emits ...the coverages and are aware of California to your rights and responsibilities. Read the warranty booklet thoroughly so you years of a 2003 Honda Accord was a wise investment. Introduction Congratulations! This information is intended to help you can refer ...
... the environment. Your selection of driving pleasure. Maintaining your car according to the schedules given in your Honda dealer's staff is to read this owner's manual in this manual, you read this manual helps to answer any time. California Proposition 65 Warning WARNING: This product contains or emits ...the coverages and are aware of California to your rights and responsibilities. Read the warranty booklet thoroughly so you years of a 2003 Honda Accord was a wise investment. Introduction Congratulations! This information is intended to help you can refer ...
Owner's Manual
Page 55
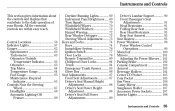
... controls are within easy reach. Daytime Running Lights...69 Instrument Panel Brightness ...69 Turn Signals ...70 Windshield Wipers ...70 Windshield Washers ...72 Hazard Warning...72 Rear Window Defogger ...72 Steering Wheel Adjustment ...73 Keys and Locks ...74 Keys...74 Immobilizer System...76 Ignition Switch ...77 Door Locks ...78 Remote Transmitter ...80 Childproof Door Locks ...84 Trunk ...84 Emergency Trunk Opener ...85 Glove Box ...86 Seat Adjustments ...87 Front Seat Adjustments ...87 Driver's Seat Manual Height Adjustment ...88 Driver's Seat Power Height Adjustment ...88 Driver's Seat...
... controls are within easy reach. Daytime Running Lights...69 Instrument Panel Brightness ...69 Turn Signals ...70 Windshield Wipers ...70 Windshield Washers ...72 Hazard Warning...72 Rear Window Defogger ...72 Steering Wheel Adjustment ...73 Keys and Locks ...74 Keys...74 Immobilizer System...76 Ignition Switch ...77 Door Locks ...78 Remote Transmitter ...80 Childproof Door Locks ...84 Trunk ...84 Emergency Trunk Opener ...85 Glove Box ...86 Seat Adjustments ...87 Front Seat Adjustments ...87 Driver's Seat Manual Height Adjustment ...88 Driver's Seat Power Height Adjustment ...88 Driver's Seat...

Owner's Manual
Page 60
Indicator Lights Traction Control System (TCS) Indicator On all V6 models Door Monitor This indicator normally comes on for a few seconds when you are signaling. If it usually means one of the car should flash. 60 Instruments and Controls Replace the bulb as soon as possible, since other drivers cannot see that you turn signal bulbs is burned out (see page 232 . If the light does...
Indicator Lights Traction Control System (TCS) Indicator On all V6 models Door Monitor This indicator normally comes on for a few seconds when you are signaling. If it usually means one of the car should flash. 60 Instruments and Controls Replace the bulb as soon as possible, since other drivers cannot see that you turn signal bulbs is burned out (see page 232 . If the light does...
Owner's Manual
Page 65
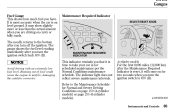
CONTINUED Instruments and Controls 65 It is most accurate when the car is on page 250 (4-cylinder models) or page 255 (6-cylinder models). 4-cylinder models For the first 8,000 miles (12,800 km) after the Maintenance Required Indicator is reset, it is time to the bottom after you turn the ignition switch to ON (II). The gauge shows the fuel level reading immediately after you turn the ignition switch back ON...
CONTINUED Instruments and Controls 65 It is most accurate when the car is on page 250 (4-cylinder models) or page 255 (6-cylinder models). 4-cylinder models For the first 8,000 miles (12,800 km) after the Maintenance Required Indicator is reset, it is time to the bottom after you turn the ignition switch to ON (II). The gauge shows the fuel level reading immediately after you turn the ignition switch back ON...
Owner's Manual
Page 73
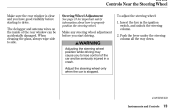
... drive. To adjust the steering wheel: 1. CONTINUED Instruments and Controls 73 Controls Near the Steering Wheel Make sure the rear window is stopped. Steering Wheel Adjustment See page 18 for important safety information about how to lose control of the rear window can be seriously injured in the ignition switch, and unlock the steering column. 2. Insert the key in a crash. Adjusting the steering wheel position while driving may cause you start driving. Make any steering wheel adjustment before starting...
... drive. To adjust the steering wheel: 1. CONTINUED Instruments and Controls 73 Controls Near the Steering Wheel Make sure the rear window is stopped. Steering Wheel Adjustment See page 18 for important safety information about how to lose control of the rear window can be seriously injured in the ignition switch, and unlock the steering column. 2. Insert the key in a crash. Adjusting the steering wheel position while driving may cause you start driving. Make any steering wheel adjustment before starting...
Owner's Manual
Page 97
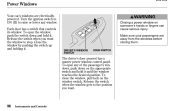
... lower any of the passenger's windows, push down and hold it . Make sure your passengers are electricallypowered. Turn the ignition switch to ON (II) to stop. To open any window. Release the switch when the window gets to the position you want . 96 Instruments and Controls DRIVER'S WINDOW SWITCH MAIN SWITCH The driver's door armrest has a master power window control panel. To close the window, pull back on the window switch. Close the window by pushing the switch...
... lower any of the passenger's windows, push down and hold it . Make sure your passengers are electricallypowered. Turn the ignition switch to ON (II) to stop. To open any window. Release the switch when the window gets to the position you want . 96 Instruments and Controls DRIVER'S WINDOW SWITCH MAIN SWITCH The driver's door armrest has a master power window control panel. To close the window, pull back on the window switch. Close the window by pushing the switch...
Owner's Manual
Page 98
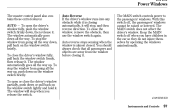
The window automatically goes all the way up . CONTINUED Instruments and Controls Auto Reverse If the driver's window runs into any obstacle while it is almost closed. To close the driver's window fully, pull back the window switch firmly, then release it. The MAIN switch controls power to the passengers' windows. To stop when you have children in the car so they do not injure themselves by operating the windows unintentionally...
The window automatically goes all the way up . CONTINUED Instruments and Controls Auto Reverse If the driver's window runs into any obstacle while it is almost closed. To close the driver's window fully, pull back the window switch firmly, then release it. The MAIN switch controls power to the passengers' windows. To stop when you have children in the car so they do not injure themselves by operating the windows unintentionally...

Owner's Manual
Page 99
... turn the ignition switch ON (II) again before you can raise or lower the windows. 98 Instruments and Controls Push down on the driver's window switch to close the window completely, then hold the switch for up to ten minutes after resetting, have your car's battery is disconnected or goes dead, or the driver's window fuse is fully open. 2. If the power windows do the following. 1. Start the engine. Power Windows If your car...
... turn the ignition switch ON (II) again before you can raise or lower the windows. 98 Instruments and Controls Push down on the driver's window switch to close the window completely, then hold the switch for up to ten minutes after resetting, have your car's battery is disconnected or goes dead, or the driver's window fuse is fully open. 2. If the power windows do the following. 1. Start the engine. Power Windows If your car...
Owner's Manual
Page 123
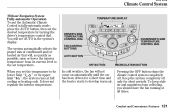
... times. Comfort and Convenience Features 121 It does not regulate the interior temperature. When you should have the fan running at full limit '' cooling or heating only. TEMPERATURE DISPLAY DRIVER'S SIDE TEMPERATURE CONTROL DIAL FAN CONTROL BUTTONS AUTO BUTTON PASSENGER'S SIDE TEMPERATURE CONTROL DIAL OFF BUTTON RECIRCULATION BUTTON In cold weather, the fan will see AUTO in fully-automatic mode, press the AUTO button, then set temperature. Climate Control System Without Navigation...
... times. Comfort and Convenience Features 121 It does not regulate the interior temperature. When you should have the fan running at full limit '' cooling or heating only. TEMPERATURE DISPLAY DRIVER'S SIDE TEMPERATURE CONTROL DIAL FAN CONTROL BUTTONS AUTO BUTTON PASSENGER'S SIDE TEMPERATURE CONTROL DIAL OFF BUTTON RECIRCULATION BUTTON In cold weather, the fan will see AUTO in fully-automatic mode, press the AUTO button, then set temperature. Climate Control System Without Navigation...
Owner's Manual
Page 243
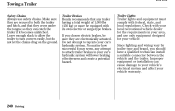
... cause damage to turn corners easily, but do not let the chains drag on the ground. Towing a Trailer Safety Chains Trailer Brakes Trailer Lights Always use only equipment designed for the requirements in your area, and use safety chains. If you should have a qualified technician install a suitable connector between the vehicle and the trailer. Since lighting and wiring vary by trailer type and brand, you choose electric brakes, be equipped...
... cause damage to turn corners easily, but do not let the chains drag on the ground. Towing a Trailer Safety Chains Trailer Brakes Trailer Lights Always use only equipment designed for the requirements in your area, and use safety chains. If you should have a qualified technician install a suitable connector between the vehicle and the trailer. Since lighting and wiring vary by trailer type and brand, you choose electric brakes, be equipped...
Owner's Manual
Page 247
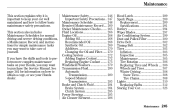
... Oil ...269 Additives ...270 Changing the Oil and Filter ...270 Cooling System ...272 Adding Engine Coolant ...272 Replacing Engine Coolant ...275 Windshield Washers ...279 Transmission Fluid ...280 Automatic Transmission...280 5-speed Manual Transmission...283 Brake and Clutch Fluid ...284 Brake System ...284 Clutch System ...285 Power Steering ...285 Air Cleaner Element ...286 Hood Latch ...289 Spark Plugs ...289 Replacement ...289 Specifications ...291 Battery ...294 Wiper Blades ...297 Air Conditioning System ...299 Dust and Pollen Filter ...300 Drive Belt ...302 Timing Belt ...302 Tires...
... Oil ...269 Additives ...270 Changing the Oil and Filter ...270 Cooling System ...272 Adding Engine Coolant ...272 Replacing Engine Coolant ...275 Windshield Washers ...279 Transmission Fluid ...280 Automatic Transmission...280 5-speed Manual Transmission...283 Brake and Clutch Fluid ...284 Brake System ...284 Clutch System ...285 Power Steering ...285 Air Cleaner Element ...286 Hood Latch ...289 Spark Plugs ...289 Replacement ...289 Specifications ...291 Battery ...294 Wiper Blades ...297 Air Conditioning System ...299 Dust and Pollen Filter ...300 Drive Belt ...302 Timing Belt ...302 Tires...
Owner's Manual
Page 252
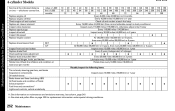
.... Replace engine oil Replace engine oil filter Check engine oil and coolant Replace air cleaner element Inspect valve clearance Replace spark plugs Inspect drive belt Inspect idle speed Replace engine coolant Replace transmission fluid M/T A/T Every 3 years (independent of mileage) Every 30,000 miles (48,000 km) or 2 years Rotate tires every 10,000 miles (16,000 km) Visually inspect the following items: Tie rod ends, steering gear box, and boots Suspension components Driveshaft boots Brake hoses and lines (including ABS) All fluid levels and condition of fluids Exhaust system Fuel lines...
.... Replace engine oil Replace engine oil filter Check engine oil and coolant Replace air cleaner element Inspect valve clearance Replace spark plugs Inspect drive belt Inspect idle speed Replace engine coolant Replace transmission fluid M/T A/T Every 3 years (independent of mileage) Every 30,000 miles (48,000 km) or 2 years Rotate tires every 10,000 miles (16,000 km) Visually inspect the following items: Tie rod ends, steering gear box, and boots Suspension components Driveshaft boots Brake hoses and lines (including ABS) All fluid levels and condition of fluids Exhaust system Fuel lines...
Owner's Manual
Page 254
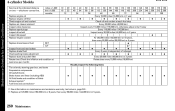
...000 km) Visually inspect the following items: Inspect front and rear brakes Replace brake fluid Check parking brake adjustment Replace dust and pollen filter Lubricate all hinges, locks, and latches Rotate tires (Check tire inflation and condition at the indicated distance or time whichever comes first. Replace engine oil Replace engine oil filter Check engine oil and coolant Replace air cleaner element Inspect valve clearance Replace spark plugs Inspect drive belt Inspect idle speed Replace engine coolant Replace transmission fluid M/T A/T miles x 1,000 km x 1,000 months 10 16 12 20 32 30...
...000 km) Visually inspect the following items: Inspect front and rear brakes Replace brake fluid Check parking brake adjustment Replace dust and pollen filter Lubricate all hinges, locks, and latches Rotate tires (Check tire inflation and condition at the indicated distance or time whichever comes first. Replace engine oil Replace engine oil filter Check engine oil and coolant Replace air cleaner element Inspect valve clearance Replace spark plugs Inspect drive belt Inspect idle speed Replace engine coolant Replace transmission fluid M/T A/T miles x 1,000 km x 1,000 months 10 16 12 20 32 30...
Owner's Manual
Page 257
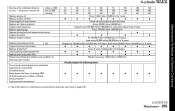
... oil Replace engine oil filter Check engine oil and coolant Replace air cleaner element Inspect valve clearance Replace spark plugs Replace timing belt and inspect water pump Inspect drive belt Replace engine coolant Replace transmission fluid A/T Inspect front and rear brakes Replace brake fluid Check parking brake adjustment Replace dust and pollen filter Rotate tires (Check tire inflation and condition at least once per month) Tie rod ends, steering gear box, and boots Suspension components Driveshaft boots Brake hoses and lines (including ABS) All fluid levels and condition of mileage...
... oil Replace engine oil filter Check engine oil and coolant Replace air cleaner element Inspect valve clearance Replace spark plugs Replace timing belt and inspect water pump Inspect drive belt Replace engine coolant Replace transmission fluid A/T Inspect front and rear brakes Replace brake fluid Check parking brake adjustment Replace dust and pollen filter Rotate tires (Check tire inflation and condition at least once per month) Tie rod ends, steering gear box, and boots Suspension components Driveshaft boots Brake hoses and lines (including ABS) All fluid levels and condition of mileage...

Owner's Manual
Page 259
... normal schedule except in dusty conditions) Inspect every 105,000 miles (168,000 km), otherwise adjust only if noisy 30 48 24 120 192 96 Replace engine oil, and oil filter Check engine oil and coolant Replace air cleaner element Inspect valve clearance Replace spark plugs Replace timing belt 1 and inspect water pump Inspect drive belt Replace engine coolant Replace transmission fluid A/T Inspect front and rear brakes Replace brake fluid Check parking brake adjustment Replace dust and pollen filter 2 Lubricate all hinges, locks and latches Rotate tires (Check tire inflation and condition at...
... normal schedule except in dusty conditions) Inspect every 105,000 miles (168,000 km), otherwise adjust only if noisy 30 48 24 120 192 96 Replace engine oil, and oil filter Check engine oil and coolant Replace air cleaner element Inspect valve clearance Replace spark plugs Replace timing belt 1 and inspect water pump Inspect drive belt Replace engine coolant Replace transmission fluid A/T Inspect front and rear brakes Replace brake fluid Check parking brake adjustment Replace dust and pollen filter 2 Lubricate all hinges, locks and latches Rotate tires (Check tire inflation and condition at...
Owner's Manual
Page 306
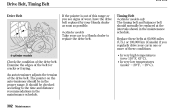
... your car in the maintenance schedule. 302 Maintenance An auto-tensioner adjusts the tension of the drive belt. It should be checked according to replace the drive belt. 4-cylinder models Check the condition of the drive belt. In very low temperatures (under 20°F, 29°C). Drive Belt, Timing Belt Drive Belt If the pointer is out of this range or you see signs of wear, have the drive belt replaced by your Honda dealer as...
... your car in the maintenance schedule. 302 Maintenance An auto-tensioner adjusts the tension of the drive belt. It should be checked according to replace the drive belt. 4-cylinder models Check the condition of the drive belt. In very low temperatures (under 20°F, 29°C). Drive Belt, Timing Belt Drive Belt If the pointer is out of this range or you see signs of wear, have the drive belt replaced by your Honda dealer as...
Owner's Manual
Page 327
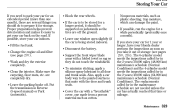
... cotton. If possible, store your car back on jackstands so the tires are completely dry. Wash and dry the exterior completely. Clean the interior. Also, apply a car body wax to the painted surfaces that time or mileage. Disconnect the battery. Fill the fuel tank. Cover the car with the door and trunk seals. The replacements called for in Reverse (5-speed manual) or Park (automatic). Change the engine oil and filter (see pages 250 , 255 ). are...
... cotton. If possible, store your car back on jackstands so the tires are completely dry. Wash and dry the exterior completely. Clean the interior. Also, apply a car body wax to the painted surfaces that time or mileage. Disconnect the battery. Fill the fuel tank. Cover the car with the door and trunk seals. The replacements called for in Reverse (5-speed manual) or Park (automatic). Change the engine oil and filter (see pages 250 , 255 ). are...
Owner's Manual
Page 388
... Automatic Transmission...222 5-speed Manual Transmission...221 Glass Cleaning ...330 Glove Box ...86 Headlights...68 Aiming ...312 Automatic Lighting Off ...69 Daytime Running Lights...69 Low Beams, Turning on ...68 Reminder Chime ...68 Replacing Halogen Bulbs ...312 Turning on ...68 Head Restraints ...91 Heating and Cooling ...112 Heated Mirror ...102 High Altitude, Starting at ...220 HomeLink Wireless Control System...198 Hood, Opening the ...206 Hydraulic Clutch ...285 Hydroplaning...236 Important Safety Precautions ...6 Indicators, Instrument Panel...
... Automatic Transmission...222 5-speed Manual Transmission...221 Glass Cleaning ...330 Glove Box ...86 Headlights...68 Aiming ...312 Automatic Lighting Off ...69 Daytime Running Lights...69 Low Beams, Turning on ...68 Reminder Chime ...68 Replacing Halogen Bulbs ...312 Turning on ...68 Head Restraints ...91 Heating and Cooling ...112 Heated Mirror ...102 High Altitude, Starting at ...220 HomeLink Wireless Control System...198 Hood, Opening the ...206 Hydraulic Clutch ...285 Hydroplaning...236 Important Safety Precautions ...6 Indicators, Instrument Panel...

Owner's Manual
Page 391
... Your Airbags Work ...45, 47, 48 How Your SRS Indicator Works ...48 SRS Components ...45 SRS Service...51 SRS Indicator...48, 59 START (Ignition Key Position) ...78 Starting the Engine...219 In Cold Weather at High Altitude ...220 With a Dead Battery ...342 Steam Coming from Engine ...345 Steering Wheel Adjustment ...73 Anti-theft Column Lock ...77 Stereo Sound System ...134, 150, 169 Storing Your Car ...323 Sun Visor...
... Your Airbags Work ...45, 47, 48 How Your SRS Indicator Works ...48 SRS Components ...45 SRS Service...51 SRS Indicator...48, 59 START (Ignition Key Position) ...78 Starting the Engine...219 In Cold Weather at High Altitude ...220 With a Dead Battery ...342 Steam Coming from Engine ...345 Steering Wheel Adjustment ...73 Anti-theft Column Lock ...77 Stereo Sound System ...134, 150, 169 Storing Your Car ...323 Sun Visor...


