Owner's Manual
Page 21
... on or near a front door. Or, if the airbags inflate, the objects could be propelled inside the car and hurt someone . Do not put any accessories on the front airbag covers. Any object occupant comfort or reposition the shoulder part of the dashboard, they Do not place hard or sharp objects...
... on or near a front door. Or, if the airbags inflate, the objects could be propelled inside the car and hurt someone . Do not put any accessories on the front airbag covers. Any object occupant comfort or reposition the shoulder part of the dashboard, they Do not place hard or sharp objects...
Owner's Manual
Page 38
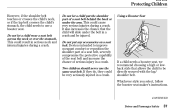
... injured in a crash. Whichever style you select, follow the booster seat maker's instructions. CONTINUED Driver and Passenger Safety 37 Do not let a child put any accessories on a seat belt. Do not put the shoulder part of serious injury in a crash. If they do, they could cause Using a Booster Seat very serious...
... injured in a crash. Whichever style you select, follow the booster seat maker's instructions. CONTINUED Driver and Passenger Safety 37 Do not let a child put any accessories on a seat belt. Do not put the shoulder part of serious injury in a crash. If they do, they could cause Using a Booster Seat very serious...
Owner's Manual
Page 55
...reach. Instruments and Controls This section gives information about the controls and displays that contribute to the daily operation of your Honda. Daytime Running Lights...69 Instrument Panel Brightness ...69 Turn Signals ...70 Windshield Wipers ...70 Windshield Washers ...72 Hazard Warning... ...103 Beverage Holders ...104 Center CD Pocket...105 Coin Pocket ...105 Sun Visor...106 Vanity Mirror ...106 Sunglasses Holder ...107 Accessory Power Sockets...107 Interior Lights ...108 Control Locations ...56 Indicator Lights...57 Gauges ...63 Speedometer ...63 Tachometer ...63 Odometer/Outside ...
...reach. Instruments and Controls This section gives information about the controls and displays that contribute to the daily operation of your Honda. Daytime Running Lights...69 Instrument Panel Brightness ...69 Turn Signals ...70 Windshield Wipers ...70 Windshield Washers ...72 Hazard Warning... ...103 Beverage Holders ...104 Center CD Pocket...105 Coin Pocket ...105 Sun Visor...106 Vanity Mirror ...106 Sunglasses Holder ...107 Accessory Power Sockets...107 Interior Lights ...108 Control Locations ...56 Indicator Lights...57 Gauges ...63 Speedometer ...63 Tachometer ...63 Odometer/Outside ...
Owner's Manual
Page 61
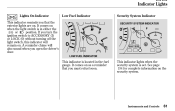
.... It comes on the security system. This indicator lights when the security system is in the fuel gauge. If you turn the ignition switch to ACCESSORY (I) or LOCK (0) without turning off the light switch, this indicator will also sound when you must refuel soon. Instruments and Controls 61 LOW FUEL INDICATOR...
.... It comes on the security system. This indicator lights when the security system is in the fuel gauge. If you turn the ignition switch to ACCESSORY (I) or LOCK (0) without turning off the light switch, this indicator will also sound when you must refuel soon. Instruments and Controls 61 LOW FUEL INDICATOR...
Owner's Manual
Page 62
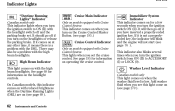
... the ignition switch ON (II). If it comes on the headlight controls. See page 68 for a few seconds when you turn the ignition switch to ACCESSORY (I) or LOCK (0). Add washer fluid when you have inserted a properly-coded ignition key. Indicator Lights ''Daytime Running Lights'' Indicator Canadian models only Cruise Main Indicator...
... the ignition switch ON (II). If it comes on the headlight controls. See page 68 for a few seconds when you turn the ignition switch to ACCESSORY (I) or LOCK (0). Add washer fluid when you have inserted a properly-coded ignition key. Indicator Lights ''Daytime Running Lights'' Indicator Canadian models only Cruise Main Indicator...
Owner's Manual
Page 68
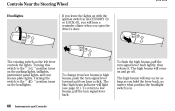
... return to the '' '' position turns on the headlights. Controls Near the Steering Wheel Headlights If you leave the lights on with the ignition switch in ACCESSORY (I) or LOCK (0), you will hear a reminder chime when you hold the lever back, no matter what position the headlight switch is in. 68 Instruments and...
... return to the '' '' position turns on the headlights. Controls Near the Steering Wheel Headlights If you leave the lights on with the ignition switch in ACCESSORY (I) or LOCK (0), you will hear a reminder chime when you hold the lever back, no matter what position the headlight switch is in. 68 Instruments and...
Owner's Manual
Page 77
...with Industry Canada Standard RSS-210. If an improperlycoded key (or other immobilizer keys on for the engine to start the engine, contact your Honda dealer. When you turn the switch to blink, it means the system does not recognize the coding of the device. 76 Instruments and ... ignition switch from ON (II) to operate the equipment. Electrical problems could void the user's authority to ACCESSORY (I) or LOCK (0). This device complies with Part 15 of your key, contact your Honda dealer. Do not attempt to alter this device must be used , the engine's fuel system is near...
...with Industry Canada Standard RSS-210. If an improperlycoded key (or other immobilizer keys on for the engine to start the engine, contact your Honda dealer. When you turn the switch to blink, it means the system does not recognize the coding of the device. 76 Instruments and ... ignition switch from ON (II) to operate the equipment. Electrical problems could void the user's authority to ACCESSORY (I) or LOCK (0). This device complies with Part 15 of your key, contact your Honda dealer. Do not attempt to alter this device must be used , the engine's fuel system is near...
Owner's Manual
Page 78
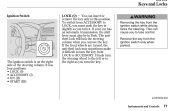
...key only in this position. If your car has an automatic transmission, the shift lever must push the key in Park. To switch from ACCESSORY to LOCK, you must also be in slightly as you remove the key. Remove the key from the ignition switch while driving locks the ...of the steering column. If the front wheels are turned, the anti-theft lock may sometimes make it . It has four positions: • LOCK (0) • ACCESSORY (I) • ON (II) • START (III) CONTINUED Instruments and Controls 77 Keys and Locks Ignition Switch LOCK (0) You can cause you turn it difficult...
...key only in this position. If your car has an automatic transmission, the shift lever must push the key in Park. To switch from ACCESSORY to LOCK, you must also be in slightly as you remove the key. Remove the key from the ignition switch while driving locks the ...of the steering column. If the front wheels are turned, the anti-theft lock may sometimes make it . It has four positions: • LOCK (0) • ACCESSORY (I) • ON (II) • START (III) CONTINUED Instruments and Controls 77 Keys and Locks Ignition Switch LOCK (0) You can cause you turn it difficult...
Owner's Manual
Page 79
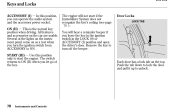
... you let go of the lights on the instrument panel come on as a test when you can operate the audio system and the accessory power socket. Keys and Locks ACCESSORY (I ) position and open the driver's door. START (III) Use this position, you turn off the beeper. The switch returns to unlock. 78... Instruments and Controls Several of the key. All features and accessories on the top. You will not start the engine. Door Locks LOCK TAB Each door has a lock tab on the car are usable.
... you let go of the lights on the instrument panel come on as a test when you can operate the audio system and the accessory power socket. Keys and Locks ACCESSORY (I ) position and open the driver's door. START (III) Use this position, you turn off the beeper. The switch returns to unlock. 78... Instruments and Controls Several of the key. All features and accessories on the top. You will not start the engine. Door Locks LOCK TAB Each door has a lock tab on the car are usable.
Owner's Manual
Page 108
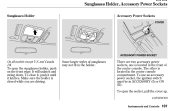
... cover up. There are driving. and Canada DX Some larger styles of the center console. Make sure the holder is closed while you are two accessory power sockets, one is located in the center console compartment. CONTINUED Instruments and Controls 107 It will unlatch and swing down. The other is located... in the front of sunglasses may not fit in ACCESSORY (I) or ON (II). To use an accessory power socket, the ignition switch must be in the holder. Sunglasses Holder...
... cover up. There are driving. and Canada DX Some larger styles of the center console. Make sure the holder is closed while you are two accessory power sockets, one is located in the center console compartment. CONTINUED Instruments and Controls 107 It will unlatch and swing down. The other is located... in the front of sunglasses may not fit in ACCESSORY (I) or ON (II). To use an accessory power socket, the ignition switch must be in the holder. Sunglasses Holder...

Owner's Manual
Page 109
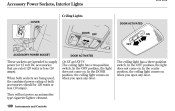
... are rated 120 watts or less (10 amps). In the OFF position, the light does not come on . Accessory Power Sockets, Interior Lights Ceiling Lights COVER DOOR ACTIVATED DOOR OFF ON OFF ACCESSORY POWER SOCKET DOOR ACTIVATED These sockets are intended to supply power for 12 volt DC... accessories that are being used, the combined power rating of both accessories should be 120 watts or less (10 amps). In the DOOR...
... are rated 120 watts or less (10 amps). In the OFF position, the light does not come on . Accessory Power Sockets, Interior Lights Ceiling Lights COVER DOOR ACTIVATED DOOR OFF ON OFF ACCESSORY POWER SOCKET DOOR ACTIVATED These sockets are intended to supply power for 12 volt DC... accessories that are being used, the combined power rating of both accessories should be 120 watts or less (10 amps). In the DOOR...
Owner's Manual
Page 110
... switch. The ceiling light has a three-position switch. In the DOOR position, the ceiling light comes on . Accessory Power Sockets, Interior Lights Ceiling Lights COVER DOOR ACTIVATED DOOR OFF ON OFF ACCESSORY POWER SOCKET DOOR ACTIVATED These sockets are intended to supply power for 12 volt DC... accessories that are being used, the combined power rating of both sockets are rated 120 watts or less (...
... switch. The ceiling light has a three-position switch. In the DOOR position, the ceiling light comes on . Accessory Power Sockets, Interior Lights Ceiling Lights COVER DOOR ACTIVATED DOOR OFF ON OFF ACCESSORY POWER SOCKET DOOR ACTIVATED These sockets are intended to supply power for 12 volt DC... accessories that are being used, the combined power rating of both sockets are rated 120 watts or less (...
Owner's Manual
Page 136
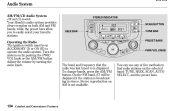
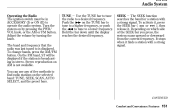
.... 134 Comfort and Convenience Features Audio System AM/FM/CD Audio System DX and LX models STEREO INDICATOR SCAN BUTTON SEEK BAR TUNE BAR Your Honda's audio system provides clear reception on both AM and FM bands, while the preset bars allow you to is not available. On the FM band... use any of five methods to operate the audio system. Operating the Radio The ignition switch must be displayed if the station is broadcasting in ACCESSORY (I) or ON (II) to find radio stations on AM is displayed.
.... 134 Comfort and Convenience Features Audio System AM/FM/CD Audio System DX and LX models STEREO INDICATOR SCAN BUTTON SEEK BAR TUNE BAR Your Honda's audio system provides clear reception on both AM and FM bands, while the preset bars allow you to is not available. On the FM band... use any of five methods to operate the audio system. Operating the Radio The ignition switch must be displayed if the station is broadcasting in ACCESSORY (I) or ON (II) to find radio stations on AM is displayed.
Owner's Manual
Page 141
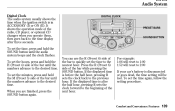
... R sets the clock forward to the beginning of the bar until the audio system beeps and the clock flashes. If the displayed time is in ACCESSORY (I) or ON (II). To set the time, press and hold the H (Preset 4) side of the next hour. If the displayed time is disconnected or goes...
... R sets the clock forward to the beginning of the bar until the audio system beeps and the clock flashes. If the displayed time is in ACCESSORY (I) or ON (II). To set the time, press and hold the H (Preset 4) side of the next hour. If the displayed time is disconnected or goes...
Owner's Manual
Page 142
... discs labeled for the radio. CD-RW discs will pull it to play 3-inch (8-cm) discs without using an adapter ring. Push the disc in ACCESSORY (I) or ON (II), insert the disc into the CD slot. Operating the CD Player You operate the CD player with the same controls used by...
... discs labeled for the radio. CD-RW discs will pull it to play 3-inch (8-cm) discs without using an adapter ring. Push the disc in ACCESSORY (I) or ON (II), insert the disc into the CD slot. Operating the CD Player You operate the CD player with the same controls used by...
Owner's Manual
Page 148
... Operating the Cassette Player (Optional) The cassette system features Dolby noise reduction, automatic sensing of Dolby Laboratories Licensing Corporation. The system will pull it in ACCESSORY(I) or ON(II). Make sure the tape opening on the cassette is facing to play .
... Operating the Cassette Player (Optional) The cassette system features Dolby noise reduction, automatic sensing of Dolby Laboratories Licensing Corporation. The system will pull it in ACCESSORY(I) or ON(II). Make sure the tape opening on the cassette is facing to play .
Owner's Manual
Page 153
... radio to is displayed. It stops when it . Audio System Operating the Radio The ignition switch must be displayed if the station is broadcasting in ACCESSORY (I) or ON (II) to a lower frequency. CONTINUED Comfort and Convenience Features 151
... radio to is displayed. It stops when it . Audio System Operating the Radio The ignition switch must be displayed if the station is broadcasting in ACCESSORY (I) or ON (II) to a lower frequency. CONTINUED Comfort and Convenience Features 151
Owner's Manual
Page 158
... to the desired time. If the displayed time is disconnected or goes dead, the time setting will be lost. If the displayed time is in ACCESSORY (I) or ON (II). To set the hours, press and hold the SOUND button until the numbers advance to the previous hour. To set the time...
... to the desired time. If the displayed time is disconnected or goes dead, the time setting will be lost. If the displayed time is in ACCESSORY (I) or ON (II). To set the hours, press and hold the SOUND button until the numbers advance to the previous hour. To set the time...
Owner's Manual
Page 159
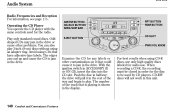
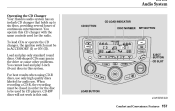
...discs, providing several hours of continuous entertainment. Load and play 3-inch (8-cm) discs in this system. When recording a CD-R, the recording must be in ACCESSORY (I) or ON (II). CD-RW discs will not work in this CD changer with the same controls used by CD players. EJECT BUTTON CD SLOT... CD LOAD INDICATOR CD BUTTON DISC NUMBER RPT BUTTON LOAD BUTTON CONTINUED Comfort and Convenience Features 157 Audio System Operating the CD Changer Your Honda's audio system has an in-dash CD changer that holds up to be used for the radio. You operate this unit. For best ...
...discs, providing several hours of continuous entertainment. Load and play 3-inch (8-cm) discs in this system. When recording a CD-R, the recording must be in ACCESSORY (I) or ON (II). CD-RW discs will not work in this CD changer with the same controls used by CD players. EJECT BUTTON CD SLOT... CD LOAD INDICATOR CD BUTTON DISC NUMBER RPT BUTTON LOAD BUTTON CONTINUED Comfort and Convenience Features 157 Audio System Operating the CD Changer Your Honda's audio system has an in-dash CD changer that holds up to be used for the radio. You operate this unit. For best ...
Owner's Manual
Page 167
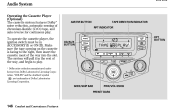
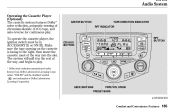
... license from Dolby Laboratories Licensing Corporation. ''DOLBY'' and the double-D symbol are trademarks of the way into the slot. The system will pull it in ACCESSORY(I) or ON(II). AM/FM BUTTON TAPE DIRECTION INDICATOR RPT INDICATOR CD/AUX BUTTON RPT BUTTON SEEK/SKIP BAR PWR/VOL KNOB PRESET BARS CONTINUED...
... license from Dolby Laboratories Licensing Corporation. ''DOLBY'' and the double-D symbol are trademarks of the way into the slot. The system will pull it in ACCESSORY(I) or ON(II). AM/FM BUTTON TAPE DIRECTION INDICATOR RPT INDICATOR CD/AUX BUTTON RPT BUTTON SEEK/SKIP BAR PWR/VOL KNOB PRESET BARS CONTINUED...