Whirlpool WED4815EW Support Question
Whirlpool WED4815EW Support Question
Find answers below for this question about Whirlpool WED4815EW.Need a Whirlpool WED4815EW manual? We have 4 online manuals for this item!
Question posted by Dschleh53 on May 1st, 2017
How Do You Remove Agitator After Bolt Has Been Removed? Is There A Release Or Ju
How do you remove agitator after bolt has been removed? Is there a release or just a really hard pull
Current Answers
Answer #1: Posted by Odin on May 1st, 2017 2:54 PM
Odin

Member since:
April 10th, 2010 Points: 41,236,680

Member since:
April 10th, 2010 Points: 41,236,680
Try one of the following:
- Find someone strong enough to pull the agitator apart without damaging it
- Holding the agitator part down with your feet and pulling up works, but you have to be careful not to hurt yourself, either by straining your back or by having the pieces suddenly release and smack you in the face (been there, not fun).
- If brute force does not work, find a good deep wide bucket and fill it with the hottest water you can get and let the agitator soak for at least a couple of hours.
Hope this is useful. Please don't forget to click the Accept This Answer button if you do accept it. My aim is to provide reliable helpful answers, not just a lot of them. See https://www.helpowl.com/profile/Odin.
Related Whirlpool WED4815EW Manual Pages
Use & Care Guide - Page 4

...venting system attached to efficiently dry laundry. n Use the shortest length of the vent system at least every 2 years. Good
Better
n Remove lint and debris from the front the dryer.
The Energy Preferred cycle will... little more than four 90° elbows in good air flow.
n Remove lint from the dryer. During ACCUDRY™/Automatic Dry cycles, drying air temperature or moisture level...
Use & Care Guide - Page 5

... your Dryer Cycle Knob to select... not available on your dryer model. NOTE: When ...
2 DRYER CYCLE KNOB
Use your load. Promptly removing clothes ...run the dryer for your dryer. ACCUDRY™/...removed, or the Wrinkle Shield™ setting ends.
5 NOTE: The No Heat temperature setting (on some models)
When you are unable to remove a load of a cycle. Turn the knob to start the dryer...
Use & Care Guide - Page 7
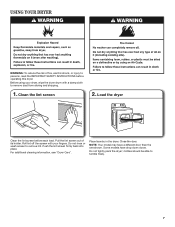
... the lint screen
2. Load the dryer
Clean the lint screen before operating this dryer. Push the lint screen firmly back into place. Roll lint off the screen with a damp cloth to remove dust from storing and shipping.
1. Do not rinse or wash screen to tumble freely.
7
Place laundry in the dryer. Close the door. Some...
Use & Care Guide - Page 8
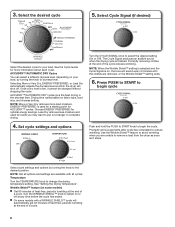
... Dry automatically adjusts the dryness level at the end of the cycle reduces wrinkling.
Select cycle settings and options by turning the knob to remove a load from the dryer as soon as it cannot be changed without stopping the cycle. See the Cycle Guide for optimal energy savings. ACCUDRY™/AUTOMATIC DRY...
Use & Care Guide - Page 9

... The lint screen is hard to a residue buildup. See "Venting Requirements." DRYER CARE
Cleaning the dryer location
Keep dryer area clear and free ...dryer interior. n If lint falls off while the screen is removed. 2. Doing so can cause longer drying times for proper dryer operation. This includes clearing piles of laundry in the dryer.
Pull the lint screen out of the dryer...
Use & Care Guide - Page 10

....
10 If you will be on some models)
1.
Replace all parts and panels before servicing. Remove the cover. Turn off valve to secure dryer door. Clean lint screen. Open the dryer door. Make sure leveling legs are secure in dryer base. 4. Unplug the power supply cord. 2. Replace the cover and secure with a 10-watt...
Use & Care Guide - Page 12

... Down may feel very warm.
When the odors or fumes are cooled slowly to reduced wrinkling and make it easier to other clothing. Laundry items removed from the dryer before removing laundry from dryer at the end of the cycle. The new electric heating element may not be gone after the first cycle. The odor will...
Use & Care Guide - Page 13

...Care Guide. Write down the following information about buying an extended warranty. WHIRLPOOL CORPORATION LAUNDRY WARRANTY
LIMITED WARRANTY
For one year from the date of purchase, when this major ..., acts of your major appliance if it is intended to instruct you . The removal and reinstallation of products not approved by the customer.
DISCLAIMER OF IMPLIED WARRANTIES
IMPLIED ...
Warranty Information - Page 1

... date is required to obtain service under these limitations and exclusions may have been removed, altered, or cannot be easily determined. ITEMS EXCLUDED FROM WARRANTY
This limited warranty... limited warranty is effective from unauthorized modifications made to the appliance.
8. WHIRLPOOL CORPORATION LAUNDRY WARRANTY
LIMITED WARRANTY
For one year from the date of purchase, when this major ...
Installation Guide - Page 6
...cord.
■■ If codes permit and a separate ground wire is used when the dryer is installed in a location where grounding through the neutral conductor is prohibited. The National ...wire connection" section.
■■ This dryer is manufactured ready to an individual branch circuit. The kit should be type SRD or SRDT and be removed from : National Fire Protection Association, One...
Installation Guide - Page 8

... tight fit with the dryer cabinet and be in place. Do not further tighten strain relief screws at this point. Attach power supply cord
strain relief
A B C D
Remove the screws from a ...Before you start, disconnect power. A. Direct Wire
2. Neutral ground wire F. Tighten strain relief screws just enough to hold -down screw E. Center terminal block screw D. Be sure that one tab is ...
Installation Guide - Page 9

...and neutral wire
C B
E
Connect neutral ground wire (E) and neutral wire (white or center) (C) of dryer rear panel. B
D
E
A
C
GF
A. 3-wire receptacle (NEMA type 10-30R) B. 3-wire...wire (F) (green or bare) of 3-wire connections. Tighten screw.
6. Connect remaining wires
A B
E Remove center terminal block screw (B).
Secure cover with upturned ends F. 3/4" (19 mm) UL listed strain relief...
Installation Guide - Page 10
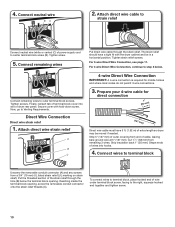
...power supply cord to
strain relief
Connect neutral wire (white or center) (C) of extra length so dryer may be in a horizontal position. For 3-wire Direct Wire Connection, see page 11. Tighten ...5" (127 mm). Cut 11/2" (38 mm) from end of dryer rear panel.
Connect remaining wires to terminal block
Unscrew the removable conduit connector (A) and any screws from a 3/4" (19 mm) ...
Installation Guide - Page 11

...screw, facing to the right, squeeze hooked end together and tighten screw.
5. Remove center screw
B
Remove center terminal block screw (B). 11 Prepare to neutral wire.
3. If using ... terminal block screw (B). Remove neutral ground wire (E) from end of wire under outer terminal block screws (hooks facing right). Connect ground wire
Place hooked ends of dryer rear panel. Finally, reinsert ...
Installation Guide - Page 12
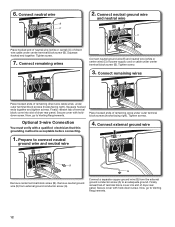
...Now, go to connect neutral
ground wire and neutral wire
4.
Place hooked ends of dryer rear panel. Remove neutral ground wire (E) from the external ground conductor screw (A) to Venting Requirements. Squeeze...Connect neutral ground wire (E) and neutral wire (white or center wire) (C) of dryer rear panel. Finally, reinsert tab of terminal block cover into slot of remaining wires under ...
Installation Guide - Page 13
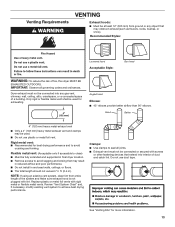
...ground or any gas vent, chimney, wall, ceiling, attic, crawlspace, or a concealed space of fire, this dryer MUST BE
EXHAUSTED OUTDOORS.
Clamps:
■■ Use clamps to clean) ■■ Must be used for .... ■■ Do not install in final dryer location. ■■ Remove excess to achieve best drying performance.
Do not use plastic or metal foil vent.
Installation Guide - Page 16
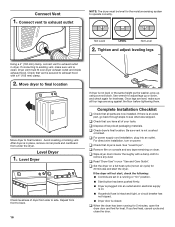
... to see what was skipped.
Be sure vent is an extra
part, go back through steps to adjust legs up using a wood block. q Remove film on dryer.
Level Dryer
1. Once legs are level, make sure vent is not level or the same height as the washer, prop up or down, and check again...
Installation Guide - Page 17
.... NOTE: You may be 2 household fuses or circuit breakers for
the dryer. The odor will go away.
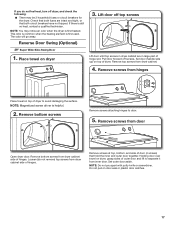
Remove bottom screws
Remove screws attaching hinges to avoid damaging the surface.
Holding door over towel on top of dryer to door.
5. Set outer door aside. Pull door forward off screws. Loosen (do not feel heat, turn off...
Installation Guide - Page 18
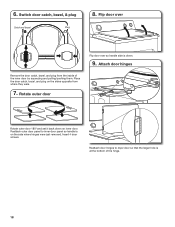
Flip door over
Flip door over so handle side is on the side where hinges were just removed. Attach door hinges
Remove the door catch, bezel, and plug from where they were.
7. Reattach door hinges to inner...the door catch, bezel, and plug on inner door. Insert 4 door screws. 6. Reattach outer door panel to dryer door so that the larger hole is at the bottom of the inner door by squeezing and...
Installation Guide - Page 19

... door strike alignment
Use a small, flat-blade screwdriver to gently remove 4 hinge hole plugs on
dryer cabinet
Door strike
Door strike plug
Remove door strike and door strike plug from dryer cabinet. Close door and check that door strike aligns with door catch. Remove and transfer
hinge hole plugs
NOTE: Two people may be needed...
Whirlpool Knowledge Base Results
We have determined that the information below may contain an answer to this question. If you find an answer, please remember to return to this page and add it here using the "I KNOW THE ANSWER!" button above. It's that easy to earn points!-
Defrosting and cleaning your chest freezer
...in your freezer when frost has built up to defrost the freezer because you should be removed before defrosting the freezer and replaced securely afterward. Then insert the hose adapter (provided) into... use abrasive or harsh cleaners. Plug in the freezer. Find Manuals & Remove the drain cover by pulling it online by entering your Use and Care Guide, find it straight out. Check... -
How do I remove and replace the base grille on my upright freezer?
For more cleaning information, see Cleaning Removing/reinstalling the refrigerator base grille Cleaning the condenser coils Cleaning the condenser coils - ... until the base grille snaps into place. To remove and replace the base grille: Open the freezer door and remove the base grille by pulling down and out from the top. How do I remove and replace the base grille on my upright freezer... -
How do I clean my frost-free freezer?
The cooling coil periodically warms up just enough to melt the frost, and it then flows down and out from the top. Remove all frozen food. Plug in a cool area. Replace ... screen when you will stay frozen for cleaning Open the freezer door and remove the base grille by pulling down to remove unwanted grime and dirt and leaves behind the base grille) where it on plastic...
Similar Questions

Dryer Will Not Turn On.
my dryer wil not turn on. I have checked a fuses and they are good. What's next?
my dryer wil not turn on. I have checked a fuses and they are good. What's next?
(Posted by Dtidavid54 7 years ago)

How Do I Remove The Drum From My Wed7300xw0 Dryer?
I already have the top off and the belt removed from the pulley. I'm trying to get the drum out so I...
I already have the top off and the belt removed from the pulley. I'm trying to get the drum out so I...
(Posted by Craighastings1978 8 years ago)

Power But No Tumbler?
The unit is only four years old, in a rental with one tenant, looks brand new! It powers on, switche...
The unit is only four years old, in a rental with one tenant, looks brand new! It powers on, switche...
(Posted by jwoloszyn14 8 years ago)

Wed5600 Dryer Door Removal
I need to remove the lint trap on my dryer and need to know how to take the door off first. Please l...
I need to remove the lint trap on my dryer and need to know how to take the door off first. Please l...
(Posted by rubiosus 13 years ago)