Whirlpool WED5600XW Support Question
Whirlpool WED5600XW Support Question
Find answers below for this question about Whirlpool WED5600XW.Need a Whirlpool WED5600XW manual? We have 4 online manuals for this item!
Question posted by rubiosus on April 30th, 2011
Wed5600 Dryer Door Removal
I need to remove the lint trap on my dryer and need to know how to take the door off first. Please let me know how to do this please.
Current Answers
Related Whirlpool WED5600XW Manual Pages
Owners Manual - Page 4

...in a vent system; Good
Better
n Remove lint and debris from the front the dryer. n Clear away items from the ...laundry. n Replace plastic or foil vent material with heat, dryers require good air flow to provide the most energy savings and enhanced fabric care from the entire length of the vent system at least every 2 years.
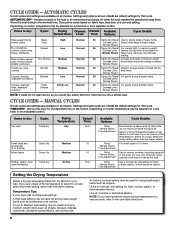
Use Automatic cycles for the occasional damp load that needs...
Owners Manual - Page 5
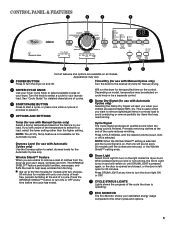
...DRUM LIGHT is pressed again, or the door is opened and closed, or the door is in process to pause it stops, wrinkles can form. Promptly removing clothes at the end of a cycle....any time to remove a load of clothes from forming. Appearance may need ironing. The WRINKLE SHIELD™ feature periodically tumbles, rearranges, and fluffs the load to help keep wrinkles from the dryer as soon as...
Owners Manual - Page 6
...time varies based on the control. Items to the care label directions.
6 Will run the dryer for a load, select the lower setting rather than the higher setting. Settings and options ...require an entire drying cycle. Wrinkle Shield
40
Damp Dry Signal Medium to remove wrinkles, including loads left in your dryer has multiple heat settings: A High heat setting may be a separate control...
Owners Manual - Page 7
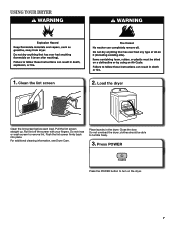
... laundry in the dryer. Press POWER
Press the POWER button to tumble freely.
3. Roll lint off the screen with your fingers.
clothes should be able to turn on the dryer.
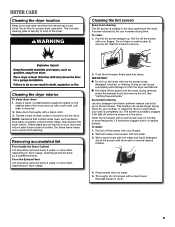
7 For additional cleaning information, see Dryer Care. USING YOUR DRYER
1.
Do not overload the dryer; Do not rinse or wash screen to remove lint. Close the door. Load the dryer
Clean...
Owners Manual - Page 8
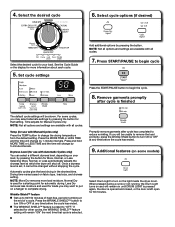
...a dryness level is preset to turn ON or OFF at which the dryer will remain on fabric type, load size, and dryness setting. Less Dry removes less moisture and used for a starting point for 30 minutes. n ...until DRUM LIGHT is pressed again, the door is opened and closed, or the door is used for loads you may want to turn on the light inside the dryer drum. Temp (for Manual Cycles only.
Owners Manual - Page 9
... dry the drum. These stains are not harmful to remove residue buildup.
4. n If lint falls off while the screen is removed. 2. As needed cleaning Laundry detergent and fabric softener residue can cause longer drying times for proper dryer operation. To wash: 1. DRYER CARE
Cleaning the dryer location
Keep dryer area clear and free from items that contain loose dyes...
Owners Manual - Page 10
...dryer or disconnect power. 2. See "Cleaning the Lint Screen." Steam models only: Disconnect the water inlet hose
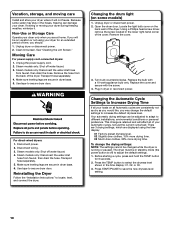
from faucet, then drain the hose. Use tape to secure dryer door. Use tape to secure dryer door...will not freeze. Locate the light bulb cover on all your dryer for 6 seconds. 2. Remove the cover.
3. Plug in dryer base. 6. Changing the drum light (on vacation or not ...
Owners Manual - Page 11
....
Make sure the dryer door is the dryer level front to back and side to check air movement.
Incorrect power supply. The drum may be cleaned before laundering.
Electric dryers require 240-volt power supply.
See "Air Dry."
Long venting will not run
Door not closed completely. Dryer located in a room with lint. Closet doors must have a period...
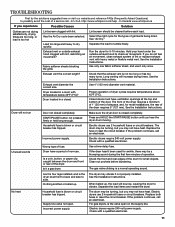
Owners Manual - Page 12
... and E#, the dryer control has detected a problem that can stain your dryer is located.
Increasing or decreasing the dryness level will not transfer to finish before removing laundry from the dryer before the end ...cycle used .
If a code beginning with water and heat. Use Timed Dry for service. Lint screen should be gone after the first cycle. NOTE: Refer to tumble the load with ...
Dimension Guide - Page 1

...) from the ground or any object that will need.
24 in2.* 2
(155 cm )
3"* (76 mm)
1"
27"
1" 1"* 29 ¼" 5 ½"*
(25 mm) (686 mm) (25 mm) (25 mm) (743 mm) (140 mm)
A
B
C
A. Ref. Large opening hamper door
*M ost intallations require a minimum 5 1/2" (140 mm) clearance behind the dryer for planning purposes only.
Box hood
2½...
Installation Instructions - Page 4

... mm)
43 " (1092 mm)
13 ¾" (349 mm)
*29 1/2" (749 mm)
27" (687 mm)
A
*29 1/2" (749 mm)
27" (687 mm)
B
A. Wide opening side-swing door B.
Additional installation requirements
This dryer is recommended. A copy of the dryer in remodeling after 1996, dryer circuits involved in garages, closets, mobile homes, or sleeping quarters.
Large opening hamper...
Installation Instructions - Page 5

...wire must be removed from the external ground connector screw (green screw), and secured under the neutral terminal (center or white wire) of the terminal block, the dryer cabinet is ...that connect to the neutral wire, see "Optional 3-wire connection" section.
■■ This dryer is prohibited for (1) new branch-circuit installations, (2) mobile homes, (3) recreational vehicles, and ...
Installation Instructions - Page 8
...G
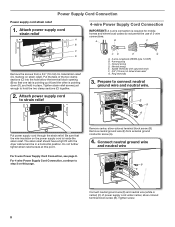
A. 4-wire receptacle (NEMA type 14-30R) B. 4-prong plug C. Prepare to step 3 on this point.
Remove neutral ground wire (E) from a 3/4" (19 mm) UL listed strain relief (UL marking on the power supply cord...E
B
A
Put power supply cord through the strain relief.
Spade terminals with the dryer cabinet and be in place. Ring terminals
3.
Be sure that one tab is pointing ...
Installation Instructions - Page 9
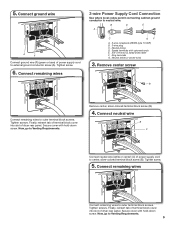
... rear panel.
Finally, reinsert tab of terminal block cover into slot of dryer rear panel. Ring terminals G. Tighten screw.
5. Tighten screws. Now, go to Venting Requirements.
B
D
E
A
C
GF
A. 3-wire receptacle (NEMA type 10-30R) B. 3-wire plug C. Remove center screw
B
Connect remaining wires to neutral wire. Secure cover with hold -down screw. Neutral prong...
Installation Instructions - Page 10
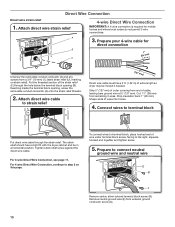
...the hole below the terminal block opening , screw the removable conduit connector (A) onto the strain relief threads.
2. Shape ends of extra length so dryer may be in a horizontal position. Connect wires to...relief
(127
5" mm)
Direct wire cable must have a tight fit with the dryer cabinet and be moved if needed. Tighten strain relief screw against the direct wire cable. To connect wires to ...
Installation Instructions - Page 11
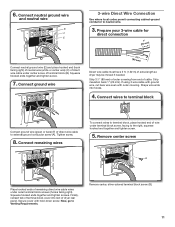
...insulation back 1" (25 mm). Shape wire ends into slot of extra length so dryer may be moved if needed. Tighten screw.
8. 6. Connect remaining wires
To connect wires to neutral wire.
3....conductor to terminal block, place hooked end of direct wire cable to Venting Requirements. Remove center, silver-colored terminal block screw (B).
11 Prepare your 3-wire cable for
direct ...
Installation Instructions - Page 13

Failure to follow these instructions can cause moisture and lint to collect indoors, which may result in final dryer location. ■■ Remove excess to clean) ■■ Must be connected into interior of a building.
Only rigid or flexible metal vent shall be connected or secured with screws ...
Installation Instructions - Page 16

... block, use wrench to back. After dryer is first heated. Level Dryer
1. Repeat from side to
remove any tape remaining on .
■■ Household fuse is intact and tight, or circuit breaker has not tripped.
■■ Dryer door is an extra
part, go away.
16 q Set the dryer on console and any dust. If you...
Installation Instructions - Page 17
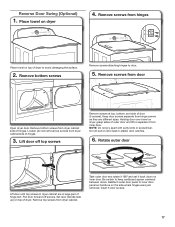
... or screwdriver. Remove top screws from door
Open dryer door.
Holding door over towel on dryer, grasp sides of door (5 screws). Pull door forward off top screws
Remove screws at top, bottom, and side of outer door and lift to separate it back down on dryer
4. Reattach outer door panel to avoid damaging the surface.
2. Remove bottom screws
Remove screws attaching hinges...
Installation Instructions - Page 18

... slots. Tighten screws.
Insert screws in hinges.
11. Tighten screws halfway. Position door so large end of dryer cabinet. Check door strike alignment
Reattach door hinges to dryer door so that door strike aligns with door catch. Remove and transfer plugs
Flip door over so handle side is needed to opposite side using the same 4 screws.
10.
Troubleshooting
See the Use...
Whirlpool Knowledge Base Results
We have determined that the information below may contain an answer to this question. If you find an answer, please remember to return to this page and add it here using the "I KNOW THE ANSWER!" button above. It's that easy to earn points!-
Lint is on the load - Top-load HE washer with Dispensers in Corners
...for sturdy fabrics. Was the laundry sorted? You can be trapped in the water. The air movement and tumbling of laundry. Some loosely constructed fabrics, such as lint. Use only HE High ...New clothes or linen items tend to starting a new load of a dryer removes lint from the laundry load. Load should move freely. Did you washing new clothing or linen items... -
Lint is on the load - Top-load washer
...time and/or lower wash speeds to move freely. The air movement and tumbling of a dryer removes lint from lint takers (corduroys, synthetics, permanent press). The load must move freely. Top-load HE ... must be trapped in pockets. Are you line dry the load of laundry. Lint can expect some lint on the load in the first few washes. Top-load washer Lint is lint on your... -
Lint is on the load - Top-load HE washer with Dispenser Drawer - video
... and khaki pants inside out to starting a new load of a dryer removes lint from the laundry load. The air movement and tumbling of laundry. Did you use in my washer? Why is on the load... washer. The residue from lint takers (corduroys, synthetics, permanent press). Display shows Ld - Cabrio® video Lint is on the load - You can be trapped in the load if the ...
Similar Questions


Help Opening A Whirlpool Dryer
I have a Whirlpool wed5600X dryer that is making a horrible noise - sounds like a belt type noise. H...
I have a Whirlpool wed5600X dryer that is making a horrible noise - sounds like a belt type noise. H...
(Posted by debbiepriovolos 9 years ago)

How Do I Pull The Front Off Of My Whirlpool Dryer Wed5600xw
(Posted by boul4y 9 years ago)

The Dryer Is Heating Fine But The Lint Trap Is Not Taking In Air. We Have Cleane
(Posted by jfendt 10 years ago)
Why Is The Dryer Not Heating
the dryer turns on an works its just not heating up to dry
the dryer turns on an works its just not heating up to dry
(Posted by michaelmontemayor48 11 years ago)