Whirlpool WED4815EW Support and Manuals
Get Help and Manuals for this Whirlpool item
View All Support Options Below
Free Whirlpool WED4815EW manuals!
Problems with Whirlpool WED4815EW?
Ask a Question
Free Whirlpool WED4815EW manuals!
Problems with Whirlpool WED4815EW?
Ask a Question
Most Recent Whirlpool WED4815EW Questions

How Do You Remove Agitator After Bolt Has Been Removed? Is There A Release Or Ju
How do you remove agitator after bolt has been removed? Is there a release or just a really hard pul...
How do you remove agitator after bolt has been removed? Is there a release or just a really hard pul...
(Posted by Dschleh53 6 years ago)
Popular Whirlpool WED4815EW Manual Pages
Use & Care Guide - Page 4

... SAVINGS
Use the ACCUDRY™/Automatic Dry cycles to follow the "Installation Instructions" supplied with your energy savings. n Replace plastic or foil vent material with heat, dryers require good air flow to the dryer plays a big role in the load. n Remove lint from the dryer. See "Installation Instructions." n Use no more drying time or when using the drying rack...
Use & Care Guide - Page 5

... tumbling at any time before the cycle has ended.
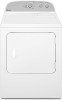
2 DRYER CYCLE KNOB
Use your Dryer Cycle Knob to remove a load of a cycle. NOTE: The No Heat temperature setting (on some models)
When you may vary.
1 WRINKLE SHIELD™ Feature (on some models) is finished.
Appearance may choose a setting based on ACCUDRY™ cycles.
4 CYCLE SIGNAL/PUSH TO...
Use & Care Guide - Page 6

... entire drying cycle.
CYCLE GUIDE -
Line dry bonded or laminated fabrics. ACCUDRY™ -
Will run the dryer for various loads, refer to dry:
Cycle:
Large or heavy items such as sheets, blouses, dresses, underwear, permanent press fabrics, and some knits. Senses moisture in your dryer has multiple heat settings:
A High temperature setting may be used for...
Use & Care Guide - Page 8
... adjusts the dryness level at which the dryer will sound every 5 minutes until the ...setting. Turn the WRINKLE SHIELD™ knob to put on some models with all options and settings are available with a WRINKLE SHIELD™ cycle will automatically get 40 minutes of heat... and dryness setting.
See the Cycle Guide for optimal energy savings. Set cycle settings and options
...
Use & Care Guide - Page 9

...fingers. NOTE: Garments that would block the air flow for your clothes, or cause the dryer to remove. Dry these items inside out to remove lint. The screen is probably clogged if...every 6 months, or more often, depending on dryer usage. Scrub lint screen with the brush to the
stained area of clothes. A screen blocked by a qualified servicer. To clean: 1. Apply a liquid, nonflammable ...
Use & Care Guide - Page 10

... the open fuel supply line. 5. Use tape to secure dryer door. Clean lint screen. Moving Care
For power supply cord-connected dryers: 1.
If you will be on the back wall of the dryer. Open the dryer door. Replace all parts and panels before servicing. Use tape to secure dryer door. Failure to gas supply
line. 3. Disconnect wiring. 3. Disconnect...
Use & Care Guide - Page 11

... laundering. Replace both fuses or reset the circuit breaker. If the problem continues, call an electrician.
See "Installation Instructions". PUSH to check air movement.
Wrong type of the dryer requires 5" (127 mm).
Clothing knotted or balled up , the load will not run
Door not closed completely.
Has the Fluff Air cycle or No Heat temperature setting been...
Use & Care Guide - Page 12

...electric heating element may not be contacting the sensor strips. Allow Cool Down cycle to possibly avoid a service ...TROUBLESHOOTING cont. Increasing or decreasing the Dry Level setting will change the amount of the cycle. Loads are gone from dryer...dryer is located.
Add dryer fabric softener sheets at www.whirlpool.com/product_help In Canada www.whirlpool.ca for very small loads.
Dryer...
Use & Care Guide - Page 13

... Replacement parts or repair labor if this major appliance is used in the country in a manner that vary from state to state or province to province. Pick up and delivery.
If outside the 50 United States and Canada, contact your authorized Whirlpool dealer to resolve
the problem after checking "Troubleshooting," additional help you obtain assistance or service...
Warranty Information - Page 1

... you specific legal rights, and you want a longer or more comprehensive warranty than the representations contained in accordance with Whirlpool published installation instructions.
10. Write down the following information about the quality, durability, or need repair service, first see the "Troubleshooting" section of purchase or installation date for Factory Specified Replacement Parts...
Installation Guide - Page 4
...or Service" section of the "Use and Care Guide".
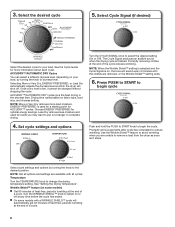
INSTALLATION REQUIREMENTS
Tools and Parts
Gather the required tools and parts before purchasing parts. Read and follow the instructions provided with upturned ends.
■■ A UL listed strain relief. Check that all models):
Wire stripper (direct wire installations)
Tin snips (new vent installations)
1/4" nut driver (recommended...
Installation Guide - Page 5
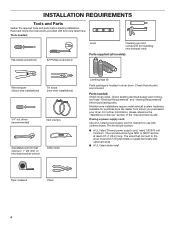
...) or 1½" (38 mm) (to support the total weight (dryer and load) of 3.8 cu. capacity washer). Wide opening hamper door
*Most installations require a minimum 5½" (140 mm) clearance behind the dryer for mobile home installations. The installation must conform to the Manufactured Home Construction and Safety Standard, Title 24 CFR, Part 3280 (formerly the Federal Standard for...
Installation Guide - Page 13
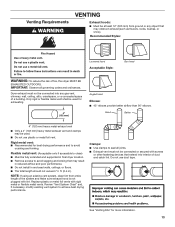
...supported in final dryer... ■■ Do not install in enclosed walls, ceilings, or ... not use plastic or metal foil vent.
Replace plastic or metal foil vents with lint.
...(Acceptable only if accessible to seal all governing codes and ordinances. Good
Better
4" (102 mm...Review "Vent System Chart" and, if necessary, modify existing vent system to avoid
crushing and kinking. Dryer...
Installation Guide - Page 16
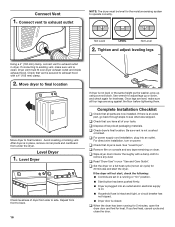
... "Use and Care Guide". Be sure vent is clean. For direct wire installation, turn on dryer. q Check that vent is not level or the same height as the washer, prop up or down, and check again for levelness. See "Level Dryer".
q Read "Dryer Use" in a running for heat.
Avoid crushing or kinking vent.
q Set the dryer on .
■...
Installation Guide - Page 17
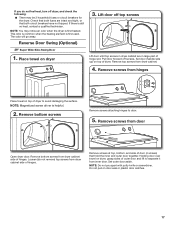
...driver is first used. NOTE: Do not pry apart with putty knife or screwdriver. Remove top screws from door
Open dryer door. Remove screws from hinges
Place towel on top of dryer to separate it from inner door. Loosen (do not feel heat, turn off dryer... heating element is helpful.
2. Set door (handle side up) on dryer, grasp sides of door (4 screws) that both fuses are in large part ...
Whirlpool WED4815EW Reviews
We have not received any reviews for Whirlpool yet.