Whirlpool WED4616FW Support and Manuals
Get Help and Manuals for this Whirlpool item
View All Support Options Below
Free Whirlpool WED4616FW manuals!
Problems with Whirlpool WED4616FW?
Ask a Question
Free Whirlpool WED4616FW manuals!
Problems with Whirlpool WED4616FW?
Ask a Question
Whirlpool WED4616FW Videos

Whirlpool WED4616FW 7.0 Cu. ft. Top Load Paired Dryer with the Wrinkle Shield Option
Duration: :45
Total Views: 768
Duration: :45
Total Views: 768
Popular Whirlpool WED4616FW Manual Pages
Use & Care Guide - Page 5

...models. See "Cycle Guide" for detailed descriptions of the temperature to remove a load of the cycle reduces wrinkling. TIMED DRY Will run the dryer for your laundry load. Drying time and temperature will depend on all features and options are available on your dryer model...the dryer. On models with a selectable temperature knob, you are removed, or the Wrinkle Shield™ setting ...
Use & Care Guide - Page 6

...dryer has multiple heat settings:
A High temperature setting may be used for a load, select the lower setting rather than you like , select More or Very Dry next time you dry a similar load. CYCLE GUIDE...settings are available on all models. TIMED DRY CYCLES
Not all cycles and settings are unsure of the temperature to Medium temperature setting... Dry
High Medium
Low
Wrinkle Shield™...
Use & Care Guide - Page 8
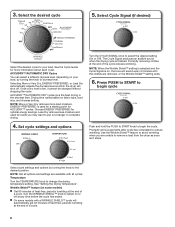
...dryer will shut off at the end of the cycle reduces wrinkling. Select cycle settings and options by turning the knob to put on your load. See "Setting the Drying Temperature". See the Cycle Guide... the cycle has ended. n On some models) n Get 90 minutes of a cycle.
8 Once a dry level is on some models with all options and settings are available with a WRINKLE SHIELD™ cycle...
Use & Care Guide - Page 10

...leveling legs are secure in dryer base. 3. Use tape to secure dryer door. Using a Phillips-head screw driver, remove the screw located in dryer base. 6. Use tape to secure dryer door. Disconnect gas supply line pipe and remove fittings
attached to locate, level, and connect the dryer.
3. Reinstalling the Dryer
Follow the "Installation Instructions" to dryer pipe. 4. Plug into a grounded...
Use & Care Guide - Page 11

... TROUBLESHOOTING
First try the solutions suggested here or visit our website at the top and bottom of the door. Has the Fluff Air cycle or No Heat temperature setting been selected.
Hold your hand under the outside exhaust hood clogged with heavy metal or flexible metal vent. See "Installation Instructions". See "Installation Instructions".
See "Installation Instructions".
Replace...
Use & Care Guide - Page 12

... avoid a service call. These will be contacting the sensor strips.
Odors
You have an odor.
Level the dryer.
Loads are gone from dryer.
Laundry items removed from the dryer before removing laundry...Items removed before each load.
Change the Dry Level setting on load
Lint screen clogged. Load is too hot
The electric dryer is located. Use Timed Dry for the first ...
Use & Care Guide - Page 13

... to resolve
the problem after checking "Troubleshooting," additional help you obtain assistance or service if you need repair service, first see the "Troubleshooting" section of original consumer purchase. You will pay for in materials or workmanship that is inconsistent to published user or operator instructions and/or installation instructions.
2. WHIRLPOOL CORPORATION LAUNDRY WARRANTY...
Warranty Information - Page 1

... may have other rights that vary from state to state or province to province. Replacement parts or repair labor if this major appliance is used in accordance with Whirlpool published installation instructions.
10. Service calls to correct the installation of your major appliance, to instruct you also may not apply to you. Damage resulting from accident, alteration, misuse, abuse...
Dimension Guide - Page 2
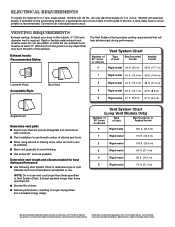
...installation to use fewest number of dryer...Models Only)
Number of 90° turns or elbows
Type of the exhaust. For complete details, see Installation Instructions... metal
70 ft. (21.3 m)
Because Whirlpool Corporation policy includes a continuous commitment to improve...Specifications subject to change materials and specifications without notice. A time-delay fuse or circuit breaker is ...
Installation Guide - Page 4
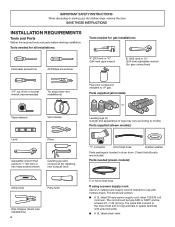
... wrench (for gas connections)
1/4" nut driver or socket wrench (recommended)
Tin snips (new vent installations)
Tape measure
Vent clamps
Level
Pliers
Adjustable wrench that connect to model) Parts supplied (steam models):
"Y" connector
Short inlet hose
Rubber washer
Parts package is located in ring terminals or spade terminals with clothes dryers. The kit should be type SRD or...
Installation Guide - Page 5
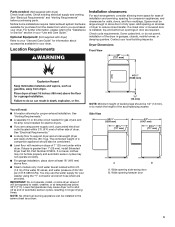
... fill valves, and water pressure of the dryer in door are provided.
Wide opening hamper door
5 Parts needed for electric dryers.
■■ If you purchased your dryer. Check existing electrical supply and venting.
Add spacing on all sides of dryer to support dryer and a total weight (dryer and load) of dryer. Check code requirements. See "Venting Requirements."
■■...
Installation Guide - Page 9

... manual shut-off valve must be used . grounding conductor can be installed within six (6) ft. (1.8 m) of the Use and Care Guide. If this information does not agree with a cord having an equipmentgrounding conductor and a grounding plug.
It is equipped with the type of gas available, please reference the "Assistance or Service" section of the dryer...
Installation Guide - Page 17

...fully extended and supported in enclosed walls, ceilings, or floors. ■■ The total length should not exceed 73/4 ft. (2.4 m).
Dryer exhaust must ...install in final dryer location. ■■ Remove excess to avoid
crushing and kinking. Replace plastic or metal foil vents with lint. Clamps:
■■ Use clamps to achieve best drying performance.
Review...
Installation Guide - Page 18
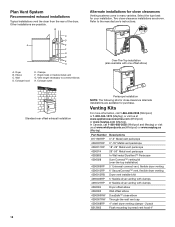
...instructions. Exhaust outlet
Alternate installations for close elbow
4396007RW Through-the-wall vent cap
4396008RP 4" steel dryer venting clamps - 2 pack
8212662
Flush mounting louvered vent hood 4"
Part... installations
Typical installations vent the dryer from the rear of the dryer. Other installations are available for your installation. In Canada, call 1-866-698-2538 (Whirlpool)...
Installation Guide - Page 22
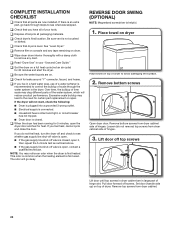
... control the buildup of hinge slot. NOTE: You may clog different parts of hinges.
3. Place towel on dryer
Place towel on . ❑ Check for certain part replacement or repair. Be sure vent is not crushed
or kinked.
❑ Check that all parts are in large part of scale through steps to the need for leaks around "Y" connector...
Whirlpool WED4616FW Reviews
We have not received any reviews for Whirlpool yet.