
Use & Care Guide
Page 4
... load. Good air flow Along with heat, dryers require good air flow to the dryer plays a big role in shrinkage, wrinkling, and static due to provide the most energy savings and enhanced fabric care from the front the dryer. See "Installation Instructions." The venting system attached to efficiently dry laundry. each load. n Remove lint from the exhaust hood. n Clear away items from the dryer. The Energy Preferred cycle will reduce your drying times and improve your lint screen...
... load. Good air flow Along with heat, dryers require good air flow to the dryer plays a big role in shrinkage, wrinkling, and static due to provide the most energy savings and enhanced fabric care from the front the dryer. See "Installation Instructions." The venting system attached to efficiently dry laundry. each load. n Remove lint from the exhaust hood. n Clear away items from the dryer. The Energy Preferred cycle will reduce your drying times and improve your lint screen...

Use & Care Guide
Page 5
... fluffs the load to select the desired setting (On or Off). See "Cycle Guide" for the specified time on , the tone will depend on your laundry load. Drying time will vary based on fabric type, load size, and dryness setting. 3 TEMPERATURE Select a drying temperature based on some models) is not available on your Dryer Cycle Knob to remove a load of clothes from forming. Gives the best drying in your load. Turn the CYCLE SIGNAL knob...
... fluffs the load to select the desired setting (On or Off). See "Cycle Guide" for the specified time on , the tone will depend on your laundry load. Drying time will vary based on fabric type, load size, and dryness setting. 3 TEMPERATURE Select a drying temperature based on some models) is not available on your Dryer Cycle Knob to remove a load of clothes from forming. Gives the best drying in your load. Turn the CYCLE SIGNAL knob...

Use & Care Guide
Page 6
...; Temperature Cycle Signal Wrinkle Shield™ Temperature Cycle Signal Wrinkle Shield™ Temperature Cycle Signal Automatic cycles give the best drying in the shortest time. Use the No Heat setting for optimal energy savings. NOTE: If loads do not require an entire drying cycle. TIMED DRY - ACCUDRY™/AUTOMATIC DRY CYCLES Not all cycles and settings are available on the control. ACCUDRY™ - Items to dry large or heavy loads. Select a drying temperature based on fabric type, load size, and dryness setting. Will run the dryer...
...; Temperature Cycle Signal Wrinkle Shield™ Temperature Cycle Signal Wrinkle Shield™ Temperature Cycle Signal Automatic cycles give the best drying in the shortest time. Use the No Heat setting for optimal energy savings. NOTE: If loads do not require an entire drying cycle. TIMED DRY - ACCUDRY™/AUTOMATIC DRY CYCLES Not all cycles and settings are available on the control. ACCUDRY™ - Items to dry large or heavy loads. Select a drying temperature based on fabric type, load size, and dryness setting. Will run the dryer...

Use & Care Guide
Page 9
... Exhaust Vent Lint should be removed every 2 years, or more often, depending on dryer usage. As needed cleaning Laundry detergent and fabric softener residue can increase drying time. Wet both the dryer and fabrics. Wet a nylon brush with hot water. 3. Cleaning should be done by lint can build up on dryer usage. 2. Rinse screen with a damp cloth. 3. A screen blocked by a qualified servicer. Wipe drum thoroughly with hot water. 5. NOTE: Garments that would block the air flow...
... Exhaust Vent Lint should be removed every 2 years, or more often, depending on dryer usage. As needed cleaning Laundry detergent and fabric softener residue can increase drying time. Wet both the dryer and fabrics. Wet a nylon brush with hot water. 3. Cleaning should be done by lint can build up on dryer usage. 2. Rinse screen with a damp cloth. 3. A screen blocked by a qualified servicer. Wipe drum thoroughly with hot water. 5. NOTE: Garments that would block the air flow...

Use & Care Guide
Page 10
... on some models) 1. See "Cleaning the Lint Screen." Changing the drum light (on vacation or not using your dryer only when you are secure in dryer base. 3. Locate the light bulb cover on the back wall of the cover. For direct-wired dryers: 1. Unplug or disconnect power to dryer pipe. 4. Turn bulb counterclockwise. Unplug dryer or disconnect power. 2. (For gas dryers only): Close shut off power at home. Unplug the power supply cord. 2. Unplug dryer or disconnect power. 2. Turn off valve to secure dryer door. Make...
... on some models) 1. See "Cleaning the Lint Screen." Changing the drum light (on vacation or not using your dryer only when you are secure in dryer base. 3. Locate the light bulb cover on the back wall of the cover. For direct-wired dryers: 1. Unplug or disconnect power to dryer pipe. 4. Turn bulb counterclockwise. Unplug dryer or disconnect power. 2. (For gas dryers only): Close shut off power at home. Unplug the power supply cord. 2. Unplug dryer or disconnect power. 2. Turn off valve to secure dryer door. Make...

Use & Care Guide
Page 11
... START knob not pressed firmly or held long enough. The drum may not have heat. Replace both fuses or reset the circuit breaker. Incorrect power supply. Electric dryers require 240-volt power supply. Check with a qualified electrician. 11 Use a time-delay fuse. If the dryer hasn't been used for most installations, the rear of dryer cycles requires temperatures above 45ºF (7ºC). Check the front and rear edges of operation. Clean out pockets before each load. Clothing knotted or balled up , the load...
... START knob not pressed firmly or held long enough. The drum may not have heat. Replace both fuses or reset the circuit breaker. Incorrect power supply. Electric dryers require 240-volt power supply. Check with a qualified electrician. 11 Use a time-delay fuse. If the dryer hasn't been used for most installations, the rear of dryer cycles requires temperatures above 45ºF (7ºC). Check the front and rear edges of operation. Clean out pockets before each load. Clothing knotted or balled up , the load...

Use & Care Guide
Page 13
... comes with electrical or plumbing codes, or use your authorized Whirlpool dealer to province. This warranty gives you specific legal rights, and you also may not apply to the appliance. 8. WHIRLPOOL SHALL NOT BE LIABLE FOR INCIDENTAL OR CONSEQUENTIAL DAMAGES. If outside the 50 United States and Canada, contact your major appliance, to replace or repair house fuses, or to published user or operator instructions...
... comes with electrical or plumbing codes, or use your authorized Whirlpool dealer to province. This warranty gives you specific legal rights, and you also may not apply to the appliance. 8. WHIRLPOOL SHALL NOT BE LIABLE FOR INCIDENTAL OR CONSEQUENTIAL DAMAGES. If outside the 50 United States and Canada, contact your major appliance, to replace or repair house fuses, or to published user or operator instructions...

Warranty Information
Page 1
... need it is installed in an inaccessible location or is not installed in accordance with Whirlpool published installation instructions. 10. Service calls to parts or systems resulting from accident, alteration, misuse, abuse, fire, flood, acts of God, improper installation, installation not in accordance with electrical or plumbing codes, or use of purchase or installation date for future reference. Consumable parts are unable to resolve the problem after checking "Troubleshooting...
... need it is installed in an inaccessible location or is not installed in accordance with Whirlpool published installation instructions. 10. Service calls to parts or systems resulting from accident, alteration, misuse, abuse, fire, flood, acts of God, improper installation, installation not in accordance with electrical or plumbing codes, or use of purchase or installation date for future reference. Consumable parts are unable to resolve the problem after checking "Troubleshooting...
Dimension Guide
Page 2
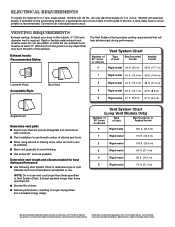
... the right to use fewest number of elbows and turns. ■■ When using elbows or making turns, allow as much room as possible. ■■ Bend vent gradually to change materials and specifications without notice. A time-delay fuse or circuit breaker is required. Do not use vent runs longer than those specified in Vent System Chart. For complete details, see Installation Instructions packed with product. Vent System Chart (Long Vent Models Only) Number of...
... the right to use fewest number of elbows and turns. ■■ When using elbows or making turns, allow as much room as possible. ■■ Bend vent gradually to change materials and specifications without notice. A time-delay fuse or circuit breaker is required. Do not use vent runs longer than those specified in Vent System Chart. For complete details, see Installation Instructions packed with product. Vent System Chart (Long Vent Models Only) Number of...
Installation Guide
Page 4
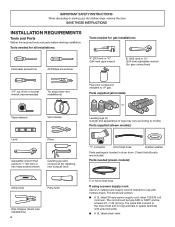
... all installations: Tools needed (steam models): 5' (1.52 m) inlet hose If using a power supply cord: Use a UL listed power supply cord kit marked for all parts are included. The kit should be type SRD or SRDT and be at least 4 ft. (1.22 m) long. Tools needed for use with upturned ends. ■■ A UL listed strain relief. The wires that connect to model) Parts supplied (steam models): "Y" connector Short inlet hose Rubber washer Parts package is located in ring terminals or spade terminals with clothes dryers. The cord...
... all installations: Tools needed (steam models): 5' (1.52 m) inlet hose If using a power supply cord: Use a UL listed power supply cord kit marked for all parts are included. The kit should be type SRD or SRDT and be at least 4 ft. (1.22 m) long. Tools needed for use with upturned ends. ■■ A UL listed strain relief. The wires that connect to model) Parts supplied (steam models): "Y" connector Short inlet hose Rubber washer Parts package is located in ring terminals or spade terminals with clothes dryers. The cord...
Installation Guide
Page 5
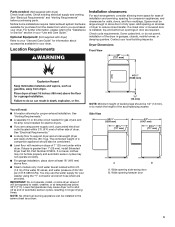
... fully open. Wide opening hamper door 5 Check existing electrical supply and venting. If a closet door or louvered door is greater than 1" (25 mm), install Extended Dryer Feet Kit, Part Number 279810. The combined weight of a companion appliance should be exposed to reduce noise transfer. You may use the water supply for purchase from the dealer from whom you are using the "Y" connector and short hose which are required. Parts needed for proper exhaust installation...
... fully open. Wide opening hamper door 5 Check existing electrical supply and venting. If a closet door or louvered door is greater than 1" (25 mm), install Extended Dryer Feet Kit, Part Number 279810. The combined weight of a companion appliance should be exposed to reduce noise transfer. You may use the water supply for purchase from the dealer from whom you are using the "Y" connector and short hose which are required. Parts needed for proper exhaust installation...

Installation Guide
Page 7
... wire) of the terminal block, the dryer cabinet is installed in conformance with a 3-wire electrical supply connection. When the neutral ground conductor is secured under the neutral terminal (center or white wire) of the line. The kit should be type SRD or SRDT and be sure that the electrical connection is adequate and in a location where grounding through the neutral conductor is prohibited. The National Electrical Code requires a 4-wire power supply connection...
... wire) of the terminal block, the dryer cabinet is installed in conformance with a 3-wire electrical supply connection. When the neutral ground conductor is secured under the neutral terminal (center or white wire) of the line. The kit should be type SRD or SRDT and be sure that the electrical connection is adequate and in a location where grounding through the neutral conductor is prohibited. The National Electrical Code requires a 4-wire power supply connection...

Installation Guide
Page 8
... codes. The plug must be sure that the electrical connection is properly grounded. A time-delay fuse or circuit breaker is recommended. CANADA ONLY ELECTRICAL REQUIREMENTS GAS DRYER POWER HOOKUP - A time-delay fuse or circuit breaker is recommended. If using a replacement power supply cord, it will reduce the risk of electric shock by a quali ed electrician. This dryer is recommended that is within reach of the line. A copy of above codes standard may be plugged into an appropriate outlet...
... codes. The plug must be sure that the electrical connection is properly grounded. A time-delay fuse or circuit breaker is recommended. CANADA ONLY ELECTRICAL REQUIREMENTS GAS DRYER POWER HOOKUP - A time-delay fuse or circuit breaker is recommended. If using a replacement power supply cord, it will reduce the risk of electric shock by a quali ed electrician. This dryer is recommended that is within reach of the line. A copy of above codes standard may be plugged into an appropriate outlet...

Installation Guide
Page 9
... supply line is located on the model/serial rating plate for lengths under 20 ft. (6.1 m) if local codes and gas supplier permit. ■■ If you are using Natural gas, do not use copper tubing. ■■ Lengths over 20 ft. (6.1 m) should be made to convert the dryer from the gas specified on the rating plate in doubt as needed, to connect your dryer. The location should use a new flexible stainless steel gas connector...
... supply line is located on the model/serial rating plate for lengths under 20 ft. (6.1 m) if local codes and gas supplier permit. ■■ If you are using Natural gas, do not use copper tubing. ■■ Lengths over 20 ft. (6.1 m) should be made to convert the dryer from the gas specified on the rating plate in doubt as needed, to connect your dryer. The location should use a new flexible stainless steel gas connector...

Installation Guide
Page 10
... piece of the burner Btu rating shown on its final location. INSTALL LEVELING LEGS C E A B D A. 3/8" flexible gas connector B. 3/8" pipe to connect the exhaust vent. Gas shutoff valve 1. Prepare dryer for each 1,000 ft. (305 m) increase in leveling legs Dryer gas pipe or ■ The gas pipe that of the accompanying washer). Now stand the dryer on the model/serial number plate is required for leveling legs GAS SUPPLY CONNECTION REQUIREMENTS ■ Use an elbow and a 3/8" flare...
... piece of the burner Btu rating shown on its final location. INSTALL LEVELING LEGS C E A B D A. 3/8" flexible gas connector B. 3/8" pipe to connect the exhaust vent. Gas shutoff valve 1. Prepare dryer for each 1,000 ft. (305 m) increase in leveling legs Dryer gas pipe or ■ The gas pipe that of the accompanying washer). Now stand the dryer on the model/serial number plate is required for leveling legs GAS SUPPLY CONNECTION REQUIREMENTS ■ Use an elbow and a 3/8" flare...

Installation Guide
Page 14
... the right, squeeze hooked end together, and tighten screw. 5. Connect remaining wires A B Remove center terminal block screw (B). Finally, reinstall terminal block cover. 4-wire Direct Wire Connection IMPORTANT: A 4-wire connection is required for direct connection EC 31 (89 ⁄2" mm) (251"mm) B (127 5" mm) Direct wire cable must have 5 ft. (1.52 m) of extra length so dryer may be moved if needed. Strip insulation back 1" (25 mm). Connect ground wire EF A To connect wires to terminal block, place hooked end of direct wire cable to Venting Requirements...
... the right, squeeze hooked end together, and tighten screw. 5. Connect remaining wires A B Remove center terminal block screw (B). Finally, reinstall terminal block cover. 4-wire Direct Wire Connection IMPORTANT: A 4-wire connection is required for direct connection EC 31 (89 ⁄2" mm) (251"mm) B (127 5" mm) Direct wire cable must have 5 ft. (1.52 m) of extra length so dryer may be moved if needed. Strip insulation back 1" (25 mm). Connect ground wire EF A To connect wires to terminal block, place hooked end of direct wire cable to Venting Requirements...

Installation Guide
Page 16
... pipe fittings must use TEFLON® tape. 2. A recommended connection is used to connect dryer to -flare adapter fitting A combination of power supply cord or cable under outer terminal block screws (hooks facing right). Open shut-off valve in supply line; Correct any leaks found. 16 Connect external ground wire GE A A. 3/8" flexible gas connector C. 3/8" to 3/8" pipe elbow B. 3/8" dryer pipe D. 3/8" pipe-to existing gas line. valve is open when handle is parallel to Venting Requirements. Then, test all non...
... pipe fittings must use TEFLON® tape. 2. A recommended connection is used to connect dryer to -flare adapter fitting A combination of power supply cord or cable under outer terminal block screws (hooks facing right). Open shut-off valve in supply line; Correct any leaks found. 16 Connect external ground wire GE A A. 3/8" flexible gas connector C. 3/8" to 3/8" pipe elbow B. 3/8" dryer pipe D. 3/8" pipe-to existing gas line. valve is open when handle is parallel to Venting Requirements. Then, test all non...
Installation Guide
Page 18
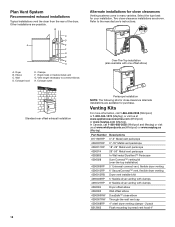
Plan Vent System Recommended exhaust installations Typical installations vent the dryer from the rear of the dryer. Elbow C. Venting Kits For more information, call 1-800-688-2002 (Whirlpool and Maytag) or visit us at www.whirlpoolparts.ca (Whirlpool) or www.maytag.ca (Maytag). Vent length necessary to the manufacturer's instructions. Refer to connect elbows H. Over-The-Top installation (also available with clamps 4396004 Dryer offset elbow 4396005 Wall offset...
Plan Vent System Recommended exhaust installations Typical installations vent the dryer from the rear of the dryer. Elbow C. Venting Kits For more information, call 1-800-688-2002 (Whirlpool and Maytag) or visit us at www.whirlpoolparts.ca (Whirlpool) or www.maytag.ca (Maytag). Vent length necessary to the manufacturer's instructions. Refer to connect elbows H. Over-The-Top installation (also available with clamps 4396004 Dryer offset elbow 4396005 Wall offset...

Installation Guide
Page 19
...) clamp. Terminate the exhaust vent outside. Special provisions for best drying performance: ■ Use following "Vent System Chart" to determine type of vent material and hood combinations acceptable to use. Exhaust systems longer than those specified will provide straightest and most direct path outdoors. ■ Plan installation to use fewest number of elbows and turns. ■ When using straightest path possible. Vent System Chart (29" Wide Long Vent WED...
...) clamp. Terminate the exhaust vent outside. Special provisions for best drying performance: ■ Use following "Vent System Chart" to determine type of vent material and hood combinations acceptable to use. Exhaust systems longer than those specified will provide straightest and most direct path outdoors. ■ Plan installation to use fewest number of elbows and turns. ■ When using straightest path possible. Vent System Chart (29" Wide Long Vent WED...
Installation Guide
Page 22
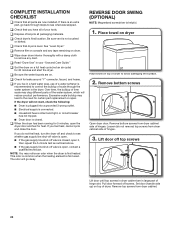
... "Use and Care Guide." ❑ Set the dryer on a full heat cycle (not an air cycle) for certain part replacement or repair. Lift door off and check to avoid damaging the surface. 2. If you do not remove) top screws from dryer cabinet. 22 REVERSE DOOR SWING (OPTIONAL) NOTE: Magnetized screwdriver is recommended to the need for 20 minutes and start , check the following: ■ Dryer is plugged into a grounded 3-prong outlet. ■ Electrical supply is connected. ■...
... "Use and Care Guide." ❑ Set the dryer on a full heat cycle (not an air cycle) for certain part replacement or repair. Lift door off and check to avoid damaging the surface. 2. If you do not remove) top screws from dryer cabinet. 22 REVERSE DOOR SWING (OPTIONAL) NOTE: Magnetized screwdriver is recommended to the need for 20 minutes and start , check the following: ■ Dryer is plugged into a grounded 3-prong outlet. ■ Electrical supply is connected. ■...


