Sony VPCL212FX Support Question
Sony VPCL212FX Support Question
Find answers below for this question about Sony VPCL212FX.Need a Sony VPCL212FX manual? We have 8 online manuals for this item!
Question posted by wsxLEN on January 30th, 2014
How To Remove Sony Vaio Vpcl212fx Hard Disk Drive
The person who posted this question about this Sony product did not include a detailed explanation. Please use the "Request More Information" button to the right if more details would help you to answer this question.
Current Answers
Related Sony VPCL212FX Manual Pages
User Guide - Page 11

Before starting your computer for example, a printer, an external hard disk drive, a scanner, and so on) at a time, following the manufacturer's instructions.
❑ Locating Controls and Ports ... do not connect any other hardware that did not originally come with your VAIO computer. ! Getting Started >
n 11 N
Getting Started
This section describes how to get started using your computer.
User Guide - Page 56

..., place a disc in the middle of the drive tray when placing/removing a disc onto/from the drive tray. 4 Close the drive tray by pushing it toward you, and gently push it in Sleep mode. Using Your VAIO Computer > Using the Optical Disc Drive
n 56 N
3 Hold the back of the drive tray with the label side facing toward...
User Guide - Page 112
... can use . However, the actual transfer rate depends on the transfer rate of Sony Corporation used only to your compatible i.LINK device for more information.
❑ Check...computer does not supply power to connect an i.LINK device, such as a CD-RW or hard disk drive, confirm their operating system compatibility and required operating conditions. See the manual that came with ...
User Guide - Page 143
... Built-in Storage Device
n 143 N
Handling the Built-in Storage Device
The built-in storage device (hard disk drive or solid state drive) has a high storage density and reads or writes data in temperature. ❑ Do not remove the storage device from your computer. To prevent losing data, you should be careful when handling your...
User Guide - Page 150

... computer and press the F11 key repeatedly until the VAIO logo disappears. If the screen does not appear, restart the computer and try again. 2 Press the < or , key to select Boot. 3 Press the M or m key to select your computer from the USB floppy disk drive connected to change the current screen saver. Turn...
User Guide - Page 154

... and Security, and Create and format hard disk partitions under Administrative
Tools. 2 If the User Account Control window appears, click Yes. See Using the VAIO Care (page 32) for more information.... If you are currently logged onto your computer as a standard user, you may be prompted to enter an administrator name and password. 3 Right-click the C drive...
User Guide - Page 179

... the floppy disk is properly inserted in the drive. ❑ If the disk is connected? Troubleshooting > Floppy Disks
n 179 N
Floppy Disks
Why doesn't the Safely Remove Hardware and Eject Media icon appear on the floppy disk drive turns off. 3 Push the eject button to remove the disk, and unplug the USB floppy disk drive from your computer. 4 Reconnect the floppy disk drive by plugging...
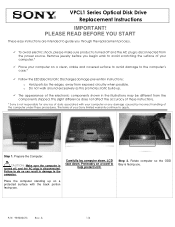
VPCL2 Series Hard Disk Drive Replacement Instructions - Page 1
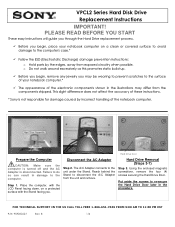
... the A/C Adapter from exposed circuitry when possible.
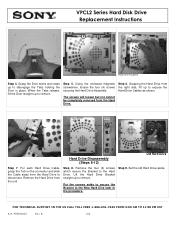
VPCL2 Series Hard Disk Drive Replacement Instructions
IMPORTANT! Hard Drive Door
Prepare the Computer
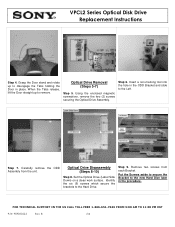
CAUTION: Make sure the computer is turned off and the AC Adapter is not responsible for damage caused by the edges, away from the unit and remove. Hard Drive Removal (Steps 3-7)
Step 3. B
1/4 Failure to do so can result...
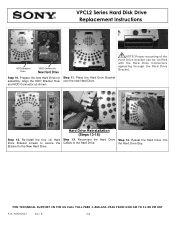
VPCL2 Series Hard Disk Drive Replacement Instructions - Page 2
... up to disengage the Tabs holding the Door in the procedure.
Grasping the Hard Drive from the Hard Drive to the Hard Drive. Step 8. Hard Drive Disassembly (Steps 8-12)
Old Hard Drive
Step 7. Step 9. B
2/4
Put the screws aside to secure the Bracket to the New Hard Dive later in place. VPCL2 Series Hard Disk Drive Replacement Instructions
Hard Drive Cables
Step 4.
VPCL2 Series Hard Disk Drive Replacement Instructions - Page 3
... the HDD Bracket Hole over the new Hard Drive.
VPCL2 Series Hard Disk Drive Replacement Instructions
Old Hard Drive
DriveDrive HDD Bracket Hole
HDD Connector
New Hard Drive
NOTE! Prepare the new Hard Drive for Step 11. Bracket to the Hard Drive.
Reconnect the Hard Drive Step 14. and HDD Connector as shown.
Proper mounting of the Hard Drive bracket can be verified with the...
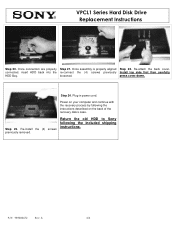
VPCL2 Series Hard Disk Drive Replacement Instructions - Page 4
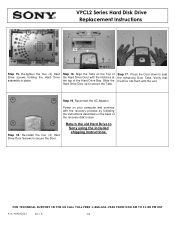
Step 16. Press the Door down to Sony using the included shipping instructions. Reconnect the AC Adaptor. Step 18. Return the old Hard Drive to seat the remaining Door Tabs. Align the Tabs on the back of the recovery disk's case. Slide the Hard Drive Door up to secure the Door. Step 19. B
4/4
FOR TECHNICAL SUPPORT IN...
VPCL2 Series Optical Disk Drive Replacement Instructions - Page 1
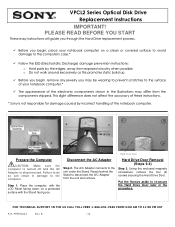
... connects to the surface of your notebook computer.*
The appearance of these instructions.
* Sony is disconnected.
Using the enclosed magnetic screwdriver, remove the four (4) screws securing the Hard Drive Door. Put the Screws aside to re-secure the Hard Drive Door later in damage to the computer's case.*
Follow the ESD (Electrostatic Discharge) damage...
VPCL2 Series Optical Disk Drive Replacement Instructions - Page 2
... TOLL FREE 1-866-651-7669 FROM 9:00 AM TO 11:00 PM EST
P/N 989202624
Rev. VPCL2 Series Optical Disk Drive Replacement Instructions
Step 4. Put the Screws aside to secure the Bracket to remove. Grasp the Door stand and rotate up to the new Hard Dive later in the ODD Bracket and slide to the...
VPCL2 Series Optical Disk Drive Replacement Instructions - Page 4
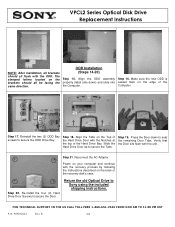
...-install the four (4) Hard Drive Door Screws to Sony using the included shipping ...instructions. B
4/4
Align the Tabs on the brackets should all brackets should sit flush with the recovery process by following the instructions described on the edge of the recovery disk's case. Step 19.
The stamped letters located on the Top of the Hard Drive...
VPCL1 Series Hard Disk Drive Replacement Instructions - Page 1
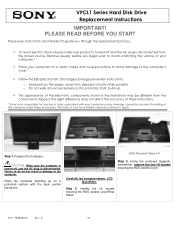
... computer on a protected surface with your Sony limited warranty continue to avoid scratching the ...Sony is disconnected from the power source. LCD face down . Place the computer standing up . o Do not walk around excessively as this promotes static build-up on a clean, stable and covered surface to avoid damage to guide you .
(HDD Removal) Steps 3-9
Step 3. VPCL1 Series Hard Disk Drive...
VPCL1 Series Hard Disk Drive Replacement Instructions - Page 2
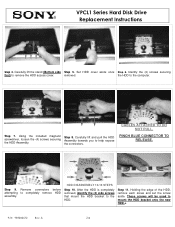
... (4) side screws that mount the HDD bracket to help expose
the HDD Assembly. Holding the edge of the HDD, remove each screw and set the screw aside.
VPCL1 Series Hard Disk Drive Replacement Instructions
Step 4. removed. Step 7. Using the included magnetic screwdriver, loosen the (4) screws securing
Step 8. PINCH BLUE CONNECTOR TO RELEASE. Identify the (4) screws...
VPCL1 Series Hard Disk Drive Replacement Instructions - Page 3
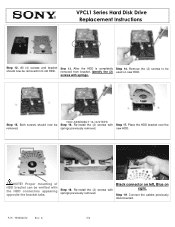
... left, Blue on new HDD.
Re-install the (2) screws with springs previously removed. springs previously removed. Step 19. VPCL1 Series Hard Disk Drive Replacement Instructions
Step 12. Place the HDD bracket over the
removed.
Connect the cables previously disconnected. Both screws should now be removed from bracket, identify the (2) used on right. NOTE!
After the HDD is...
VPCL1 Series Hard Disk Drive Replacement Instructions - Page 4
... 24. Re-install the (4) screws previously removed. Return the old HDD to Sony following the instructions described on your computer and continue with the recovery process by following the included shipping instructions. A
4/4 press cover down. Once assembly is properly aligned Step 22.
Step 23.
VPCL1 Series Hard Disk Drive Replacement Instructions
Step 20. Re-attach...
VPCL1 Series Optical Disk Drive Replacement Instructions - Page 1
... does not affect the accuracy of these procedures.
Step 2.
VPCL1 Series Optical Disk Drive Replacement Instructions
IMPORTANT!
To avoid electric shock, please make sure product is turned...under these instructions.
* Sony is disconnected from the power source.
Rotate computer so the ODD Bay is disconnected. A
1/4
Place the computer standing up . Remove jewelry before you . ...
Quick Start Guide - Page 2
... FAQs. Otherwise, you to factory-installed settings in hard disk drive, avoid moving your computer while it into contact with your computer.
The illustrations in this sheet) Recovery, Backup and
Troubleshooting Guide Safety Information
Help and Support is equipped with the following documentation. Your VAIO® computer comes with a built-in case...
Similar Questions

I Have A Sony Vpcl212fx. It Was Working Fine. Now Won't Power Up. Suggestion?
I have a sony vpcl212fx. It was working fine but now won't power up. Any suggestions?
I have a sony vpcl212fx. It was working fine but now won't power up. Any suggestions?
(Posted by jniederman 7 years ago)


How Do I Locate And Access Primary Hard Disk Drive.
(Posted by velcoo 11 years ago)
How To Remove Optical Disk Drives?
(Posted by michfarb 12 years ago)