Singer 7469Q Confidence Quilter Support Question
Singer 7469Q Confidence Quilter Support Question
Find answers below for this question about Singer 7469Q Confidence Quilter.Need a Singer 7469Q Confidence Quilter manual? We have 1 online manual for this item!
Question posted by herbf672 on September 11th, 2015
All Buttons Flash At Start
mod 7469 Serial H11 10 8A 469 10068Machine worked normal for two years. Few use, 15 minutes for week. Problem begun.Looper is clean, no jammed thead. By Switching power on, machine behavior is normal. By Start sewing all light buttons flash toghether followed by machine buzz, machine keep stopped: no sewing
Current Answers
Answer #1: Posted by TechSupport101 on September 11th, 2015 6:05 AM
TechSupport101

Member since:
May 24th, 2013 Points: 12,171,305

Member since:
May 24th, 2013 Points: 12,171,305
This is most probably caused by a threading issue. Turn off machine and be sure top transparent threading path is threaded correctly. Turn machine back on.
Related Singer 7469Q Confidence Quilter Manual Pages
Instruction Manual - Page 3
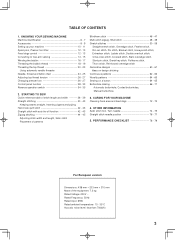
... on a button 64 - 65 Buttonhole making 66 - 71 Automatic buttonhole, Corded buttonholes, Manual buttonhole
3. KNOWING YOUR SEWING MACHINE Machine identification 6 - 7 Accessories 8 - 9 Setting up your machine 10 - 11 Spool pins, Presser foot lifter 12 - 13 Feed dogs control 12 - 13 Converting to free-arm sewing 14 - 15 Winding the bobbin 16 - 17 Threading the bobbin thread...
Instruction Manual - Page 6
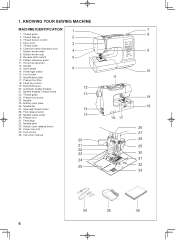
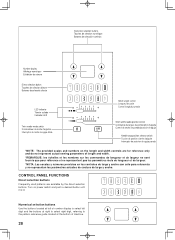
KNOWING YOUR SEWING MACHINE
MACHINE IDENTIFICATION
1. Reverse stitch switch 10. Power/light switch 15. Needle bar 27. Alternate Thread Cutter 28. Needle plate 33. Bobbin cover release button 34. Thread tension control 4. Extension table (Accessory box) 7. Horizontal spool pin 12. Cord socket 16. Foot release button 29. Presser foot 31. Power line cord 35. Thread guide...
Instruction Manual - Page 8
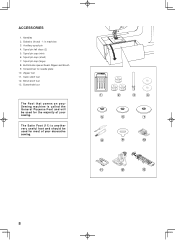
...1. Auxiliary spool pin 4. Spool pin cap (large) 8. Blind stitch foot 13. Buttonhole foot
The Foot that comes on your Sewing machine is another very useful foot and should be used for most of your decorative sewing.
1
2
3
4
5
6
7
8
9
10
11
12
13
Zipper foot 11.
Spool pin cap (small) 7. Spool pin felt discs (2) 5. Spool pin cap (mini) 6. Screwdriver...
Instruction Manual - Page 10
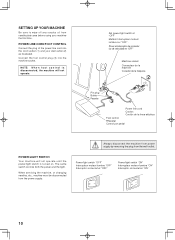
....
The same switch controls both the power and the light. When servicing the machine, or changing needles, etc., machine must be disconnected from the wall-outlet. Power/light switch "OFF" Interrupteur moteur/lumière "OFF" Interruptor corriente/luz "OFF"
Power/light switch "ON" Interrupteur moteur/lumière "ON" Interruptor corriente/luz "ON"
10 Connect the foot control...
Instruction Manual - Page 16
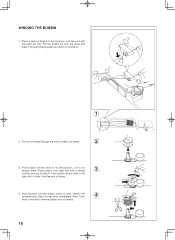
... on the spool pin, and secure it with end of thread.
4. Push bobbin winder shaft to wind. Bobbin will automatically stop turning when completely filled. Start machine and the bobbin starts to the
right until it through the hole in illustration.
1
2.
Instruction Manual - Page 18
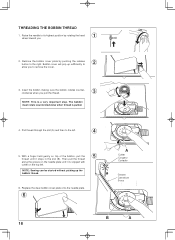
Remove the bobbin cover plate by rotating the hand
1
wheel toward you.
2. NOTE: Sewing can be started without picking up sufficiently to
2
allow you pull the thread.
3
NOTE: This is pulled.
4. Pull thread through the slot (A) and ... pull the
5
thread until it stops in the slot (B).
Raise the needle to its highest position by pushing the release button to the left .
Instruction Manual - Page 26
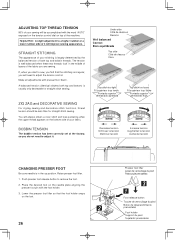
... when you start to sew, you find that the foot holder snaps
on the foot.
2
26
Presser foot lifter Levier de verrouillage du pied Palanca pie prensatelas
3 1
Foot release button Touche de verrouillage... tension control dial on top of the machine. Helpful Hint: A slight adjustment to remove the foot. 2.
You will be less than for straight stitch sewing. The tension is well balanced when these...
Instruction Manual - Page 28
... de aguja parada
*NOTE: The provided scales and numbers on power switch and push a desired button until it is lit.
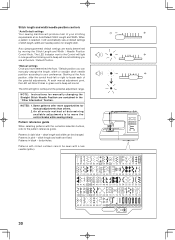
CONTROL PANEL FUNCTIONS
Direct selection buttons
Frequently used patterns are for reference only and do not represent actual sewing parameters of machine.
28
Numerical selection buttons
Use the buttons located at left of number display to select left digit and...
Instruction Manual - Page 30
... Pattern reference guide
When selecting patterns with the numerical selection buttons, refer to move the control knobs while sewing slowly. stitch length and width are at an Auto/Default ... position controls
*Auto/Default settings Your sewing machine will produce most of your preference. When a pattern is to the pattern reference guide. Starting at default settings of stitch length, width...
Instruction Manual - Page 32
...parada
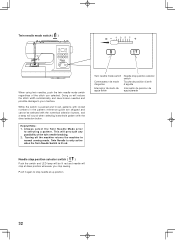
Needle stop position selector switch ( )
Push the switch and LED lamp will be selected with the numerical selection buttons, and a beep will ...normal sewing mode.
Doing so will preclude any possibility of the stitch you stop sewing. Turning off the machine returns the machine to your machine.
Twin needle mode switch ( )
When using twin needles, push the twin needle mode switch...
Instruction Manual - Page 34
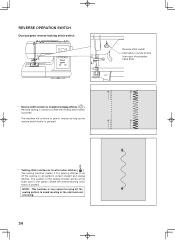
... the start and end of other stitches ( ) The sewing machine makes 4 tiny tacking stitches to avoid raveling at the exact spot in reverse as long as the reverse switch button is pushed. NOTE: This function is pushed.
The position of the tacking stitches will continue to sew in the pattern where the reverse/tacking stitch button is...
Instruction Manual - Page 40
... foot - AUTO
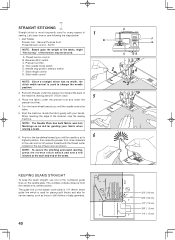
NOTE: Based upon the weight of the fabric, slight "fine tuning" of
1
sewing. Thread tension control B. Start the machine. KEEPING SEAMS STRAIGHT
To keep the seam straight, use one of
the machine, leaving about 6" (15cm) clear.
5
3. Reverse stitch switch C. Turn the hand wheel toward the back of the numbered guide lines on the bobbin...
Instruction Manual - Page 42
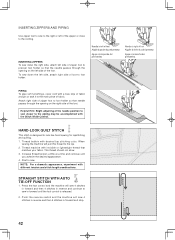
...Use zipper foot to sew to the right or left of foot to foot holder.
Increase thread tension a little at a time and continue until the foot control is designed to sew in forward and stop.
42 Start to the top. 2. Press the foot control and the machine will sew... the reverse switch and the machine will pull this thread to sew. INSERTING ZIPPERS To sew down the left side of the foot.
Instruction Manual - Page 44
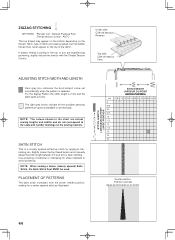
... indicates the Auto/default value set manualy.
NOTE: When sewing a dense (closely spaced) Satin Stitch, the Satin Stitch Foot MUST be used. General Purpose Foot :Thread tension control -
SATIN STITCH...bottom depending on the thread, fabric, type of stitch and sewing speed, but the bobbin thread must never appear on the sewing machine. For the Zigzag Pattern the stitch length is 2 mm...
Instruction Manual - Page 60
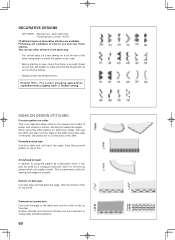
... attractive patterns.
60 Domino on top of this pattern as a triangular backtack stitch for sewing both edges of the stitch. Satin stitch foot :Thread tension control - Scallop stitches and diamond stitches can be used . * Before starting to sew, check that there is an ideal decorative stitch for the sleeves and collars of ladies' and...
Instruction Manual - Page 68
...
5
6
7
8
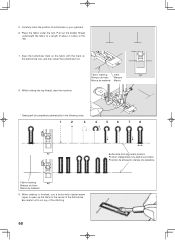
Fabric marking Marque du tissu Marca de material 9. When sewing is finished, use a buttonhole opener/seam
ripper to a length of the buttonhole. Align the buttonhole...Sewing will be completed automatically in the center of about 4 inches to cut any of buttonhole on the buttonhole foot, and then lower the buttonhole foot.
8. While holding the top thread, start the machine...
Instruction Manual - Page 70
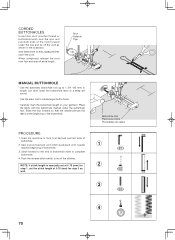
...* Use the automatic buttonhole foot up to 1 3/4 "(45 mm) in the illustration. Start the machine to complete buttonhole.
4. Slide the foot forward so that zigzag stitches cover the cord. Sew second...switch to create larger buttonholes.
* Carefully mark the buttonhole length on your garment. NOTE: If stitch length is manually set the stitch length at the beginning of buttonhole.
3. Sew ...
Instruction Manual - Page 72
....
4
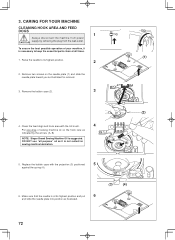
Put one drop of your machine, it is necessary to its highest position.
2
2. Remove two screws on the hook race as indicated by removing the plug from power
supply by the arrows. (A, B)
NOTE: Singer Brand Sewing Machine Oil is at all purpose" oil as illustrated.
(3)
(4)
72 CARING FOR YOUR MACHINE
CLEANING HOOK AREA AND FEED DOGS...
Instruction Manual - Page 78
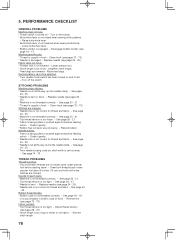
PERFORMANCE CHECKLIST
GENERAL PROBLEMS Machine does not sew. * Power switch is damaged.- Disengage bobbin winder (see page 72 - 73). Clean hook (see page 26 - 27). * .... * Twin needle is being pulled or pushed against machine feeding
action. - See page 26 - 27. * Needle is set too wide.
- 5. Machine jams/knocks. * Thread is being used but stitch width is bent. - See page 20...
Instruction Manual - Page 82
...or plug, if it is for all instructions before cleaning."
2. "Keep fingers away from the accumulation of
injury,
switch
off
before
servicing. "Always unplug sewing machine from the electric outlet immediately after using and before using an electrical appliance, basic safety precautions should never be used by or near children." 2.
"IMPORTANT SAFETY INSTRUCTIONS"
"When...
Similar Questions

Singer 170th Additio Making Unusual Sound During Sewing. Breaking Of Thread, Ad
my machine red 170th addition making unusual sound during sewing , thread is breaking many times, al...
my machine red 170th addition making unusual sound during sewing , thread is breaking many times, al...
(Posted by Sufiaafrin26 6 months ago)

Machine Stops After 5 Stitches. Error Message 0.1. Nothing In Bobbin Area. Pleas
machine stitches 5 stitches and stops with error code 0.1. Nothing in bobbin ca
machine stitches 5 stitches and stops with error code 0.1. Nothing in bobbin ca
(Posted by barfar224 2 years ago)
Singer Model 7469q Quilter Sewing Machine Disassembly
After pulling the screws all out from the plastic case . how do you split the cases?please no addres...
After pulling the screws all out from the plastic case . how do you split the cases?please no addres...
(Posted by sdeiter544 9 years ago)
Singer # 7469q Sewing Machine
After pulling the screws all out from the plastic case . how do you split the cases?
After pulling the screws all out from the plastic case . how do you split the cases?
(Posted by sdeiter544 9 years ago)

Singer 7469q Confidence Quilter - Beeping Noise And Machine Freezing
I was in the midst of using one of the novelty stitches and all of a sudden the machine locked up, b...
I was in the midst of using one of the novelty stitches and all of a sudden the machine locked up, b...
(Posted by whitewavejl 10 years ago)