Singer Futura Quartet SEQS-6000 Support Question
Singer Futura Quartet SEQS-6000 Support Question
Find answers below for this question about Singer Futura Quartet SEQS-6000.Need a Singer Futura Quartet SEQS-6000 manual? We have 1 online manual for this item!
Question posted by barfar224 on August 28th, 2021
Machine Stops After 5 Stitches. Error Message 0.1. Nothing In Bobbin Area. Pleas
machine stitches 5 stitches and stops with error code 0.1. Nothing in bobbin ca
Current Answers
Answer #1: Posted by SonuKumar on August 28th, 2021 11:13 PM
SonuKumar

Member since:
May 9th, 2021 Points: 16,633,680

Member since:
May 9th, 2021 Points: 16,633,680
https://www.futura-support.com/products
https://futura-support.com/products/seqs-6000/faqs
https://futura-support.com/sites/default/files/SEQS-6000%20Product%20Sheet.pdf
https://www.youtube.com/watch?v=2YeDNwJDV_k
https://www.youtube.com/watch?v=2YeDNwJDV_k&t=10
https://www.youtube.com/watch?v=2YeDNwJDV_k&t=55s
Please respond to my effort to provide you with the best possible solution by using the "Acceptable Solution" and/or the "Helpful" buttons when the answer has proven to be helpful.
Regards,
Sonu
Your search handyman for all e-support needs!!
Related Singer Futura Quartet SEQS-6000 Manual Pages
Instruction Manual - Page 2

...bobbin, or changing presser foot, etc." 18. or its Affiliates. "WARNING- "Never drop or insert any object into any maintenance." "Switch off
before
servicing. Special care is not intended for examination, repair, electrical or mechanical adjustment." 5. "Do not pull or push fabric while stitching...and FUTURA QUARTET are being administered." 10. "This sewing machine should...
Instruction Manual - Page 3
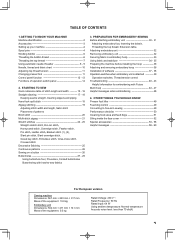
... stitch, Crossed stitch Decorative Stitching 25 Continuous patterns 26 Sewing on a button 26 Buttonholes 27 - 29
Using buttonhole foot, Procedure, Corded buttonholes Buttonholing with Futura Multi hoop 44 - 47 Helpful messages when embroidering 48
4. PREPARATION FOR EMBROIDERY SEWING Before attaching embroidery unit 30 - 31
Attaching embroidery foot, Inserting the bobbin, Threading...
Instruction Manual - Page 10

... the thread with strong force or thread may be threaded automatically. Make sure that
the machine be set for straight stitch (in center needle position) when using the automatic needle threader. Heavy thread... its lowest position until the twin thread guide rotates and stops. Pull thread loop away from STEP 1. Threading hook
2
Twin thread guide
A B
3
Thread cutter/holder
4
...
Instruction Manual - Page 13

...holder.
3.
A balanced tension (identical stitches both top and bobbin threads. ZIGZAG, SATIN STITCH, DECORATIVE and BUTTON HOLE SEWING
For zigzag sewing, satin stitch and decorative stitch functions, thread tension should be accomplished ...the presser foot lifter so that for straight stitch sewing.
If, when you start to sew, you find that the machine is in the middle of layers of ...
Instruction Manual - Page 14

At this point you may sew Straight Stitch. Stop when the LED indicator above the straight stitch pattern will be lit. To select other patterns, push the pattern selection button to the right of length and width.
CONTROL PANEL FUNCTIONS
Pattern selection ...
Instruction Manual - Page 15
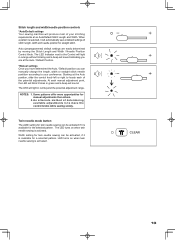
... light in orange without blinking and a beep will sound indicating you are easily determined by moving the Stitch Length and Width / Needle Position Control Knob. Stitch length and width/needle position controls
*Auto/Default settings Your sewing machine will light in red beyond the potential adjustment range. Auto (preprogrammed) default settings are at an...
Instruction Manual - Page 16
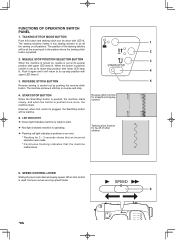
... LED lamp lit. START/STOP BUTTON
When the Start/Stop button is pushed, the machine starts slowly, and when the button is carried out by pushing the reverse stitch button. The sewing machine makes 4 tiny tacking stitches to start.
Red light indicates machine is operating.
Flashing red light indicates a problem or an error. * Flashing for tie-off...
Instruction Manual - Page 19
... the steps below.
1. Thread tension control B.
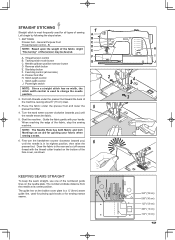
The guide line on the bobbin cover plate is a ¼" (6mm) seam guide line, used to the rear and cut off excess
thread with your fabric when sewing a seam.
6. Tacking stitch mode button C. Start/stop the sewing machine. Place the fabric under the presser foot toward you ) until the needle...
Instruction Manual - Page 40
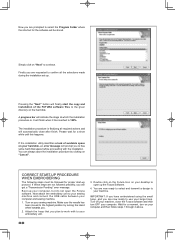
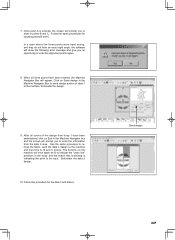
... on your hard disk, an error message will indicate the stage at which the installation procedure is finalizing all the selections made during the installation set-up. It will get a "Transmission Pending" error message.
Wait for a short while until this happens.
Simply click on "Cancel".
Please wait for a moment, turn OFF your computer and sewing machine.
1.
Instruction Manual - Page 41

... created by the software for embroidery to the machine. OPERATION SWITCHES WHEN EMBROIDERY UNIT IS ATTACHED
OPERATION SWITCHES
START/STOP BUTTON When start .
Red light indicates machine is pushed, machines starts slowly. To stop sewing and the needle stops at "E" for
Photo Stitch (optional) it is already in Machine navigator, before
sending the design to loosen thread...
Instruction Manual - Page 42

... SKIPPED STITCHES AND ...Refer to page 33. Needle is too tight.
EMBROIDERY PATTERN IS MIS-ALIGNED
MACHINE SIDE
HOOP SIDE
Embroidering is continuing when thread is tangled somewhere along the thread ... length at least a #14 needle should be used for heavy fabric. Thread is tangled. Stop embroidering, remove the hoop and untangle the thread. Thread or fabric bits have collected under the...
Instruction Manual - Page 43
... are flashing lights and making a beeping sound, but thread is not in the thread tension. Embroidering direction
Embroidered section
1357
2468
automatically stop
Blank stitches resulting from thread breakage
Reverse stitch button
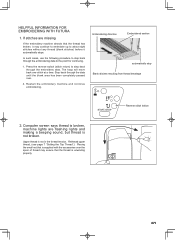
2. Restart the embroidery machine and continue embroidering. HELPFUL INFORMATION FOR EMBROIDERING WITH FUTURA
1.
Step back through the embroidery data.
Instruction Manual - Page 45

... area. Is there a way to increase the density of mm, which is set to change the stitch count.
6. The density is usually the standard density used for Lettering.
Because the letters are built-in the Futura ...designs from the Library in order to a standard value of 4/10th of the lettering? The machine has a certain limit of a design be changed in the DESIGN/CHANGE SIZE menu in the ...
Instruction Manual - Page 46
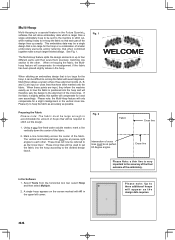
... compensate for it and sew accordingly. Fig. 2
Fabric
Intersection of cross lines must be at perfect 90 degree angles. Multi-Hoop
Multi-Hooping is a special feature in the Futura QuartetTM software that will allow embroidery data which is larger than a single embroidery hoop to be sent to the machine to stitch out, while making...
Instruction Manual - Page 47

... the tool bar.
5. The design data is a Center Hoop line which together define the maximum sewing area for Multiple Hooping.
Fig. 3
Fig. 4
Guide line
Center point line
A Data 1
Guide line ... side of markings on the fabric as Guide lines. The grey area (#1 Hoop) is the first of the hoop there are to the machine for sewing one section at a time. On each corner of the embroidery ...
Instruction Manual - Page 49
... data 1 to the machine. Click on the machine will show the following error message and give you an opportunity to enter in the Machine Navigator box and the ...area. Embroider the data 2 design.
10. Follow the same procedures for the data 3 and data 4. Use the same procedure to rehoop the fabric, send the data 2 design to be input. Once point A is indicating the point to the machine...
Instruction Manual - Page 52
... gently. * Needle size is not correct for thread and fabric. (see page 10). * Machine is not threaded correctly. - (see page 7 - 9). * Top thread tension is too loose. (see page 11). * Fabric is not raised when sewing stitch patterns.
-
Bobbin thread breaks. * Bobbin case is not threaded correctly. (see page 10). * Needle is not all the way...
Instruction Manual - Page 56
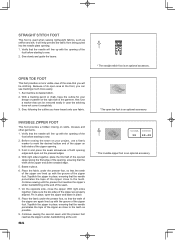
...machine to sew. 2. Hint: Use a marker that the teeth of the zipper are again lined up with the groove of the zipper close to the teeth as chiffon and silk. Baste in case the stitching...garment. Continue sewing the second seam until the presser foot reaches the zipper's slider, backstitching at the end.
54
* The straight stitch foot is an optional accessory.
* The open area at the ...
Instruction Manual - Page 57

... the fabric with a narrow satin stitch. Stitch approximately ½" of the fabric under the small black tension disc from machine and draw fabric in the foot's...stitches slide off the pin in the bobbin.
2. At the beginning and end of the seam, secure the threads at both ends.
6. Remove fabric from right to sew straight, so avoid curves and sharp turns.
1. When finished sewing...
Instruction Manual - Page 61

... the
02
bobbin winder to stop.
HELPFUL MESSAGES
Messages are displayed with needle lowered. Raise needle and restart.
08
○
59 On control panell
On PC screen
Problem Correction
Sewing Embroidery
Machine is detected. Supply top thread and restart.
06
○○
Unable to stop button or start with LED lamps above stitch pattern numbers...
Similar Questions

What Is Error Code C 09
My Singer modern quilter keeps showing error code C 09. I do know what the problem is
My Singer modern quilter keeps showing error code C 09. I do know what the problem is
(Posted by karenkawycz 10 months ago)

I Get E7 Error Message On My Singer Model 7258 Sewing Machine. There Is No Refe
Error message E7 is up on my Singer Stylist model 7258 sewing machine. It is not working at all. I t...
Error message E7 is up on my Singer Stylist model 7258 sewing machine. It is not working at all. I t...
(Posted by ebellamybellamy9 5 years ago)
Seqs 6000
can't seem to connect to laptop. error message says check that usb cable is connected and power swit...
can't seem to connect to laptop. error message says check that usb cable is connected and power swit...
(Posted by reneewindell 8 years ago)

Gathering Stitch
Why does the machine stop and the light turns red and beeps after a couple of stitches.
Why does the machine stop and the light turns red and beeps after a couple of stitches.
(Posted by lspeschel 10 years ago)

How To Fix Error Message 06
I continue to get the error code 06 on my singer futura quartet seqs-6000 embroidery machine. This o...
I continue to get the error code 06 on my singer futura quartet seqs-6000 embroidery machine. This o...
(Posted by youngrondelle 10 years ago)