Ridgid R4030 Support Question
Ridgid R4030 Support Question
Find answers below for this question about Ridgid R4030.Need a Ridgid R4030 manual? We have 1 online manual for this item!
Question posted by akopadt on April 24th, 2013
How Do I Adjust Square On My Ridgid R4030
The person who posted this question about this Ridgid product did not include a detailed explanation. Please use the "Request More Information" button to the right if more details would help you to answer this question.
Current Answers
Related Ridgid R4030 Manual Pages
Operation Manual - Page 1
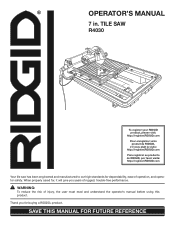
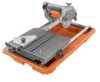
OPERATOR'S MANUAL
7 in.
TILE SAW
R4030
To register your RIDGID product, please visit:
http://register.RIDGID.com Pour enregistrer votre produit de RIDGID, s'il vous plaît la visite:
http://register.RIDGID.com Para registrar su producto de RIDGID, por favor visita: http://register.RIDGID.com
Your tile saw has been engineered and manufactured to our high standards...
Operation Manual - Page 2

......2 General Safety Rules...3-4 Specific Safety Rules...5 Symbols...6 Electrical...7-8 Features...9-10 Tools Needed...10 Loose Parts...11 Assembly...12-17 Operation...18-21 Adjustments...22-23 Maintenance...24-25 Warranty...26 Parts Ordering and Service...Back page
INTRODUCTION
This...
Operation Manual - Page 3
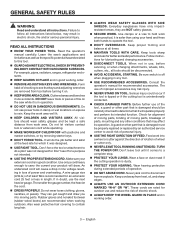
... Check for . A guard or other conditions that keys and adjusting wrenches are rated for recommended accessories. Don't leave tool until it is damaged must be disconnected.
AVOID ACCIDENTAL... visitors should be properly repaired or replaced by removing starter keys.
DON'T FORCE TOOL. Keep the work when practical, it will cause a drop in line voltage resulting in ...
Operation Manual - Page 4
...what you are not completely understood or if in doubt as to whether the tool is properly grounded.
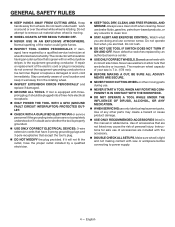
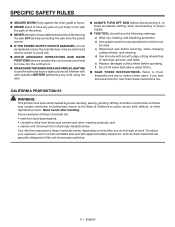
USE ONLY CORRECT ELECTRICAL DEVICES: 3-wire extension cords that have the... USE ONLY RECOMMENDED ACCESSORIES listed in . (178 mm).
BEFORE MAKING A CUT, BE SURE ALL ADJUSTMENTS ARE SECURE.
NEVER TOUCH CUTTING WHEEL or other moving .
WHEEL COASTS AFTER BEING TURNED ...
Operation Manual - Page 5
... before disconnecting it, to avoid accidental starting when reconnecting to power supply.
THIS TOOL should have the following markings:
a) Wear eye, hearing, and breathing protection. c) Disconnect saw...cutting wheel before servicing, when changing
cutting wheels, and cleaning. If you do this tool, loan them frequently and use to cause cancer, birth defects, or other users. English...
Operation Manual - Page 6
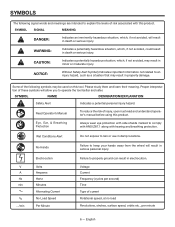
... Time Type of injury, user must read and understand operator's manual before using this tool.
CAUTION:
Indicates a potentially hazardous situation, which , if not avoided, will result ...Amperes Hertz Minutes Alternating Current No Load Speed Per Minute
Failure to operate the tool better and safer.
SYMBOL
NAME
DESIGNATION/EXPLANATION
Safety Alert
Indicates a potential personal injury...
Operation Manual - Page 7
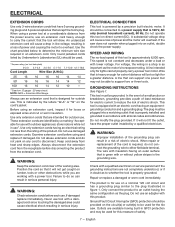
... will not fit the outlet, have 3-prong grounding plugs and 3-pole receptacles that accept the tool's plug. This is heavy enough for a short distance will cause a loss of electric shock... installed by Underwriter's Laboratories (UL) should be used for lights cannot properly carry a power tool motor. Keep cord away from the extension cord. Failure to either flat blade terminal. WARNING...
Operation Manual - Page 8
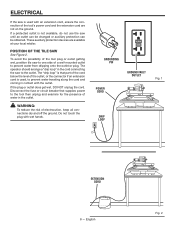
...wall-mounted outlet to the outlet. To avoid the possibility of the tool plug or outlet getting wet, position tile saw to the tool then unplug and examine for the presence of the outlet, or the...not on the ground.
Do not touch the plug with an extension cord, ensure the connection of the tool's power cord and the extension cord are available at your local retailer. The "drip loop" is that...
Operation Manual - Page 10
... use of the project you are needed for assembly and alignment:
PHILLIPS SCREWDRIVER FLATHEAD SCREWDRIVER
10 mm, 14 mm WRENCH
C-CLAMP FRAMING SQUARE
10 -
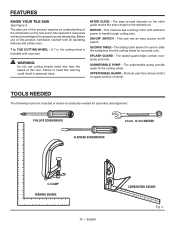
UPPER WHEEL GUARD - TOOLS NEEDED
The following tools (not included or drawn to slide the workpiece into the cutting wheel for the desired cut. TILE CUTTING WHEEL -
SLIDING TABLE...
Operation Manual - Page 12
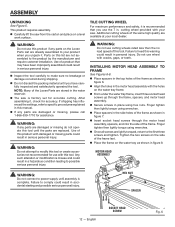
... you have been improperly assembled could result in a hazardous condition leading to modify this tool or create accessories not recommended for accurate cutting. INSTALLING MOTOR HEAD ASSEMBLY TO FRAME
See...See Figure 5.
Any such alteration or modification is factory set for use with this tool. Finger tighten then lightly torque using hex nuts. If shipping has influenced the ...
Operation Manual - Page 14
... water nozzles come in the counterclockwise direction.
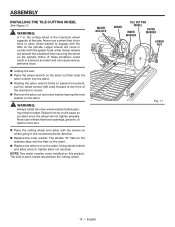
Replace the outer washer. English WARNING:
Always install the inner wheel washer before placing wheel on this tool.
Place the cutting wheel onto arbor with the flats on wheel going in contact with the flats on the arbor.
Replace the arbor...
Operation Manual - Page 15

... the water pump's electrical cord under the frame rails and over cord connections to the desired angle by turning the
lock knob clockwise.
45
To adjust angles: Loosen the miter knob.
Rotate to help keep water off the plug. English
Fig. 14 INSTALLING THE WATER PUMP
See Figures 13...
Operation Manual - Page 17
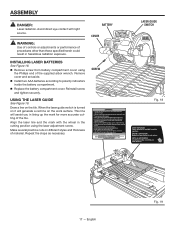
... compartment cover using the laser adjustment screw. EVITE LA EXPOSICIÓ...tool before operating
the tool. • Do not expose to polarity indicators inside the battery compartment. Replace the battery compartment cover. Reinstall screw and tighten securely. Repeat the steps as necessary.
This line will generate a red line on the tile. WARNING:
Use of controls or adjustments...
Operation Manual - Page 18
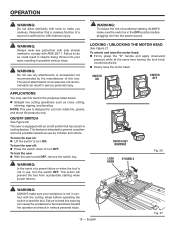
...switch OFF. WARNING:
In the event of accidental starting when power returns. This action will prevent the tool from accidentally starting , ALWAYS make you careless.
WARNING:
Do not use , turn ON. To lock...switch is not in contact with an on : Lift the switch to heed this tool.
To turn OFF. English
Fig. 21 This feature is not in use any attachments or ...
Operation Manual - Page 19
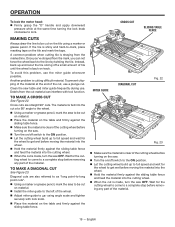
... part of tile until the wheel is back on the tile using angle scale and tighten securely with tool function. Another problem is straying from the cut . Clean the saw table and miter guide frequently during...prevent chipping of the material at the end of the wheel.
Adjust miter guide to 45° using a marker or grease pencil.
Diagonal cuts are straight 90° cuts.
Operation Manual - Page 22
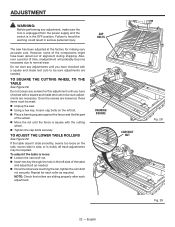
... probably become necessary due to side, or is visibly off track adjustments may be reset. Unplug the saw has been adjusted at the factory for each adjustment.
CAP BOLTS
FRAMING SQUARE
CAM BOLT NUT
22 - ADJUSTMENT
WARNING:
Before performing any adjustment, make sure the tool is unplugged from the power supply and the switch is in...
Operation Manual - Page 23
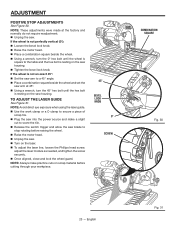
.... Place a combination square beside the wheel and set the saw arm at the factory and normally do not require readjustment. Unplug the saw arm to
stop rotating before cutting through your workpiece.
45°
BEVEL LOCK KNOB
0°
SCREW
0
COMBINATION SQUARE
45
Fig. 30
23 - ADJUSTMENT
POSITIVE STOP ADJUSTMENTS
See Figure 30.
Operation Manual - Page 24
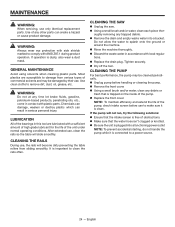
...machine.
Rinse the machine thoroughly.
Discard the waste water in this tool are susceptible to damage from sliding smoothly. Do not allow the water to clean the.... CLEANING THE RAILS
During use only identical replacement parts. Tighten securely.
Dry off the tool.
CLEANING THE PUMP
For best performance, the pump may be cleaned periodically. Unplug pump...
Operation Manual - Page 26
... WHAT IS COVERED UNDER THE 3 YEAR
LIMITED SERVICE WARRANTY
This warranty on RIDGID® Hand Held and Stationary Power Tools covers all defects in workmanship or materials and normal wear items such as ...INC. One World Technologies, Inc.
HOW TO OBTAIN SERVICE
To obtain service for this RIDGID® tool for three years following the purchase date of the 3 YEAR service warranty period. When ...
Similar Questions

How Do You Replace The Laser Battery?
The laser on my Ridgid R4030 has gone out. How should I go about replacing it?
The laser on my Ridgid R4030 has gone out. How should I go about replacing it?
(Posted by Phat56007 3 years ago)

Height Adjustment Bolt Wearing Into Beating Block
I've had my r4331 planer for under a month and it seems to be more or less rubbing instead of cuttin...
I've had my r4331 planer for under a month and it seems to be more or less rubbing instead of cuttin...
(Posted by Bbenson2367 3 years ago)

How To Adjuest Air Press On Ridgid R350che
I can't fine in the operators manual for my r350che that part that tells me how to adj. the pres. On...
I can't fine in the operators manual for my r350che that part that tells me how to adj. the pres. On...
(Posted by Rivergod177 9 years ago)

