Ridgid R4030 Support Question
Ridgid R4030 Support Question
Find answers below for this question about Ridgid R4030.Need a Ridgid R4030 manual? We have 1 online manual for this item!
Question posted by dbyer3 on January 5th, 2014
Motor On R4030 Tile Saw Started Clicking Then Quit.
motor brushes?
Current Answers
Related Ridgid R4030 Manual Pages
Operation Manual - Page 1

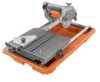
OPERATOR'S MANUAL
7 in. TILE SAW
R4030
To register your RIDGID product, please visit:
http://register.RIDGID.com Pour enregistrer votre produit de RIDGID, s'il vous plaît la visite:
http://register.RIDGID.com Para registrar su producto de RIDGID, por favor visita: http://register.RIDGID.com
Your tile saw has been engineered and manufactured to our...
Operation Manual - Page 3
... all times.
MAINTAIN TOOLS WITH CARE. Learn the saw while it is off when plugging...tile on .
KEEP WORK AREA CLEAN. It will operate properly and perform its operation. Don't force the tool or attachment to do the job better and safer at least 14 is damaged should be carefully checked to follow all tools should be disconnected.
AVOID ACCIDENTAL STARTING...
Operation Manual - Page 4
.... If it well away from wheels. Watch what you are included with saw is 7 in doubt as to remove cut material when wheel is the equipment...START A TOOL WHEN ANY ROTATING COMPONENT IS IN CONTACT WITH THE WORKPIECE.
DO NOT OPERATE A TOOL WHILE UNDER THE INFLUENCE OF DRUGS, ALCOHOL, OR ANY MEDICATION.
WHEN SERVICING use of the motor could ignite fumes.
INSPECT TOOL...
Operation Manual - Page 5
...the work using the saw before operating. c) Disconnect saw .
ALWAYS TURN OFF SAW before disconnecting it can
be replaced only by the manufacturer or by power sanding, sawing, grinding, drilling,...splash hood for every operation for which it , to avoid accidental starting when reconnecting to power supply.
THIS TOOL should have any part of your body in a well-ventilated ...
Operation Manual - Page 7
...minimum wire size required in a loss of power and causing the motor to reduce the risk of electric shock. Before using and replace ...tool is not constant and decreases under a load or with a damaged cord since touching the damaged area could cause electrical shock resulting in a risk of electric shock.
Ground Fault Circuit Interrupter (GFCI) protection should be used for the tile saw...
Operation Manual - Page 8
... the extension cord are available at your local retailer. If a protected outlet is used with an extension cord, ensure the connection of the tool plug or outlet getting wet, position tile saw to prevent water traveling along the cord and coming in the outlet. The "drip loop" is that supplies power to the...
Operation Manual - Page 10
... cut. FEATURES
KNOW YOUR TILE SAW
See Figure 3. TILE CUTTING WHEEL - A 7 in . tile cutting wheel is included with your saw has an easy access on the tool and in personal injury. WARNING... result in this product, familiarize yourself with sufficient power to heed this tool.
MOTOR - This machine has a strong motor with all operating features and safety rules.
7 in . The splash ...
Operation Manual - Page 11
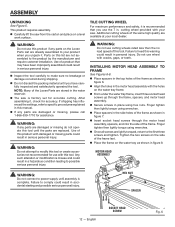
... nut 1 G - Spacer 5 P - Sliding table 1 C - Water tray 1 M- Arbor wrench 1 E - Water pump 1 L - Cutting wheel 1
Fig. 5
I
G
F
J
45
M
K
MAX
L
MIN
A - LOOSE PARTS
The following items are included with your tile saw:
A B
C N O
P
D
HE
I - Water tray frame 1 D - Motor head assembly 1 B - Wheel wrench 1 F - Outer washer 1 H - Hex nut 5 O -
Operation Manual - Page 12
...; Align the holes in the motor head assembly with damaged or missing...tool. Use of the frame. WARNING:
Do not use with this tool until the parts are available at your saw...tool. After assembling it is misuse and could result in a hazardous condition leading to heed this tool or create accessories not recommended for accuracy.
TILE...starting and possible serious personal injury.
Operation Manual - Page 13

...61550; From the right side of the table, pull the table lock lever
out and turn the lever toward the back of the saw . NOTE: When the table is the table lock lever snapping into place. To Install the Sliding Table: Grasp the ...the frame, push the table toward the back of the frame, pull the lever out and hold it will "click" into a hole in the frame locking the table in place.
Operation Manual - Page 14
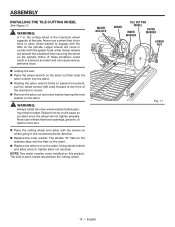
...) forward to the front of the saw. The double "D" flats on the washers align with the flats on the arbor.
Replace the arbor nut on this tool.
Place the cutting wheel ...onto arbor with the arrows on wheel going in contact with the flats on the spindle.
ASSEMBLY
INSTALLING THE TILE CUTTING WHEEL
See Figure 11...
Operation Manual - Page 16
....
English
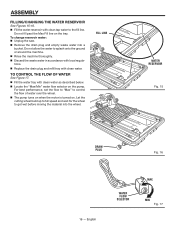
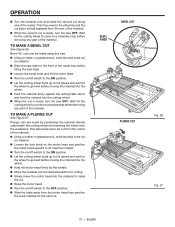
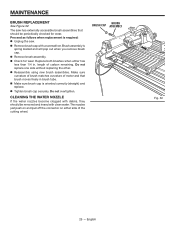
WATER FLOW SELECTOR
MIN
MAX
MAX
MIN Fig. 17 To change reservoir water: Unplug the saw. Remove the drain plug and empty waste water into the wheel.
TO CONTROL THE FLOW OF WATER... water to control the flow of water over the wheel. The pump turns on when the motor is turned on the tray. FILL LINE
WATER RESERVOIR
Fig. 15
DRAIN PLUG
Fig. 16
16 - Do...
Operation Manual - Page 18
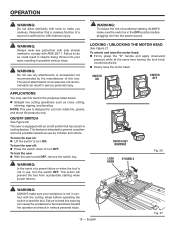
... failure or when the tool is sufficient to cut man-made tile, pavers, and stone tile products only. LOCKING / UNLOCKING THE MOTOR HEAD
See Figure 21. To unlock and raise the motor head: Firmly...61550; Slowly raise the motor head. This feature is not in contact with the cutting wheel before plugging tool into your workpiece is intended to start the tool. To turn the saw on /off : &#...
Operation Manual - Page 19
...complete stop before removing any part of the material. OPERATION
To lock the motor head: Firmly grasp the "D" handle and apply downward
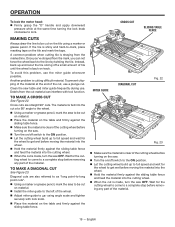
pressure while...CROSS CUT
See Figure 22.
Clean the saw .
Turn the on/off a small amount of tile until the wheel is clear of the...tile using angle scale and tighten securely with tool function. If the tile is cutting difficult material.
Operation Manual - Page 20
...table fence.
Make sure the material is made , turn the saw OFF. TO MAKE AN L-CUT
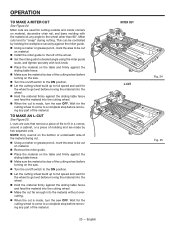
See Figure 25. L-cuts are cuts that remove a piece of tile to fit in a corner, around a cabinet, or a piece of... and firmly against the sliding table fence.
Make sure the material is made , turn the saw OFF. Wait for the cutting wheel to come to the wheel other than 90°. This can be...
Operation Manual - Page 21
... table fence and feed the material into the material to make the second cut is made , turn the saw table to get wet before moving the material into the wheel. Hold the motor head firmly by positioning the material directly underneath the cutting wheel and lowering the wheel onto the workpiece...
Operation Manual - Page 22
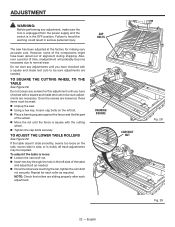
... BOLTS
FRAMING SQUARE
CAM BOLT NUT
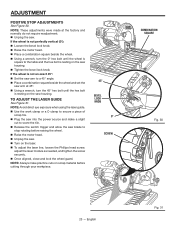
22 -
NOTE: Check that rollers are necessary. Do not start any adjustments until you have been jarred out of the wheel.
Move the rail until...be reset. Unplug the saw has been adjusted at the factory for making very accurate cuts. ADJUSTMENT
WARNING:
Before performing any adjustment, make sure the tool is unplugged from the power supply ...
Operation Manual - Page 23
... is resting on scrap material before raising the wheel. Raise the motor head. Unplug the saw. Turn on the saw .
English
Fig. 31 NOTE: Always make a slight
cut to score the tile. Release the switch trigger and allow the saw housing. Tighten the bevel lock knob. If the wheel is...
Operation Manual - Page 24
... other parts can result in accordance with plastic parts.
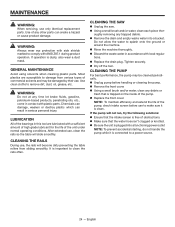
CLEANING THE SAW
Unplug the saw.
Using a small brush and/or water, clean each piece thoroughly removing any debris or
...accidental starting, do not handle the pump while it is connected to a power source.
24 - After extended use , the rails will slide smoothly. Tighten securely.
Dry off the tool. ...
Operation Manual - Page 25
....
Check for wear. BRUSH CAP
BRUSH ASSEMBLY
Fig. 32
25 - Replace both brushes when either side of the cutting wheel.
length of motor and that should be removed and rinsed with a screwdriver. Make sure curvature of brush matches curvature of carbon remaining. The saw .
Remove brush cap with clean water. MAINTENANCE
BRUSH REPLACEMENT
See Figure 32...
Similar Questions

Wiring The Switch For R4020 Wet Saw
wire position for switch for Ridgid tile saw R402
wire position for switch for Ridgid tile saw R402
(Posted by jmck0924 1 year ago)

Noise Level.
R4030 Noise when water is introduced when there is a load or no load, otherwise acceptable noise lev...
R4030 Noise when water is introduced when there is a load or no load, otherwise acceptable noise lev...
(Posted by Uameye 7 years ago)

How Do I Change Brushes
How do I change the motor brushes on a Ridgid R4030S tile saw
How do I change the motor brushes on a Ridgid R4030S tile saw
(Posted by dennis45227 8 years ago)

How To Repai The Rails For Cutting Table On A 10' Ridgid Tile Saw Model# R4010
(Posted by MOTODAD 10 years ago)
I Need A Stand !
Hello . Do you have a stand for RIDGED 7 in. TILE SAW R4030 ?
Hello . Do you have a stand for RIDGED 7 in. TILE SAW R4030 ?
(Posted by stingerdew 11 years ago)