Get support for Ricoh Aficio SP 4310N

Ricoh Aficio SP 4310N Support Question

Ricoh Aficio SP 4310N Support Question

Find answers below for this question about Ricoh Aficio SP 4310N.
Need a Ricoh Aficio SP 4310N manual? We have 3 online manuals for this item!
Question posted by abdounhager on July 18th, 2023

How To Open Rear Cover And Remove Misfeed?

The person who posted this question about this Ricoh product did not include a detailed explanation. Please use the "Request More Information" button to the right if more details would help you to answer this question.

Current Answers

Answer #1: Posted by HelpHero on July 18th, 2023 6:30 AM
This answer was accepted by the poster of the original question.
HelpHero

Member since:
September 3rd, 2022

Points: 523,390
1,100
points
To open the rear cover and remove a misfeed in your Ricoh Aficio SP 4310N printer, you can follow these steps:

1. Make sure the printer is turned off and unplugged to ensure your safety during the process.

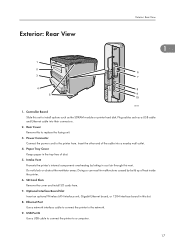
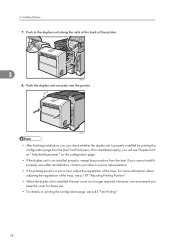
2. Locate the rear cover of the printer. It is typically located at the back of the printer.

3. There might be a latch or a release button near the rear cover. If there is a release button, press it to release the cover. If not, look for any latches or tabs that secure the cover in place.

4. Once you have released the cover, gently pull it towards you to open it. Take care not to force it or use excessive pressure.

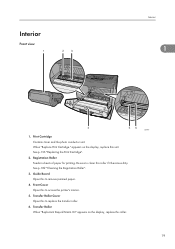
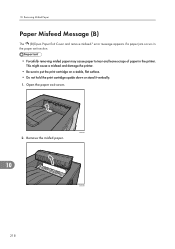
5. Inside, you should be able to see the paper path and any misfeed that needs to be cleared. Look for any torn paper or obstructions in the paper path.

6. Gently remove any paper fragments or obstructions using both hands. It's important to be cautious and avoid tearing the paper further while removing it.

7. After clearing the misfeed, make sure to close the rear cover securely. Ensure that it clicks into place or fastened properly.

8. Finally, plug in your printer and turn it on. It should be ready to use again. Please note that these instructions are general and may vary slightly depending on the specific model and design of your Ricoh printer.

If you encounter any difficulties or if the misfeed is still not resolved, I recommend consulting your printer's manual or contacting Ricoh customer support for further assistance.


I hope this is helpful? PLEASE "ACCEPT" and mark it "HELPFUL" to complement my little effort. Hope to bring you more detailed answers.

Helphero
Answer #2: Posted by SonuKumar on July 18th, 2023 10:32 AM
SonuKumar

Member since:
May 9th, 2021

Points: 16,598,000
100
points


Please respond to my effort to provide you with the best possible solution by using the "Acceptable Solution" and/or the "Helpful" buttons when the answer has proven to be helpful.

Regards,
Sonu
Your search handyman for all e-support needs!!

Related Ricoh Aficio SP 4310N Manual Pages

Manuals - Page 18

...keys for printer control and a display that shows the printer status. 6. Tray Extension 1 Pull this to remove jammed paper. 9. Front Cover Release Button Press this cover to turn the printer's power on... delivered here printed side facing down. 8. Paper Exit Cover Open this to the Printer 5. Guide to open the front cover. 11. Malfunctions and failure can result if these vents...
Manuals - Page 19

... interface board in the tray free of heat inside the printer. 6. Intake Vent Prevents the printer's internal components overheating by letting in malfunctions caused by build up of dust. 5. Controller Board Slide this to replace the fusing unit. 3. Exterior: Rear View Exterior: Rear View 1 CEE003 1. Rear Cover Remove this out to a computer. 17 Doing so can result...
Manuals - Page 21

...Print Cartridge". 2. Guide Board Open this to access the printer's interior. 5. Transfer Roller When "Replacmnt Requrd:Maint. When "Replace Print Cartridge." Kit" appears on the display, replace this roller. 19 Front Cover Open this roller if it becomes dirty... p.182 "Cleaning the Registration Roller". 3. Transfer Roller Cover Open this to clean this to remove jammed paper. 4.
Manuals - Page 50

... envelopes. Remove the rear cover of paper. Installed tray unit is identified as "Tray 2" and "Tray 3". Envelope feeder Loads up to two paper feed unit can be installed on the printer. Installed ... the optional paper feed unit, the envelope feeder cannot be installed on both sides of the printer to two envelope feeder unit can be used. 48 See p.51 "Attaching the Paper Feed...
Manuals - Page 77

CEE041 Proceed to step 7 if the paper tray cover is horizontal, and then pull it is not installed. 6. Open the rear cover. Lower the rear cover until it away. 4. Attaching the Duplex Unit 3 CEE040 5. Pull the bottom of the paper tray cover ( ) up slightly, and then remove the paper tray cover ( ), in the order shown in the illustration. 2 1 CEE043 75
Manuals - Page 78

... the duplex unit is not correct, adjust the registration of the printer. 3 CEE057 8. If you will see "Duplex Unit" as " Attached Equipment " on printing the configuration page, see p.187 "Adjusting Printing Position". • When the duplex unit is installed, the rear cover is properly installed by printing the configuration page from the start...
Manuals - Page 122

.... • Load envelopes with flaps closed to the left side of an envelope whose flap opens along its original package until time to rotate the print object 180 degrees. • To ...humid areas. • Avoid exposing paper to include the open flap when measuring. 6 ASH125S Storing Paper Take care when storing paper. Also, configure the printer driver to use it. 120 Loading Paper CEE033 •...
Manuals - Page 123

... • Wet paper • Paper that is adequate for the printer, poorly stored paper can cause paper misfeeds, print quality degradation, or malfunctions. 121 Malfunctions are especially likely when using paper printed on by other than a laser printer (e.g.monochrome and color copiers, ink-jet printers, etc.) • Surface-processed paper (excluding specified paper) • Special...
Manuals - Page 142

...printer) by running a pencil or ruler across them. 6 • Some kinds of envelope might cause misfeeds, wrinkles or print poorly. • Print quality on envelopes may be uneven if parts of an envelope have differing thicknesses. Open the rear cover... and type of this reason, take care when removing misfed paper. Otherwise, an injury might be very hot. Not doing so could...
Manuals - Page 144

6. CEE045 6. Close the rear cover. If the optional duplex unit was removed, re-install it in the printer by pushing it along the rails on the inside of the printer. 6 CEE057 7. Loading Paper 5. Securely push the duplex unit into the printer. 142 CEE050
Manuals - Page 174

Open the rear cover. Maintaining the Printer 1. Lower the rear cover until it is attached, push down the lever on the right side of the duplex unit ( ), and then pull it out until it away. 7 CEE041 3. CEE040 2. 7. If the optional duplex unit is horizontal, and then pull it stops ( ). 2 1 CEE056 172
Manuals - Page 177

Position the rear cover horizontally and align it with the grooves in the printer by pushing it in the printer's interior. If the optional duplex unit was removed, re-install it along the rails on the inside of the printer. CEE057 175 Replacing the Maintenance Kit 10. Close the rear cover. 7 CEE045 12. CEE044 11.
Manuals - Page 194

... load the paper again. For details, see p.220 "Paper Misfeed Message (C)". (Y1) Remove misfeed in Tray 3. The printer is applying the changes made to print. To reset the error, open the front cover and then close it. For details, see p.218 "Paper Misfeed Message (B)". (C) Open Rear Cover and remove misfeed. Check proxy user/password. Wait a while. Alert Messages (in alphabetical...
Manuals - Page 215

... Misfed Tray 1 • Forcefully removing misfed paper may cause paper to tear and leave scraps of paper in the standard paper feed tray or paper feed section. This might cause a misfeed and damage the printer. 1. CEE014 2. error message appears when a paper misfeed occurs in the printer. Paper Misfeed Message (A) Paper Misfeed Message (A) The " (A) Remove misfeed in Trays. CEE074 10...
Manuals - Page 220

... 218 10. error message appears if a paper jam occurs in the printer. CEE084 2. Open the paper exit cover. This might cause a misfeed and damage the printer. • Be sure to tear and leave scraps of paper in the paper exit section. • Forcefully removing misfed paper may cause paper to put the print cartridge on a stable...
Manuals - Page 222

... the metal part of paper in the paper feed section. • Forcefully removing misfed paper may cause paper to tear and leave scraps of the fusing unit. Open the rear cover. CEE040 2. Removing Misfed Paper Paper Misfeed Message (C) The " (C)Open Rear Cover and remove misfeed." 10. error message appears when a paper misfeed occurs in the printer. Touching it away. 10 CEE041 220
Manuals - Page 225

Close the rear cover. CEE045 10 223 9. CEE044 11. Position the rear cover horizontally and align it with the grooves in the printer's interior. Push the lock levers of the fusing unit down until they click. Paper Misfeed Message (C) CEE047 Proceed to step 12 if the optional duplex unit is installed. 10.
Manuals - Page 227

...; (Y2): Tray 3 This section explains how to tear and leave scraps of the optional paper trays, " (Y1) (Y2) Remove misfeed in the printer. Cov." Open all the trays indicated on the control panel, and then remove the jammed paper. 10 CEE170 225 The same procedure can be used for the other optional trays. • Forcefully...
Manuals - Page 229

... printer. Open the rear cover of paper in the duplex unit. Remove the misfed paper. Removing Misfed Paper Inside the Cover 1. CEE053 10 227 error message appears when a paper misfeed occurs inside the duplex section. • Forcefully removing misfed paper may cause paper to tear and leave scraps of the duplex unit. Paper Misfeed Message (Z) Paper Misfeed Message (Z) The " (Z)Remove...
Manuals - Page 230

CEE052 4. Remove the misfed paper. 10 CEE062 228 Close the rear cover of the duplex unit ( ). 1 2 CEE054 5. Removing Misfed Paper 3. Lift the lever ( ), open the cover of the duplex unit. 10.

Similar Questions

How To Remove Misfeed Paper
Error saying remove misfeed paper exit cover. I have removed it but can't get rid of the error.
(Posted by jtorielly 2 years ago)
How To Read The Meter On Aficio Sp 4310n Printer
I need to read the meter on the Aficio SP 4310 N printer. How do I do this
(Posted by Anonymous-130231 10 years ago)
Tray-priority Bevor Job-priority Causes A Mixing Rico Aficio Sp4310n
Several people are submitting simultaneously print jobs to a RICO AFICCIO SP4310N. Each Job needs Pa...
(Posted by ursfasler 10 years ago)
Printer Jam
I just installed the maintenance kit for my Ricoh Aficio SP4310n, now when i try to print something ...
(Posted by saraelensallam 11 years ago)
Where Is The 'rear Cover' On This Unit? Message Is Saying To Close The Rear Cove
will not print saying to close the rear cover, everything is closedd??
(Posted by LaurenBertsche 12 years ago)
Ask a New Question
Use the box below to post a new question about this Ricoh product .
Points & Prizes
  • You can earn points for nearly everything you do on HelpOwl.com
  • You can trade in those points for gift cards at leading retailers such as Amazon.com and Walmart
  • It's that simple!
See How it Works
Create a Free Account

Ricoh Manuals

Find free Ricoh Aficio SP 4310N manuals and user guides available at ManualOwl.com. Try out our unique manual viewer allowing you to interact with manuals from directly within your browser!

Ricoh Reviews

View thousands of Ricoh user reviews and customer ratings available at ReviewOwl.com.

Contact Information

Complete Ricoh customer service contact information including steps to reach representatives, hours of operation, customer support links and more from ContactHelp.com.

Scoreboard Ratings

See detailed Ricoh customer service rankings, employee comments and much more from our sister site.