Ricoh Aficio MP C6501SP Support Question
Ricoh Aficio MP C6501SP Support Question
Find answers below for this question about Ricoh Aficio MP C6501SP.Need a Ricoh Aficio MP C6501SP manual? We have 3 online manuals for this item!
Question posted by alohasarah on June 15th, 2012
Update Frequently Used Emails
I work in an office environment were several people use the printer/scanner. Some people have left and I'd like to clean up the frequently used emails in the scanner function so that people that are still with the company are at the top of the list.
Is there a way to delete an email/ID from the frequently used email section of the scanner. Or is there a way to reasign the number to someone else?
Thanks!
Current Answers
Answer #1: Posted by freginold on June 16th, 2012 5:07 AM
freginold

Member since:
December 20th, 2011 Points: 23,253,885

Member since:
December 20th, 2011 Points: 23,253,885
Hi, you can delete old users or reassign numbers through the address book:
- Press User Tools/Counter
- Select System Settings
- Select the Administrator Tools tab
- Select Address Book Management (you may have to scroll down first to find it)
To delete an old user, touch Delete and then select the user to delete. To edit a user's number or other details, select that user on the screen (without touching Delete first), change whatever details you want to change, then touch OK to save the changes.
Related Ricoh Aficio MP C6501SP Manual Pages
Quick Start Guide - Page 11
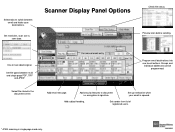
Scanner Display Panel Options
Check file status.
Groups and
individual addresses can be programmed. encryption & signature. One or two sided original. Set file types between email and folder scan destinations.
Set sender from list of registered users.
* JPEG scanning in the document server.
Add security features to switch between multi and ...
Quick Start Guide - Page 12

Place Originals in Feeder or on your operating system and device.) Press [Start]
(Note: Screenshots are provided for reference purposes only. Your display may vary depending on Glass 5. Select [E-mail] or [Folder] Tab 3. Select destination [email address or folder location
4. Basic Scanning
1. At copier Screen Press [Scanner]
2.
Quick Start Guide - Page 17
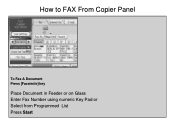
How to FAX From Copier Panel
To Fax A Document Press [Facsimile] key
Place Document in Feeder or on Glass Enter Fax Number using numeric Key Pad or Select from Programmed List Press Start
Quick Start Guide - Page 18

... and copier
Will scan and send both sides. Select Stored Fax Destination(s) or enter a New Destination using the Numeric Key Pad on Right Side of Installing the LAN fax driver for errors only or off. Use The Original Feed type to Store a FAX Destination
Users can print automatically, selectively,
for faxing documents...
Troubleshooting Guide - Page 5
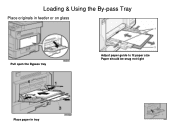
Loading & Using the By-pass Tray
Place originals in feeder or on glass
Pull open the Bypass tray
Adjust paper guide to fit paper size Paper should be snug not tight
Place paper in tray
Troubleshooting Guide - Page 6
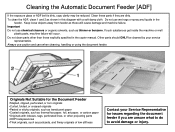
... to do to avoid damage or injury. Do not use wet rags or spray any liquids in the copier manual. Do not clean parts other projecting parts •OHP transparencies •Thick...than those explicitly specified in the
feeder. Other parts should ONLY be reduced. Clean these will occur. To clean the ADF, clean 1 and 2 as postcards, and flimsy originals of low stiffness
Contact your ...
Troubleshooting Guide - Page 7
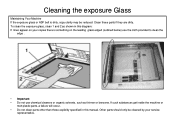
...melt plastic parts, a failure will occur. • Do not clean parts other than those explicitly specified in this manual. Cleaning the exposure Glass
Maintaining Your Machine If the exposure glass or ...is something on the leading glass edged (outlined below) use the cloth provided to clean the
edge .
• Important • Do not use chemical cleaners or organic solvents, such as shown in...
Troubleshooting Guide - Page 8
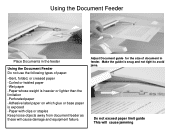
Adjust Document guide for the size of document in the feeder
Using the Document Feeder Do not use the following types of paper:
-Bent, folded, or creased paper
-Curled or twisted paper -Wet paper -Paper whose weight is ... guide is exposed -Paper with clips or staples Keep loose objects away from document feeder as these will cause jamming Using the Document Feeder
Place Documents in feeder.
Troubleshooting Guide - Page 12
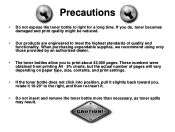
... the toner bottle to the right, and then re-insert it 10-20° to light for a long time. When purchasing expendable supplies, we recommend using only those provided by an authorized dealer.
• The toner bottles allow you do, toner becomes damaged and print quality might be reduced.
• Our...
User Guide - Page 2
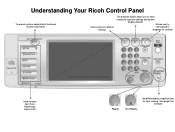
... administrator tools and counter information
Clears screen to default settings
The program button allows you to store
frequently used job settings and screen
display defaults
Allows user to
interrupt job in
progress for new job
Hard function keys have Red/Yellow status LEDs
8.5" Full Color W-VGA Screen
Ready
Not Ready
Simplified display magnifies...
User Guide - Page 3
... in simplified
display mode.
Simplified Display
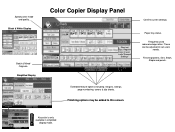
Color Copier Display Panel
Confirm current settings.
Extended feature options including; Short cut keys.
Specify color mode and quality.
Frequently used reduce/enlarge ratios. Sort, Stack, Staple and punch.
User Guide - Page 6
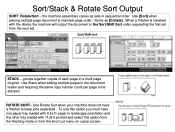
... is installed with the device the machine will output the document in the document feeder and requiring the same copy number count per page to be stacked.
Use Rotate Sort when your ...screen. Sort/Stack & Rotate Sort Output
SORT Rotate/Sort - Use [Sort] when placing multiple page document to keep jobs separated . Use Stack when setting multiple pages in the Sort/Shift Sort order,...
User Guide - Page 13

.... Press [Horizontal) Enter the desired ratio with the number keys, and then press [ ].
Place the originals, and then press the [Start] key.
Directional Size Magnification%
Use this feature to enlarge a document by placing percentage proportions in the horizontal and vertical fields. Place document on platen glass Press [Reduce/Enlarge]
Press [Direct.
User Guide - Page 14
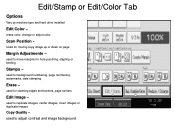
... move margins for moving copy image up or down on page
Margin Adjustments - used to replicate images, center images, invert images or duplicate images
Copy Quality - used for cleaning edges and borders, page centers
Edit Image - used for background numbering, page numbering, watermarks, date stamping
Erase -
erase color, change or adjust color
Scan Position...
User Guide - Page 15
...
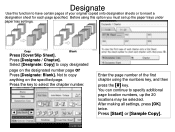
Press [Designate: Blank].
After making all settings, press [OK] twice.
Copy
Blank
Press [Cover/Slip Sheet]. Enter the page number of the first chapter using this function to have certain pages of your original copied onto designation sheets or to copy designated
page on the specified page. Select [Designate: Copy] to insert...
User Guide - Page 16

Users and also choose to place on first page only or on all pages being copied. If using
A color unit, these options may be printed in color, on units with 60+ page speeds have the option to create a desired stamp. (Options may vary by machine types) Preset Stamp
Allows users to place a watermark on documents being copied. Users Can choose stamp option, placement, size and density.
User Guide - Page 19
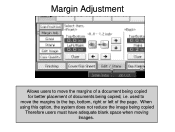
When using this option, the system does not reduce the image being copied, i.e. Margin Adjustment
Allows users to the top, bottom, right or left of documents being copied Therefore users must have adequate blank space when moving
Images. used to move the margins to move the margins of a document being copied for better placement of the page.
User Guide - Page 35

Using INTERUPT Option
Use the INTERUPT function when you want to interrupt a long copy job, to make urgently needed copies.
User Guide - Page 38
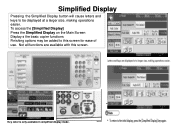
... [Simplified Display] Press the Simplified Display on the Main Screen Display s the basic copier functions Finishing options may be displayed at a larger size, making operations easier. Not all functions are available with this screen for ease of use. Simplified Display
Pressing the Simplified Display button will cause letters and keys to be added...
User Guide - Page 60
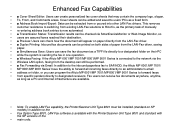
... via Email: In addition to the inbound paperless fax to SAF/HDD, the Aficio MP 6001/MP 7001/ • MP 8001/MP 9001 ...Aficio MP 6001/MP 7001/MP 8001/MP 9001 Series is now automated. • ■ Transmission Status: Transmission results can be checked via SmartDeviceMonitor or Web Image Monitor, so • users are available.
• Note: To enable LAN Fax capability, the Printer/Scanner...
Similar Questions

Ricoh Aficio Mpc6501sp How To Program Email Addresses For Scanner
(Posted by mtbath 9 years ago)

Ricoh 3500 Printer Scanner How To Remove A Email Address
(Posted by praedkre 9 years ago)

Ricoh Aficio Mp C6501sp Sc446 Error.
How to fix? Clean Image Transfer Belt, ITB sensor etc etc? Tried Service reset to no avail.
How to fix? Clean Image Transfer Belt, ITB sensor etc etc? Tried Service reset to no avail.
(Posted by bn549 11 years ago)

How Do I Save An Email Address Or A Fax Number
how do i save an email address or a fax number
how do i save an email address or a fax number
(Posted by Anonymous-83851 11 years ago)

How Do I Print From Usb To Ricoh Aficio Mp C6501sp?
(Posted by noeleneclarke 11 years ago)