Ricoh Aficio MP C5502 Support Question
Ricoh Aficio MP C5502 Support Question
Find answers below for this question about Ricoh Aficio MP C5502.Need a Ricoh Aficio MP C5502 manual? We have 3 online manuals for this item!
Question posted by nancyking42481 on July 26th, 2012
How Do You Enter A Pause When Entering Fax Numbers From The Key Board
The person who posted this question about this Ricoh product did not include a detailed explanation. Please use the "Request More Information" button to the right if more details would help you to answer this question.
Current Answers
Answer #1: Posted by freginold on July 27th, 2012 3:34 AM
freginold

Member since:
December 20th, 2011 Points: 23,253,885

Member since:
December 20th, 2011 Points: 23,253,885
There is a Pause button on the fax screen, right below where you would enter a phone number. Hit this button once for each pause you want to insert.
Related Ricoh Aficio MP C5502 Manual Pages
User Guide - Page 106
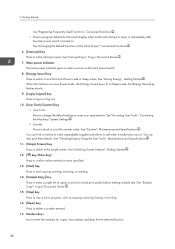
... Enquiry Using the User Tools", Maintenance and Specifications . 11. [Simple Screen] key Press to switch to and from Low Power mode or Sleep mode. See "Accessing User Tools", Connecting the Machine/ System Settings . • Counter Press to enter the numbers for copies, fax numbers and data for the initial display when modes are cleared or...
User Guide - Page 127
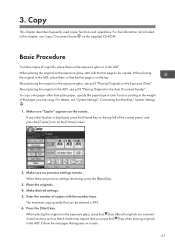
..." appears on the top. Enter the number of copies with the first page to the weight of the paper you press the [ ] key when placing originals in the ADF, see "System Settings", Connecting the Machine/ System Settings
. 1. When placing the original on the exposure glass, start with the number keys. When placing the original on...
User Guide - Page 138
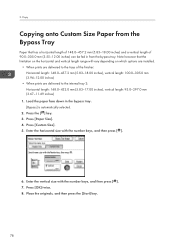
Press the [ ] key. 3. Press [Custom Size]. 5. Press [OK] twice. 8. Note however that has a horizontal length of ... fed in the bypass tray. [Bypass] is automatically selected.
2. Press [Paper Size]. 4. Enter the horizontal size with the number keys, and then press [ ]. 7. Enter the vertical size with the number keys, and then press [ ].
6. Place the originals, and then press the [Start...
User Guide - Page 143
2.
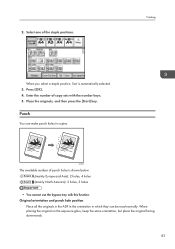
Place the originals, and then press the [Start] key. Select one of copy sets with this function. Punch
You can be read ...holes, 4 holes (mainly North America): 2 holes, 3 holes
• You cannot use the bypass tray with the number keys. 5. Enter the number of the staple positions. CKN022
The available number of punch holes is automatically selected. 3.
Press [OK]. 4.
User Guide - Page 145
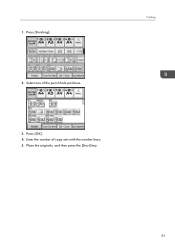
Press [OK]. 4. 1. Select one of copy sets with the number keys. 5. Enter the number of the punch hole positions.
3.
Place the originals, and then press the [Start] key.
85 Finishing
2. Press [Finishing].
User Guide - Page 150
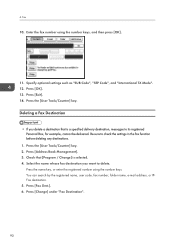
... Destination
• If you want to delete. Check that is selected. 4. Press [Address Book Management]. 3. Enter the fax number using the number keys. Press the [User Tools/Counter] key. 2. 4. Press [Exit]. 14. Select the name whose fax destination you delete a destination that [Program / Change] is a specified delivery destination, messages to check the settings in the...
User Guide - Page 156
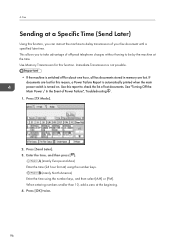
... list of lost . Press [TX Mode].
2. When entering numbers smaller than 10, add a zero at the time. Press [Send Later]. 3. Fax
Sending at a Specific Time (Send Later)
Using this ... the beginning. 4. Enter the time, and then press [ ].
(mainly Europe and Asia) Enter the time (24 hour format) using the number keys.
(mainly North America) Enter the time using the number keys, and then select ...
User Guide - Page 158
...enter a file name, and then press [OK].
• Password Press [Password], enter a password using the number keys..., and then press [OK]. You cannot use the following transmission methods:
• Immediate Transmission • Parallel Memory Transmission • On Hook Dial • Manual Dial
98 Re-enter.... Press the [Start] key. If you have selected ...
User Guide - Page 159
... [Details].
Press [Select Stored File]. Select the documents to stored documents, place the original, and then select any scan settings you select a document with a password, enter the password using the number keys, and then press [OK]. 4. Press [OK]. 6. When you want to add your originals to thumbnail display. 3. 1. Press the Thumbnails...
User Guide - Page 160
... the printing method. 4. Press [Exit] twice.
100 All
Prints the results of communications in step 3, enter a 4-digit file number using the number
keys. 5. Press [TX/RX Status / Print].
2. Press the [Start] key. 7. Print per User". Print per File No." Press [Print Journal]. 3. If you selected "Print per User" in step 3, select a user from the list...
User Guide - Page 165

... at once by pressing [Select All Jobs] after selecting a file. 5. Enter the number of the document, press [Detailed Settings]. 8. Press [Locked Print Job]. 4. To change the print settings of copies using the number keys, and then press [OK]. 7.
Press [Print]. 6. Enter the password using the number keys if necessary, and then press [Print].
105 Select the files...
User Guide - Page 167
... select all the Hold Print files at once by pressing [Select All Jobs] after selecting a file. 5. To change the print settings of copies using the number keys if necessary, and then press [Print].
107
Press [Hold Print Job]. 4. Enter the number of the document, press [Detailed Settings]. 7. 2. Press [Print]. 6.
User Guide - Page 169
... do not require a password. CJS113
2. If multiple print files are not deleted even after selecting a file. 5. Enter the number of files to be printed is displayed on the confirmation screen. 6. The number of copies using the number keys if necessary, and then press [Print].
109 Select the files you set the password in the printer...
User Guide - Page 184
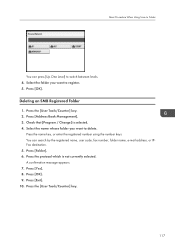
.... Select the name whose folder you want to delete. Press [OK]. Press the [User Tools/Counter] key. 2. Press the name key, or enter the registered number using the number keys. Press [Folder]. 6.
A confirmation message appears. 7. Press the [User Tools/Counter] key.
117 Press [Yes]. 8. Select the folder you want to register. 5. Press [Address Book Management]. 3. Press [OK...
User Guide - Page 189

..., or IP-Fax destination. 5. Press [Delete All], and then press [OK]. 8. Enter the e-mail address. 3. 6.
Press [E-mail]. 6. Press [OK]. 9. Press the [User Tools/Counter] key. Press [Manual Entry].
2. Press [Exit]. 10. Press [Change] under "E-mail Address". 7. Press [OK].
122 Press the name key, or enter the registered number using the number keys. Entering an E-mail Address...
User Guide - Page 199

... that were registered in the Address Book. Document Server
1. Press [Password]. 8. You can use four to eight digits for the password. 9. Place the original. 11.
Enter a password with the number keys, and then press [OK]. Press [User Name]. 4. Specify the original scanning conditions. 12.
User Guide - Page 495

... window, enter "regsvr32 schmmgmt.dll", and then press the [Enter] key.
2. ...fax number cannot be obtained during authentication, specify the setting as follows: Windows Server 2008 R2 is used to store the file, and then click [Open]. 8. In "Cryptographic service provider:", select a provider, and then click [Next]. 6. On the [File] menu, click [Save]. 13. Windows Authentication
2. Enter...
User Guide - Page 552
... has turned to "Clear".
• If the machine enters Energy Saver mode when overwriting is in progress, press the [Energy Saver] key to revive the display in order to check the icon....data of this manual, and can also automatically overwrite temporarily-stored data.
• Fax transmission data, fax numbers and network TWAIN scanner data are trained in the memory installed on again and see...
User Guide - Page 708

... the user administrator. Dest.]. Only the user administrator can register fax numbers only. Default: [Off] Transfer to [On], you use "Restrict Use of Destinations (Fax)" and "Restrict Use of Destinations (Scanner)" is set these functions to receive e-mails via SMTP
264 7. A user cannot directly enter the destinations for this setting. For details, see p.75...
Quick Reference Guide - Page 1

...
fax
2
3
1
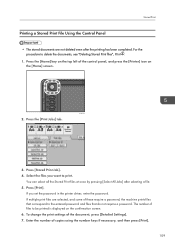
Basic Fax Procedure
Place original(s) face up in the Auto Document Feeder (ADF), or face down on the platen glass. 1. Using the number keypad, enter destination fax number....programmed one file. 4.
locked print
4 3
5
Print
2
Release Locked Print Job Procedure
1. Press key on appear.) 4. Press . 3. Press (If using the platen glass, press after placing last ...
Similar Questions


How Do I Setup My Fax Number On Ricoh Aficio Mp C5502
(Posted by vaz 10 years ago)


How Do You Send A Fax To Yourself After Scanning In The Paper You Want To Send
(Posted by Anonymous-79987 11 years ago)

Enter Fax Numbers For Speed Dial
enter fax#/fax name in sequence, not like 00001, 00003, 00005, 00009, 00013,etc.
enter fax#/fax name in sequence, not like 00001, 00003, 00005, 00009, 00013,etc.
(Posted by Anonymous-36670 12 years ago)