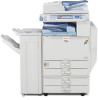
Ricoh Aficio MP C5000 Support Question
Ricoh Aficio MP C5000 Support Question
Find answers below for this question about Ricoh Aficio MP C5000.Need a Ricoh Aficio MP C5000 manual? We have 3 online manuals for this item!
Question posted by noondan on April 5th, 2014
How To Send Scan Files From Ricoh Aficio C5000 To A Computer Running Windows 7
The person who posted this question about this Ricoh product did not include a detailed explanation. Please use the "Request More Information" button to the right if more details would help you to answer this question.
Current Answers
Answer #1: Posted by freginold on April 20th, 2014 5:29 AM
freginold

Member since:
December 20th, 2011 Points: 23,253,895

Member since:
December 20th, 2011 Points: 23,253,895
Hi, to set up scanning to a folder, you will first need to create and share a folder on your computer. Basically you will need to create a folder to scan to, and then share it and give at least one user account permission to read and write to that folder. The article below will show you how to do that in Windows XP, and the steps for XP and Windows 7 are very similar.
- How to create a shared folder in Windows XP
Once you have set up the folder, this article will guide you through linking to the folder from your MFP:
- How to link to a network share folder from a Ricoh Aficio MP series copier
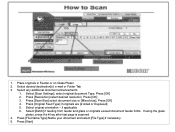
After everything is set up, follow these steps to scan a document or image to your folder:
- Press the Scanner button
- Place your document(s) in the document feeder or on the glass
- Select the Folder tab, if it isn't already selected
- Select your folder from the list of programmed destinations, or enter a new one using the Manual Entry button
- Press the Start button
Related Ricoh Aficio MP C5000 Manual Pages
Quick Start Guide - Page 1
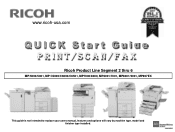
www.ricoh-usa.com
Ricoh Product Line Segment 2 thru 6
MP/5000/5001, MP C5000/C6000/C6501, MP7000/8000, MP6001/7001, MP8001/9001, MP907EX
This guide is not intended to replace your users manual, features and options will vary by machine type, model and finisher type installed.
Quick Start Guide - Page 3
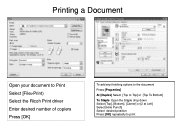
Printing a Document
Open your document to Print Select [File>Print) Select the Ricoh Print driver Enter desired number of copiers Press [OK]
To add any finishing options to the document
Press [Properties]
At [Duplex] Select [Top to Top] ...
Quick Start Guide - Page 4
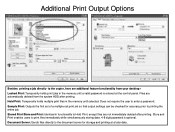
...at the control panel. Document Server: Sends files directly to the document server for accuracy prior to printing the entire job. Files are automatically deleted from your desktop:... valid password is optional. Hold Print: Temporarily holds multiple print files in functionality to Hold Print, except files are not immediately deleted after printing. Additional Print Output Options
Besides...
Quick Start Guide - Page 5
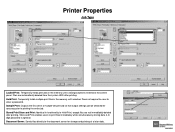
... require the user to printing the entire job. Store and Print enables users to Hold Print, except files are automatically deleted from the system HDD after printing. Files are not immediately deleted after printing. Document Server: Sends files directly to the document server for accuracy prior to enter a password. Printer Properties
Job Type
Locked...
Quick Start Guide - Page 6

Printing To Document Server
Open your document to Print
Select [File>Print]
Select the Ricoh Print driver Press [Properties] At [Job Type] open the drop down window
and choose [Document Server] Press [OK] Press [Details] Enter user Information:
User ID (if applicable) or leave blank File Name Password (if applicable) User Name Press [OK] repeatedly to print
Quick Start Guide - Page 9
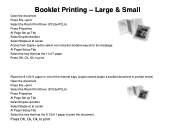
Booklet Printing -
Large & Small
Open the document Press File >print Select the Ricoh Print Driver (PCL5e/PCL6) Press Properties At Page Set up Tab ...one of the internal trays (copier cannot staple a booklet document in portrait mode) Open the document Press File >print Select the Ricoh Print Driver (PCL5e/PCL6) Press Properties At Page Set up Tab Select Duplex>booklet Select Staple>2 at center...
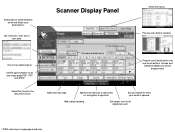
Quick Start Guide - Page 11
... document server.
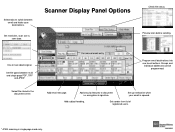
Preview scan before sending. One or two sided original.
Set up notification when your email is opened. Add subject heading. Set resolution, scan size & scan type. Select tabs to document i.e.
Add email message.
Add security features to switch between multi and single page PDF, TIFF
and JPEG*
Select file stored in single page...
Quick Start Guide - Page 13
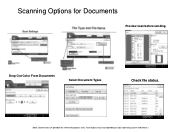
Scanning Options for reference purposes only. Your display may vary depending on your operating system and device.) Drop Out Color From Documents
Select Document Types
Check file status.
(Note: Screenshots are provided for Documents
Preview scan before sending.
Quick Start Guide - Page 18

... Copier
Use to Store a FAX Destination
Users can print automatically, selectively,
for faxing documents from the desktop with fax Covers and other options. Confirmations can send single document to select 2 sided when originals are 2 sided and copier
Will...
Quick Start Guide - Page 19

...Fax M8 driver 4. Press [Attach Cover] to add a fax cover to the document, you can select more than one destination to send same fax.
7. Press [Send] or [Print] At [Fax Number] type the Recipient's Fax# just as Destination] to fax 2. 1. Press [OK] or... [Address Book], if the number is already pre-programmed in address book.
6. Select [File], then [Print]
Faxing From Desktop
3.
User Guide - Page 40

Document Server Usage
Documents may be scanned or Printed to Document Server for: -Confidential Printing -Print and Hold -Sample Printing -Forms printing -File Merge (different types) -Electronic Distribution -HIPPA Compliancy -Label Printing -Cost Savings
User Guide - Page 41
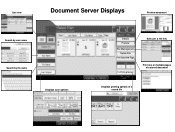
List view
Document Server Displays
Preview document
Search by user name Search by file name Displays scan options
Details Preview File Management Delete File Print Specified Page
To Printing Screen
Edit user & file Info
Print one or multiple pages of a stored document
Displays printing options of a stored file
User Guide - Page 42
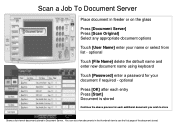
... To Document Server
Place document in feeder or on the glass
Press [Document Server] Press [Scan Original] Select any appropriate document options
Touch [User Name] enter your document if required - optional
Touch [File Name] delete the default name and enter new document name using keyboard
Touch [Password] enter a password for each additional...
User Guide - Page 46
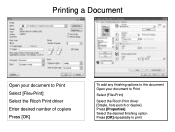
Printing a Document
Open your document to Print Select [File>Print] Select the Ricoh Print driver Enter desired number of copiers Press [OK]
To add any finishing options to the document Open your document to Print
Select [File>Print)
Select the Ricoh Print driver [Staple, hole punch or duplex] Press [Properties] Select the desired finishing option Press [OK] repeatedly to print
User Guide - Page 47

Printing To Document Server
Open your document to Print
Select [File>Print]
Select the Ricoh Print driver Press [Properties] At [Job Type] open the drop down window
and choose [Document Server] Press [OK] Press [Details] Enter user Information:
User ID (if applicable) or leave blank File Name Password (if applicable) User Name Press [OK] repeatedly to print
User Guide - Page 48
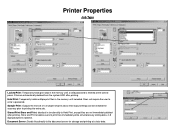
... printing at the control panel. Printer Properties
Job Type
Locked Print: Temporarily holds print jobs in the memory until selected. Document Server: Sends files directly to the document server for accuracy prior to Hold Print, except files are automatically deleted from the system HDD after printing. Does not require the user to print...
User Guide - Page 52
... can be programmed. Set up notification when your email is opened.
Set file types between email and folder scan destinations. Add email message.
Preview scan before sending.
Add security features to switch between multi and single page PDF, TIFF
and JPEG*
Select file stored in single page mode only. For manual email entry
Program email...
User Guide - Page 53
...] 2. Select original orientation - Select [Batch] if feeding from feeder and glass or originals exceed document feeder limits. Press [Start] Press [File Name/Type] Name your document and select [File Type] if necessary 5. Press [Scan Size] select document size or [Mixed size], Press [OK] 4. if applicable 6. Select desired destination[s] e-mail or Folder Tab 3. Select...
User Guide - Page 56
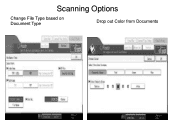
Scanning Options
Change File Type based on Document Type
Drop out Color from Documents
User Guide - Page 60
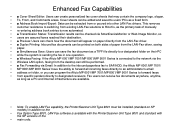
...TIFF file directly to a designated folder on their PC • while the system is sending the fax in one operation. • ■ Wireless Faxing: If the Aficio MP 6001/MP 7001/MP 8001/MP ... Transmission Status: Transmission results can program the Aficio MP 6001/MP 7001/MP 8001/MP 9001 Series to forward faxes • from specific senders directly to Ricoh's, as a fixed form. • ■...
Similar Questions

How To Send Scan Files From Ricoh Aficio C5000 To Windows 7 Computer
(Posted by drokfi 9 years ago)


Aficio Mp 6001 Will Not Send Scanned Items To Email
(Posted by nwrivasj 9 years ago)


How To Send Scanned Document To Email On Aficio Copiers
(Posted by bwhihe 10 years ago)