Ricoh Aficio MP 5001 Support Question
Ricoh Aficio MP 5001 Support Question
Find answers below for this question about Ricoh Aficio MP 5001.Need a Ricoh Aficio MP 5001 manual? We have 4 online manuals for this item!
Question posted by wendyfaulder on February 5th, 2013
I Have Had So Much Trouble Adding Fax Numbers And Names To Our User Groups.
when i use the web manager to add fax/names to our user groups, it always shows up as an individual selection on the actual machine. we are a large business and don't want this.Can you direct me on how to add names and numbers to our user groups without having them being single locations on the machine.Kind regards. Wendy
Current Answers
Related Ricoh Aficio MP 5001 Manual Pages
Quick Start Guide - Page 6
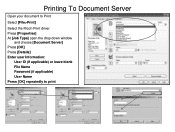
Printing To Document Server
Open your document to Print
Select [File>Print]
Select the Ricoh Print driver Press [Properties] At [Job Type] open the drop down window
and choose [Document Server] Press [OK] Press [Details] Enter user Information:
User ID (if applicable) or leave blank File Name Password (if applicable) User Name Press [OK] repeatedly to print
Quick Start Guide - Page 11
... or two sided original. Set file types between email and folder scan destinations. Groups and
individual addresses can be programmed. Set resolution, scan size & scan type. Add security features to switch between multi and single page PDF, TIFF
and JPEG*
Select file stored in single page mode only. Set up notification when your email...
Quick Start Guide - Page 16
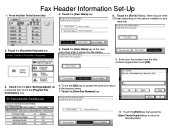
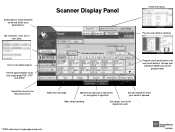
... that the [Gen. Settings/Adjust] tab is selected then touch the [Program Fax Information] key
6. Touch the [Exit] key then press the
[User Tools/Counter] key to return to the previous menu 7. Touch the [Own Name] key
8. Touch the [Own Fax Number] key
10. Fax Header Information Set-Up
1. Enter your
machine)
2. Touch the [OK] key to accept...
Quick Start Guide - Page 17
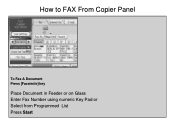
How to FAX From Copier Panel
To Fax A Document Press [Facsimile] key
Place Document in Feeder or on Glass Enter Fax Number using numeric Key Pad or Select from Programmed List Press Start
Quick Start Guide - Page 18

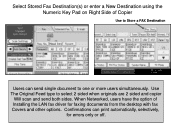
... to Store a FAX Destination
Users can print automatically, selectively,
for faxing documents from the desktop with fax Covers and other options. Select Stored Fax Destination(s) or enter a New Destination using the Numeric Key Pad on Right Side of Installing the LAN fax driver for errors only or off. Confirmations can send single document to one or more users simultaneously. When...
Quick Start Guide - Page 19

.... Press [Attach Cover] to add a fax cover to the document, you wish to send same fax.
7. You can customize your fax cover.
8. In the [Name] list, click the LAN-Fax M8 driver 4. Select [File], then [Print]
Faxing From Desktop
3. Press [OK] or [Print].
5. 1. Press [Set as if you were manually dialing the number at a Fax Machine or select from [Address Book], if...
User Guide - Page 3
... cut keys.
Sort, Stack, Staple and punch. margins, stamps, page numbering, covers & slip sheets.
Black & White Display
Batch & Mixed Originals.
Frequently used reduce/enlarge ratios. These can be added to suit users
needs.
Extended feature options including; Key color is only available in user tools "General
Settings"
Paper tray status. Specify color mode and quality...
User Guide - Page 6
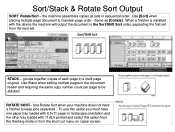
... must have a finisher to keep jobs separated . groups together copies of each page in landscape orientation and the other tray loaded with 8.5x11 paper in a multi-page original. Use Rotate Sort when your machine does not have one paper tray loaded with 11x8.5 portrait and select this option from the finishing mode or from...
User Guide - Page 10
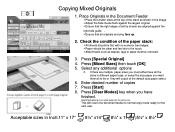
...as shown in different paper trays, or select the size paper you have
finished. Press [Mixed Sizes] then touch [OK] 5. Enter desired number of the stack as staples, tags or ... auto paper select.
6. Press [Special Original] 4. Select any additional options
3. Press [Clear Modes] key when you want them all to normal copy mode ready for the next user.
Selecting Duplexing must all...
User Guide - Page 17

Place image on glass Press [Edit/Stamp] Press [Edit Image] Press [Image Repeat] Press [OK] Press [Reduce/Enlarge] Press [Numbers Key] Enter the reproduction ratio Press [OK] Select the paper size Press [Start]
Image Repeat
4 Repeats (50%) 8 Repeats (35%) 16 Repeats (25%)
Allows users place a single page on the glass and have the image repeated multiple times on a single page
User Guide - Page 24

... position of placement of copies
Press [SAMPLE COPY] or [Start]
Page Numbering
Page Number Format
Number Page Position
Starting Page, Starting Number and Ending number,
Allows users to start number sequence
Touch [Last Number]>Enter information Touch First [Printing Number] >enter information
Touch [Total Pages] >enter information Select any other finishing options including the desired...
User Guide - Page 29

Adding Covers
To set the Bypass tray as the cover paper source:Press "User Tools" Select "System Settings" Select the "Paper Size" Settings" tab
Select "Bypass"
Select "Display" Select "Cover" Select "Mode Selected" Select "OK" Press "User Tools" again to exit
To change between 1 and 2 sided covers:Press "User Tools" Select "Copy Features" Select "Page Format" Select "Cover Mode" Select 1 or 2 ...
User Guide - Page 41
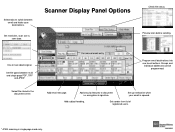
List view
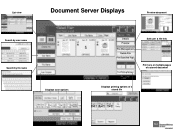
Document Server Displays
Preview document
Search by user name Search by file name Displays scan options
Details Preview File Management Delete File Print Specified Page
To Printing Screen
Edit user & file Info
Print one or multiple pages of a stored document
Displays printing options of a stored file
User Guide - Page 42

... enter new document name using keyboard
Touch [Password] enter a password for each entry Press [Start] Document is stored
Continue the above process for your name or select from list - You can also view documents in feeder or on the glass
Press [Document Server] Press [Scan Original] Select any appropriate document options
Touch [User Name] enter your document...
User Guide - Page 47

Printing To Document Server
Open your document to Print
Select [File>Print]
Select the Ricoh Print driver Press [Properties] At [Job Type] open the drop down window
and choose [Document Server] Press [OK] Press [Details] Enter user Information:
User ID (if applicable) or leave blank File Name Password (if applicable) User Name Press [OK] repeatedly to print
User Guide - Page 52
... and single page PDF, TIFF
and JPEG*
Select file stored in single page mode only.
Set sender from list of registered users.
* JPEG scanning in the document server. Groups and
individual addresses can be programmed. Add email message. Set up notification when your email is opened. Add subject heading. Select tabs to document i.e. Set resolution, scan size...
User Guide - Page 59
... are 2 sided and copier
Will scan and send both sides. When Networked, users have the option of Copier
Use to Store a FAX Destination
Users can print automatically, selectively,
for faxing documents from the desktop with fax Covers and other options. Select Stored Fax Destination(s) or enter a New Destination using the Numeric Key Pad on Right Side of Installing the LAN...
User Guide - Page 60
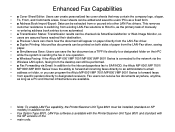
... Editor: Users can save the fax document as a TIFF file directly to a designated folder on SP models) in one operation. • ■ Wireless Faxing: If the Aficio MP 6001/MP 7001/MP 8001/MP 9001 Series is connected to the network via Email: In addition to the inbound paperless fax to SAF/HDD, the Aficio MP 6001/MP 7001/ • MP 8001/MP 9001 Series...
Reference Guide - Page 7
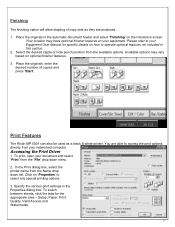
... box. Print Features
The Ricoh MP 5001 can also be used as they are able to select any special printing options. 3.
To print, open your Equipment User Manual for the appropriate area - Specify the various print settings in the automatic document feeder and select 'Finishing' on 'Properties' to access the print options directly from the available options.
Reference Guide - Page 8
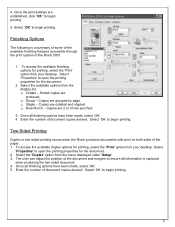
... or two-sided printing occurs when the Ricoh produces documents with print on both sides of document copies desired. Select
'Properties' to begin printing.
8 Enter the number of the Ricoh 5001.
1. Select 'Properties' to begin printing. The user can adjust the position of the document and margins to ensure all finishing options have been made...
Similar Questions


Ricoh Aficio Mp 5001 Manual How To Add Email Addresses
(Posted by jasoma 10 years ago)

Ricoh Aficio Mp 5001 How Do You Add Name To Scanner
(Posted by jupadorv 10 years ago)

How To Add Emails To Aficio Mp 5001 Via Web Browser
(Posted by koJohn19 10 years ago)

How To Change User Code Ricoh Aficio Mp C3500 Using Web Interface
(Posted by uhdfdadd 10 years ago)