Ricoh Aficio MP 171 Support Question
Ricoh Aficio MP 171 Support Question
Find answers below for this question about Ricoh Aficio MP 171.Need a Ricoh Aficio MP 171 manual? We have 2 online manuals for this item!
Question posted by davecapp on June 19th, 2023
How Do I Scan To Network Folder On The Mp 171?
Current Answers
Answer #1: Posted by freginold on June 19th, 2023 2:05 PM

Member since:
December 20th, 2011 Points: 23,253,885

- How to create a shared folder in Windows 7
Once you have set up the folder, this article will guide you through linking to the folder from your MFP:
- How to link to a network share folder from a Ricoh Aficio MP series copier
After everything is set up, follow these steps to scan a document or image to your folder:
- Press the Scanner button
- Place your original(s) in the document feeder or on the glass
- Select the Folder tab, if it isn't already selected
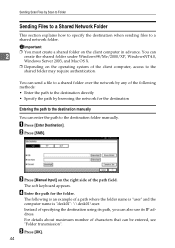
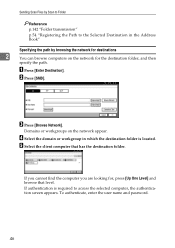
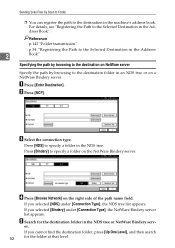
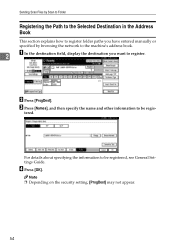
- Select your folder from the list of programmed destinations, or type it in using the Manual Entry button
- Press the Start buttonAnswer #2: Posted by SonuKumar on June 20th, 2023 2:14 AM
Member since:
May 9th, 2021 Points: 16,621,300
- Ensure that the MP 171 printer is connected to the network and that the network folder you want to scan to is accessible and properly configured.
- On the MP 171 printer, locate the control panel or display screen. It might be a touch screen or have physical buttons.
- Press the "Scanner" or "Scan" button on the control panel to access the scanning options.
- Navigate through the scanning menu options to find the "Scan to Folder" or "Scan to Network Folder" option. The exact location of this option may vary depending on the printer's firmware or software version.
- Once you've found the "Scan to Folder" option, select it. You may need to enter additional information such as the network folder's path, username, and password. Follow the on-screen prompts to enter the required details.
- After entering the necessary information, select the network folder as the destination for your scanned documents.
- Place the document you want to scan face-down on the scanner glass or into the document feeder, depending on the model.
- Adjust any scan settings if needed, such as the resolution, color mode, or file format. These settings are typically available in the scanning menu or through additional options on the control panel.
- Start the scanning process by pressing the "Start" or "Scan" button on the control panel. The MP 171 will scan the document and save it to the specified network folder.
- Once the scan is complete, you can access the scanned document from the network folder using a computer or other devices connected to the same network.
Note: The steps outlined here are general guidelines for scanning to a network folder on the MP 171. The exact process may vary slightly depending on the printer's specific firmware or software version. If you encounter any difficulties or need further assistance, I recommend referring to the printer's user manual or contacting Ricoh customer support for detailed instructions.
Please respond to my effort to provide you with the best possible solution by using the "Acceptable Solution" and/or the "Helpful" buttons when the answer has proven to be helpful.
Regards,
Sonu
Your search handyman for all e-support needs!!
Related Ricoh Aficio MP 171 Manual Pages


Similar Questions


i have a Ricoh MP C4501 printer that is not hooked up to a network. but it is hooked up to a desktop...

How do you setup scan to folder on the Aficio MP C2030 copier?