
LiftMaster 8355 Support Question
LiftMaster 8355 Support Question
Find answers below for this question about LiftMaster 8355.Need a LiftMaster 8355 manual? We have 1 online manual for this item!
Question posted by garrygo on June 26th, 2014
Where Is My Ten Digit Serial Number Located?
The person who posted this question about this LiftMaster product did not include a detailed explanation. Please use the "Request More Information" button to the right if more details would help you to answer this question.
Current Answers
Answer #1: Posted by BusterDoogen on June 26th, 2014 7:27 PM
BusterDoogen

Member since:
October 30th, 2011 Points: 28,565,407

Member since:
October 30th, 2011 Points: 28,565,407
The model number label is located on the front panel of your garage door opener.
I hope this is helpful to you!
Please respond to my effort to provide you with the best possible solution by using the "Acceptable Solution" and/or the "Helpful" buttons when the answer has proven to be helpful. Please feel free to submit further info for your question, if a solution was not provided. I appreciate the opportunity to serve you!
Related LiftMaster 8355 Manual Pages
8355 Manual - Page 1
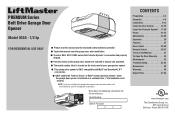
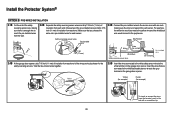
... installing the garage door opener on a one-piece door, visit www.liftmaster.com for future reference: Serial Number:
.
Date of your garage door opener. ■ This garage door opener is ONLY compatible with MyQ® and Security✚ 2.0™
accessories. ■ ONLY enable the Timer-to-Close* or MyQ® remote operation feature* when
the garage door opener is located on the front...
8355 Manual - Page 2
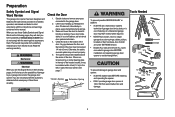
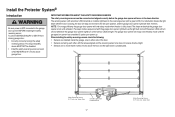
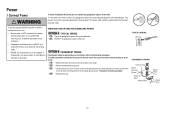
... tension.
• Disable ALL locks and remove ALL ropes connected to garage door BEFORE installation and operating garage door opener to avoid entanglement.
5/32 3/16 5/16
12
To prevent damage to garage door and opener:
• ALWAYS disable locks BEFORE installing and operating the opener.
• ONLY operate garage door opener at 120 V, 60 Hz to offer safe service provided it is...
8355 Manual - Page 3
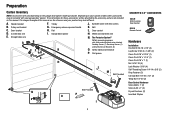
... accessory and are for these accessories will vary depending on your specific model, other accessories may look different. Header bracket B. Emergency release rope and handle H. Garage door opener
K
J.
Sprocket cover with white and white/black wire attached: Sending Sensor (1) Receiving Sensor (1) and Safety Sensor Brackets (2)
O. Depending on the...
8355 Manual - Page 4
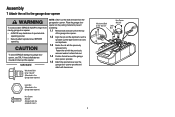
... damage to prevent scratching.
1.1 Remove bolt and lock nut from moving garage door opener: • ALWAYS keep hand clear of sprocket while
operating opener. • Securely attach sprocket cover BEFORE
operating. Cut the tape from the garage door opener. Place the garage door opener on the packing material to garage door opener, use the bolts removed from the rail, belt, and styrofoam...
8355 Manual - Page 6
... and remove ALL ropes connected to garage door BEFORE installing
opener to -Close functionality if operating either one -piece door, visit www.liftmaster.com for installation instructions. 6 NOTE: If you are installing the garage door opener on properly balanced and lubricated garage door. Install garage door opener ONLY on a one -piece or swinging
garage doors. DO NOT enable the Timer-to...
8355 Manual - Page 7
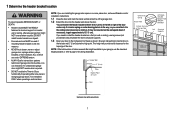
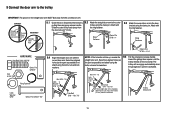
...; DO NOT enable the Timer-to gain approximately 1/2" (1 cm). 1 Determine the header bracket location
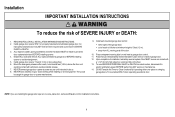
To prevent possible SERIOUS INJURY or DEATH:
• Header bracket MUST be RIGIDLY fastened to loosen, move or adjust garage door, springs, cables, pulleys, brackets, or their hardware, ALL of which are installing the garage door opener on a one -piece or swinging...
8355 Manual - Page 9
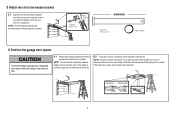
... the inner and outer trolley. NOTE: A 2x4 is ideal for the garage door opener. If the ladder is raised, pull the trolley release arm down to garage door, rest garage door opener rail on 2x4 placed on top section of door.
4.1 Remove the packing material and lift the
garage door opener onto a ladder.
Insert the clevis pin through the holes in the...
8355 Manual - Page 10
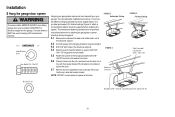
... bracket to required lengths. 5.3 Drill 3/16" pilot holes in the structural supports. 5.4 Attach one end of the garage. Instructions below are for attaching the garage door opener directly to structural supports.
5.1 Measure the distance from a falling garage door opener, fasten it SECURELY to structural supports of each bracket to a support with 5/16"-
18x1-7/8" lag screws (not provided...
8355 Manual - Page 13
...emergency release handle. Select two aligned holes (as
toward the garage door opener until the
far apart as possible) and attach using the...16"-18
Clevis Pin 5/16"x1"
Ring Fastener
9.4 Align the straight door arm with the ring fastener.
the door) about 2" (5 cm).
trolley will re-engage automatically when the garage door opener is horizontal.
Nut 5/16" - 18 Lock Washer 5/16"
Lock...
8355 Manual - Page 14
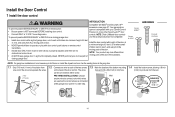
... electrocution: • Be sure power is properly adjusted, and there are connected
at the garage door opener in sight until completely closed. Screw 6ABx1"
Screw 6-32x1"
HARDWARE
Drywall Anchors
NOTE: For...location of the bottom mounting
one end of the wire and separate the wires. Use the existing holes in the gang box.
1.1 Strip 7/16 inch (11 mm) of insulation from a closing garage door...
8355 Manual - Page 15
... of the wire near the garage door opener.
7/16" (11 mm)
2.3 Connect the wire to the red and
white terminals on the garage door opener.
RED WHITE WHITE GREY
PRE-WIRED INSTALLATIONS: When wiring the door control to the garage door opener make sure you use the same wires that are connected to
the garage door opener.
Install the Door Control
k
1.5 Position the bottom...
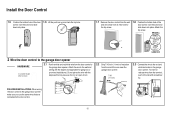
8355 Manual - Page 17
... 5 cycles upon power up. The sending sensor (with an amber LED) transmits an invisible light beam to the receiving sensor (with the garage door opener light bulb; The sleep mode shuts the garage door opener down direction. The sleep mode is sequenced with a green LED). When installing the safety reversing sensors check the following: • Sensors...
8355 Manual - Page 19

.... RED WHITE WHITE GREY
Insulated Staple (Not shown)
7/16" (11 mm)
19 Attach the wire to the
already has wires installed for the safety reversing
garage door opener.
HARDWARE
Staple
2.2A Strip 7/16 inch (11 mm) of wires. Twist the white wires together.
Insert the white/black wires into the white terminal on...
8355 Manual - Page 20
... and strip 7/16 inch (11 mm) of
insulation from each end. Yellow Purple
Yellow (for example)
Purple (for example)
Pre-installed wires
2.4B At the garage door opener, strip 7/16 inch (11 mm) of insulation from each end of insulation from the terminal, push in the tab with wire nuts
making sure there...
8355 Manual - Page 21
...the following procedure.
OPTION B PERMANENT WIRING
If permanent wiring is required by your garage door opener has a grounding type plug with ALL local electrical and building codes.
•...code, refer to install the proper outlet. The opener must be in the garage door opener into a grounded outlet. 1.2A DO NOT run garage door opener at this time.
THERE ARE TWO OPTIONS FOR...
8355 Manual - Page 23
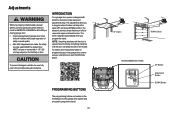
... electronic controls sense the amount of force required to program where the door will reverse. The force is designed with the door's upward travel .
PROGRAMMING BUTTONS
The programming buttons are located on floor.
INTRODUCTION
Your garage door opener is adjusted automatically when you to open door provides adequate clearance.
The adjustments allow you program the travel it...
8355 Manual - Page 29

...
LIGHT To change the amount of time the garage door opener lights will stay on: Press and hold the LOCK button until the garage door opener lights flash.* The time interval is 3 flashes. Active is 2 flashes and deactivated is indicated by the number of times garage door opener lights flash
Time the garage door opener light stays on again.* NOTE: If the command...
8355 Manual - Page 30
Keyless Entry: Enter a 4-digit personal identification number (PIN) of your garage door.
Within 30 seconds...
3 Press and hold...7 8 9 PRS
TUV
WXY
*
*
0 QZ
#
0 QZ
#
ENTER
ENTER
?? ?? PIN
PROGRAM USING THE GARAGE DOOR OPENER
1 Locate the Learn Button.
2 Press and immediately release the Learn
button.
Repeat the steps above for additional information. Visit www....
8355 Manual - Page 35
... lights on when it detects a person entering the garage. Motion Detecting Control Panel: Multi-function door control with LiftMaster® garage door openers manufactured since 1997. Plugs into any interior outlet.
877MAX
975LM
Laser Garage Parking Assist: Laser enables homeowners to the garage using a 4-digit PIN. Includes visor clip.
881LM
MAX Wireless Keyless Entry: For use outside...
8355 Manual - Page 38
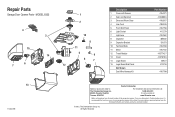
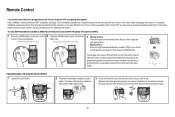
If you have access to : The Chamberlain Group, Inc. 6050 S. MODEL 8355
4 3
15 14
6 7
13
114A4419E
1 2
10
8
11
5
9
6
7
12
Description 1...recommended that you are ordering a repair part please have the model number of the garage door opener. All Rights Reserved Country Club Rd. Repair Parts
Garage Door Opener Parts - Tucson, AZ 85706
For installation and service information call...
Similar Questions

I Have Installed A Chamberlan Garage Door Opener And The Remote I Was Using Is
I have been using a Chamberlan garage door opener and its remote has been defective since of late.Pl...
I have been using a Chamberlan garage door opener and its remote has been defective since of late.Pl...
(Posted by donweera42 8 months ago)

Connecting Model 8355 Liftmaster To Wifi
Hi,I have two questions;1- Is the model 8355 from 2014 able to connect to wifi?2- This model has 11 ...
Hi,I have two questions;1- Is the model 8355 from 2014 able to connect to wifi?2- This model has 11 ...
(Posted by alatifyama 1 year ago)
Garage Door Opens After Shutting.
My Lift master 8550 inside keypad is Inside wall pad is model #880LM. outside keypad Model # is 877M...
My Lift master 8550 inside keypad is Inside wall pad is model #880LM. outside keypad Model # is 877M...
(Posted by BONNIECA92 2 years ago)

How Long Is The Power Chord On The 8355 Garage Opener?
(Posted by vincad 10 years ago)

Liftmaster Garage Door Opener 8355 Manual
How Long If The Power Chord For This Model
How Long If The Power Chord For This Model
(Posted by VINCED 10 years ago)