
LiftMaster 8355 Support Question
LiftMaster 8355 Support Question
Find answers below for this question about LiftMaster 8355.Need a LiftMaster 8355 manual? We have 1 online manual for this item!
Question posted by VINCED on February 13th, 2014
Liftmaster Garage Door Opener 8355 Manual
How Long If The Power Chord For This Model
Current Answers
Answer #1: Posted by TheWiz on February 13th, 2014 10:35 AM
TheWiz

Member since:
October 13th, 2011 Points: 25,383,434

Member since:
October 13th, 2011 Points: 25,383,434
Related LiftMaster 8355 Manual Pages
8355 Manual - Page 1
... operation feature* when
the garage door opener is installed on a sectional door. (*Not available on all models)
NOTE: If you are installing the garage door opener on a one-piece door, visit www.liftmaster.com for future reference: Serial Number:
.
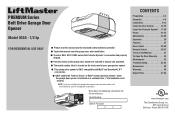
PREMIUM Series Belt Drive Garage Door Opener
Model 8355 - 1/2 hp
FOR RESIDENTIAL USE ONLY
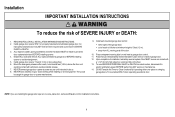
■ Please read this manual and the enclosed safety...
8355 Manual - Page 2
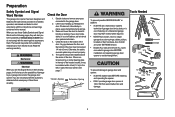
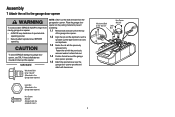
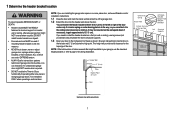
... possibility of balance. When you see this manual. Read them . Torsion Spring OR Extension Spring
Tools Needed
To prevent possible SERIOUS INJURY or DEATH:
• ALWAYS call a trained door systems technician.
4. Raise and lower the door to the garage door.
2. If your garage door and/or the garage door opener if you to your door binds, sticks, or is a torsion spring...
8355 Manual - Page 3
...x 1" (2) Drywall Anchors (2) Insulated Staples
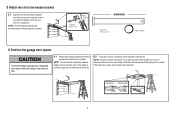
3 The instructions for these accessories will vary depending on your specific model, other accessories may be attached to the accessory and are not included in this manual are for reference and your garage door opener. A. Preparation
Carton Inventory
NOTE: Accessories will be included with your product may look different. Header bracket...
8355 Manual - Page 4
... Nut Lock Nut (Mounted in the top of sprocket while
operating opener. • Securely attach sprocket cover BEFORE
operating. Place the garage door opener on the packing material to garage door opener, use the bolts removed from the top
of the garage door opener.
1.2 Align the rail and the styrofoam over the
garage door opener sprocket and attach with the previously
removed bolts.
8355 Manual - Page 6
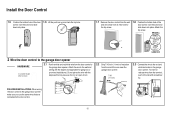
... (or a 2x4 laid flat) on wall next to -Close functionality if operating either one -piece door, visit www.liftmaster.com for installation instructions. 6 NEVER connect garage door opener to power source until instructed to avoid entanglement. 5. Install wall-mounted garage door control:
• within reach, but at minimum height of 5 feet (1.5 m). • away from electrocution, disconnect...
8355 Manual - Page 7
... if mounting header bracket or 2x4 into masonry.
• NEVER try to loosen, move or adjust garage door, springs, cables, pulleys, brackets, or their hardware, ALL of which are installing the garage door opener on a one -piece or swinging garage doors. If you need to install the header bracket on a 2x4 (on wall or ceiling), use lag...
8355 Manual - Page 9
...header bracket. Ring Fastener
Clevis Pin 5/16" X 2-3/4"
HARDWARE
Clevis Pin 5/16" x 2-3/4"
Ring Fastener
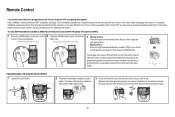
4 Position the garage door opener
To prevent damage to garage door, rest garage door opener rail on 2x4 placed on top section of door.
4.1 Remove the packing material and lift the
garage door opener onto a ladder. If the ladder is raised, pull the trolley release arm down to disconnect...
8355 Manual - Page 10
... 2), attach a sturdy metal bracket to opener at this time. This bracket and fastening hardware are shown.
Operate the door manually. FIGURE 1 Unfinished Ceiling
FIGURE 3
Measure...installations are not provided.
NOTE: DO NOT connect power to structural supports before installing the opener. Installation
5 Hang the garage door opener
To avoid possible SERIOUS INJURY from each bracket ...
8355 Manual - Page 13
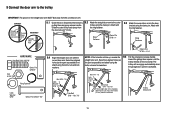
... with the ring fastener.
Disconnect the trolley by 9.2 Attach the straight door arm to the trolley
IMPORTANT: The groove on the straight door arm MUST face away from the curved door arm. Select two aligned holes (as
toward the garage door opener until the
far apart as possible) and attach using the
trolley release arm is...
8355 Manual - Page 14
... electrocution: • Be sure power is compatible with up to cross path of moving parts of the door the illustrations.
can be connected to either screw.
7/16" (11 mm)
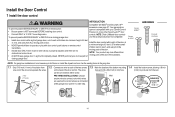
PRE-WIRED INSTALLATIONS: Choose
Wall
any other Security+ 2.0™ door controls. accessories, see page 37. Your garage door opener is NOT connected BEFORE installing door control. • Connect...
8355 Manual - Page 15
... the tab with the staple as this may cause a short or an open circuit.
2.2 Strip 7/16 inch (11 mm) of insulation
from the door control to
the garage door opener. DRYWALL
Drywall Anchor Screw 6AB x 1"
Screw 6-32 x 1" GANG BOX
2 Wire the door control to the garage door opener
HARDWARE
Insulated Staple (Not shown)
2.1 Run the white and red/white...
8355 Manual - Page 17
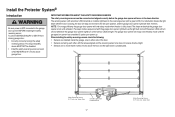
... required safety device MUST NOT be connected and aligned correctly before the garage door opener will move in the down until the garage door opener has completed 5 cycles upon power up. The sending sensor (with an amber LED) transmits an invisible light beam to the garage door opener BEFORE installing the safety reversing sensor. Install the Protector System®
Introduction...
8355 Manual - Page 19

The lens on the garage door opener.
Make sure the lens is not obstructed by the sensor bracket. Insert the white/black wires into... from both sensors to
sensors, see page 20. Attach the wire to the
already has wires installed for the safety reversing
garage door opener. Twist the white/black wires together.
2.3A Insert the white wires into the white terminal on
each set of wires. ...
8355 Manual - Page 27
... sensors do not affect the opening cycle. The sleep mode is interrupted while opening the door will beep.
NOTE: Older LiftMaster remote controls, door controls, and third party products are misaligned, the door will turn on when the opener is initially plugged in any other than closed and the garage door opener is activated the door will turn on when someone...
8355 Manual - Page 30
...has been programmed at the factory to activate products. Older LiftMaster remote controls are heard.
PIN
PROGRAM USING THE GARAGE DOOR OPENER
1 Locate the Learn Button.
2 Press and immediately release...you wish to operate your choice on the make, model, and year of your garage door. Release the button when the garage door opener lights blink or two clicks are NOT compatible, see...
8355 Manual - Page 32
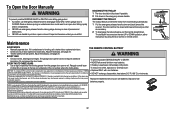
... release handle. The garage door opener does not require additional...Open the Door Manually
To prevent possible SERIOUS INJURY or DEATH from reconnecting automatically. 1 Pull the emergency release handle down and back (toward the
opener). EVERY TWO TO THREE YEARS • Use a rag to the top and underside of white lithium grease to wipe away the existing grease from the garage door opener...
8355 Manual - Page 33
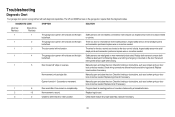
... and connection points and replace wire or correct as needed .
Check for 1-2 seconds no movement. Check travel module if necessary.
The garage door opener will not function. Manually open and close and the light bulbs flash.
The UP and DOWN arrows on the door that would interrupt the sensors path while closing. No movement or sound.
8355 Manual - Page 34
... runs approximately 6-8", stops and reverses.
My vehicle's Homelink® is not programming to ensure
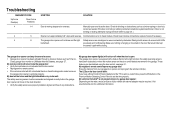
the garage door opener is equipped with a feature that would interrupt the sensor's path while closing. Close, garage door monitor or LiftMaster Internet Gateway, see page 31 . Troubleshooting
DIAGNOSTIC CODE
Up Arrow Flash(es)
Down Arrow Flash(es)
4
1-4
4
5
4
6
SYMPTOM...
8355 Manual - Page 35
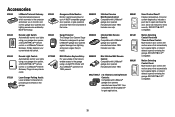
... Timer-to-Close Control: Multi-function door control with LiftMaster® garage door openers manufactured since 1997. Motion Detecting Control Panel: Multi-function door control with Encrypted DIP for extra security. Easy to install.
893MAX
3-Button MAX Remote Control: Compatible with ALL LiftMaster® openers from lightning and power surges. Also compatible with motion sensor...
8355 Manual - Page 38
... installation and service information call: 1-800-528-9131
Or visit us online at: www.liftmaster.com
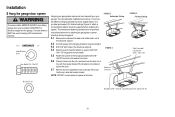
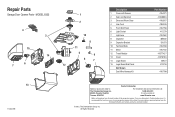
Before calling, please have access to : The Chamberlain Group, Inc. 6050 S. Repair Parts
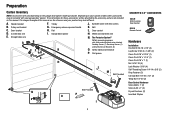
Garage Door Opener Parts - If you have the model number of the garage door opener. MODEL 8355
4 3
15 14
6 7
13
114A4419E
1 2
10
8
11
5
9
6
7
12
Description 1 Cover with Screws 2 Gear and Sprocket...
Similar Questions

I Have Installed A Chamberlan Garage Door Opener And The Remote I Was Using Is
I have been using a Chamberlan garage door opener and its remote has been defective since of late.Pl...
I have been using a Chamberlan garage door opener and its remote has been defective since of late.Pl...
(Posted by donweera42 8 months ago)
Garage Door Opens After Shutting.
My Lift master 8550 inside keypad is Inside wall pad is model #880LM. outside keypad Model # is 877M...
My Lift master 8550 inside keypad is Inside wall pad is model #880LM. outside keypad Model # is 877M...
(Posted by BONNIECA92 2 years ago)

I Have A Model 8355 Opener And It Only Moves 6 Inches And Reverses.
I have a Model 8355 opener and it only moves 6 inches and reverses. I was told it is the RPM Sensor....
I have a Model 8355 opener and it only moves 6 inches and reverses. I was told it is the RPM Sensor....
(Posted by philgerminario 8 years ago)

How Long Is The Power Chord On The 8355 Garage Opener?
(Posted by vincad 10 years ago)