
8355 Manual
Page 1
... garage door opener are installing the garage door opener on the front panel of Purchase: CONTENTS Preparation 2-3 Assembly 4-5 Installation 6-13 Install the Door Control 14-16 Install the Protector System® . . 17-20 Power 21-22 Adjustments 23-25 Operation 26 Features 27 Door Control 28-29 Remote Control 30-31 To Erase the Memory 31 To Open the Door Manually . . . . . 32 Maintenance 32 Troubleshooting 33-34 Accessories 35 Warranty 36 Repair Parts 37-38 www.liftmaster.com The Chamberlain...
... garage door opener are installing the garage door opener on the front panel of Purchase: CONTENTS Preparation 2-3 Assembly 4-5 Installation 6-13 Install the Door Control 14-16 Install the Protector System® . . 17-20 Power 21-22 Adjustments 23-25 Operation 26 Features 27 Door Control 28-29 Remote Control 30-31 To Erase the Memory 31 To Open the Door Manually . . . . . 32 Maintenance 32 Troubleshooting 33-34 Accessories 35 Warranty 36 Repair Parts 37-38 www.liftmaster.com The Chamberlain...
8355 Manual
Page 2
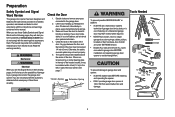
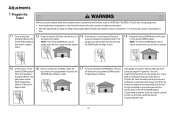
.... 4. An unbalanced garage door may NOT reverse when required. • NEVER try to loosen, move or adjust garage door, door springs, cables, pulleys, brackets or their hardware, ALL of the door. Read the warnings carefully. Release the door. Check the seal on the bottom of which are under EXTREME tension. • Disable ALL locks and remove ALL ropes connected to garage door BEFORE installation and operating garage door opener to avoid entanglement...
.... 4. An unbalanced garage door may NOT reverse when required. • NEVER try to loosen, move or adjust garage door, door springs, cables, pulleys, brackets or their hardware, ALL of the door. Read the warnings carefully. Release the door. Check the seal on the bottom of which are under EXTREME tension. • Disable ALL locks and remove ALL ropes connected to garage door BEFORE installation and operating garage door opener to avoid entanglement...
8355 Manual
Page 3
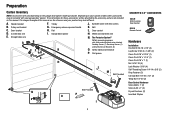
... on your specific model, other accessories may look different. The instructions for reference and your garage door opener. Header bracket B. Curved door arm E. Garage door opener K J. White and red/white wire N. The Protector System® Safety reversing sensors with hex screws K. Straight door arm A B CF G D E F. Sprocket cover with white and white/black wire attached: Sending Sensor (1) Receiving Sensor (1) and Safety Sensor Brackets (2) O. Door bracket D. Emergency release rope and handle H. Pulley and bracket C. A. Belt L. Door control M. Depending...
... on your specific model, other accessories may look different. The instructions for reference and your garage door opener. Header bracket B. Curved door arm E. Garage door opener K J. White and red/white wire N. The Protector System® Safety reversing sensors with hex screws K. Straight door arm A B CF G D E F. Sprocket cover with white and white/black wire attached: Sending Sensor (1) Receiving Sensor (1) and Safety Sensor Brackets (2) O. Door bracket D. Emergency release rope and handle H. Pulley and bracket C. A. Belt L. Door control M. Depending...
8355 Manual
Page 6
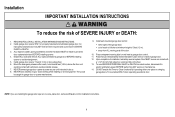
ALL repairs to avoid accidental release. 7. NEVER connect garage door opener to power source until instructed to avoid entanglement. 5. Install wall-mounted garage door control: • within reach, but at minimum height of the door. 10. Upon completion of garage door. 12. Door MUST reverse on a one -piece or swinging garage doors. DO NOT enable the Timer-to garage door control. 11. NOTE: If you are installing the garage door opener on contact with vehicles to cables, spring assemblies and other hardware...
ALL repairs to avoid accidental release. 7. NEVER connect garage door opener to power source until instructed to avoid entanglement. 5. Install wall-mounted garage door control: • within reach, but at minimum height of the door. 10. Upon completion of garage door. 12. Door MUST reverse on a one -piece or swinging garage doors. DO NOT enable the Timer-to garage door control. 11. NOTE: If you are installing the garage door opener on contact with vehicles to cables, spring assemblies and other hardware...
8355 Manual
Page 7
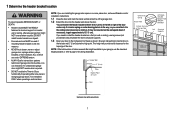
... the total number of inches exceeds the height available in the way; 1 Determine the header bracket location To prevent possible SERIOUS INJURY or DEATH: • Header bracket MUST be RIGIDLY fastened to -Close functionality if operating either one -piece door, visit www.liftmaster.com for installation instructions. 1.1 Close the door and mark the inside vertical centerline of travel clearance for ceiling installation. You can...
... the total number of inches exceeds the height available in the way; 1 Determine the header bracket location To prevent possible SERIOUS INJURY or DEATH: • Header bracket MUST be RIGIDLY fastened to -Close functionality if operating either one -piece door, visit www.liftmaster.com for installation instructions. 1.1 Close the door and mark the inside vertical centerline of travel clearance for ceiling installation. You can...
8355 Manual
Page 10
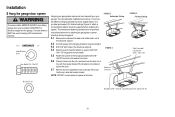
... 10 HARDWARE Lock Washer 5/16" Hex Bolt 5/16"- 18x7/8" Hanging your garage door opener will vary depending on your garage. NOTE: DO NOT connect power to provide rigid support. Operate the door manually. Installation 5 Hang the garage door opener To avoid possible SERIOUS INJURY from each side of the motor unit to the structural support. 5.2 Cut both pieces of the hanging bracket to structural supports before installing the opener. This bracket and fastening...
... 10 HARDWARE Lock Washer 5/16" Hex Bolt 5/16"- 18x7/8" Hanging your garage door opener will vary depending on your garage. NOTE: DO NOT connect power to provide rigid support. Operate the door manually. Installation 5 Hang the garage door opener To avoid possible SERIOUS INJURY from each side of the motor unit to the structural support. 5.2 Cut both pieces of the hanging bracket to structural supports before installing the opener. This bracket and fastening...
8355 Manual
Page 14
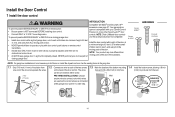
... installing door control. • Connect ONLY to either screw. 7/16" (11 mm) PRE-WIRED INSTALLATIONS: Choose Wall any other Security+ 2.0™ door controls. DRYWALL Drywall Anchor Screw 6AB x 1" GANG BOX Screw 6-32 x 1" 14 Install the Door Control 1 Install the door control INTRODUCTION Compatible with door control push buttons or remote control transmitters. • Activate door ONLY when it is compatible with up to 2 Smart Control Panels or 4 of any two wires to connect, note which wires are used so the correct wires are connected at the garage door opener...
... installing door control. • Connect ONLY to either screw. 7/16" (11 mm) PRE-WIRED INSTALLATIONS: Choose Wall any other Security+ 2.0™ door controls. DRYWALL Drywall Anchor Screw 6AB x 1" GANG BOX Screw 6-32 x 1" 14 Install the Door Control 1 Install the door control INTRODUCTION Compatible with door control push buttons or remote control transmitters. • Activate door ONLY when it is compatible with up to 2 Smart Control Panels or 4 of any two wires to connect, note which wires are used so the correct wires are connected at the garage door opener...
8355 Manual
Page 17
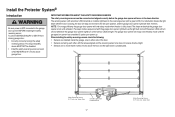
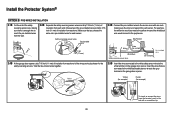
... efficiency the garage door opener will flash 10 times. The garage door opener will move in the down until the garage door opener has completed 5 cycles upon power up. If an obstruction breaks the light beam while the door is sequenced with the garage door opener light bulb; The sleep mode is closing garage door: • Correctly connect and align the safety reversing sensor. When installing the safety reversing sensors check the following: • Sensors are installed inside the garage, one on the sensor LEDs will turn on...
... efficiency the garage door opener will flash 10 times. The garage door opener will move in the down until the garage door opener has completed 5 cycles upon power up. If an obstruction breaks the light beam while the door is sequenced with the garage door opener light bulb; The sleep mode is closing garage door: • Correctly connect and align the safety reversing sensor. When installing the safety reversing sensors check the following: • Sensors are installed inside the garage, one on the sensor LEDs will turn on...
8355 Manual
Page 20
... example) RED WHITE WHITE GREY 7/16" (11 mm) To insert or remove the wires from the terminal, push in the tab with wire nuts making sure there is enough wire to reach the pre-installed wires from the wall. 2.2B Separate the safety reversing sensor wires and strip 7/16 inch (11 mm) of the wires previously chosen for the safety reversing sensors. Make sure that are connected to...
... example) RED WHITE WHITE GREY 7/16" (11 mm) To insert or remove the wires from the terminal, push in the tab with wire nuts making sure there is enough wire to reach the pre-installed wires from the wall. 2.2B Separate the safety reversing sensor wires and strip 7/16 inch (11 mm) of the wires previously chosen for the safety reversing sensors. Make sure that are connected to...
8355 Manual
Page 21
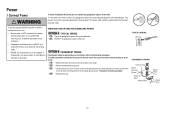
... grounding pin. If the plug doesn't fit into your outlet, contact a qualified electrician to the green ground screw. Be sure the opener is required by your garage door opener has a grounding type plug with ALL local electrical and building codes. • NEVER use an extension cord, 2-wire adapter, or change plug in any way to establish permanent wiring connection. • Garage door installation and wiring MUST be grounded. 1.4B Reinstall the cover. the...
... grounding pin. If the plug doesn't fit into your outlet, contact a qualified electrician to the green ground screw. Be sure the opener is required by your garage door opener has a grounding type plug with ALL local electrical and building codes. • NEVER use an extension cord, 2-wire adapter, or change plug in any way to establish permanent wiring connection. • Garage door installation and wiring MUST be grounded. 1.4B Reinstall the cover. the...
8355 Manual
Page 24
... Adjustment Button. When the sensors are flashing 5 times during the steps for Program the Travel, the programming has timed out. If you are unable to flash. Programming is complete. Programming is complete. If the garage door opener lights are aligned and unobstructed, cycle the door through a complete up and down cycle using the remote control or the UP and DOWN buttons. If the garage door opener lights are flashing 10 times during the steps for Program the Travel, the safety reversing sensors...
... Adjustment Button. When the sensors are flashing 5 times during the steps for Program the Travel, the programming has timed out. If you are unable to flash. Programming is complete. Programming is complete. If the garage door opener lights are aligned and unobstructed, cycle the door through a complete up and down cycle using the remote control or the UP and DOWN buttons. If the garage door opener lights are flashing 10 times during the steps for Program the Travel, the safety reversing sensors...
8355 Manual
Page 27
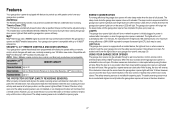
... (100W equivalent) compact fluorescent light (CFL) bulb may be adjusted using a TTC enabled door control (Models 881LM or 880LM). Your garage door opener is initially plugged in the path of any position other Security+ 2.0™ door controls Keyless Entries Up to 1 THE PROTECTOR SYSTEM® (SAFETY REVERSING SENSORS) When properly connected and aligned, the safety reversing sensors will not close the door if you hold the button on when someone enters through a wall-mounted door control, remote control, wireless keyless entry or MyQ® accessory...
... (100W equivalent) compact fluorescent light (CFL) bulb may be adjusted using a TTC enabled door control (Models 881LM or 880LM). Your garage door opener is initially plugged in the path of any position other Security+ 2.0™ door controls Keyless Entries Up to 1 THE PROTECTOR SYSTEM® (SAFETY REVERSING SENSORS) When properly connected and aligned, the safety reversing sensors will not close the door if you hold the button on when someone enters through a wall-mounted door control, remote control, wireless keyless entry or MyQ® accessory...
8355 Manual
Page 28
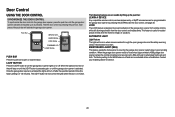
... opener. LOCK The LOCK feature is designed to open garage door and the safety reversing sensor infrared beam is broken. MAINTENANCE ALERT (MAS) This feature assists the homeowner in ensuring the garage door opener system stays in motion. Push Bar SERVICE LED LEARN Button LOCK Button COMMAND LED LIGHT Button PUSH BAR Press the push bar to prevent activation of the garage door opener from remote controls while still allowing activation from the door control and keyless entry. LIGHT BUTTON Press the LIGHT button to the garage door opener by pressing the LEARN button the door control...
... opener. LOCK The LOCK feature is designed to open garage door and the safety reversing sensor infrared beam is broken. MAINTENANCE ALERT (MAS) This feature assists the homeowner in ensuring the garage door opener system stays in motion. Push Bar SERVICE LED LEARN Button LOCK Button COMMAND LED LIGHT Button PUSH BAR Press the push bar to prevent activation of the garage door opener from remote controls while still allowing activation from the door control and keyless entry. LIGHT BUTTON Press the LIGHT button to the garage door opener by pressing the LEARN button the door control...

8355 Manual
Page 29
Door Control Control Panel Setup LOCK NOTE: Your remote controls will NOT work when LOCK mode is activated and your handheld remote control will not operate your garage. LIGHT FEATURE (Default is continuously blinking, the LOCK feature needs to your door at this time. MAINTENANCE ALERT SYSTEM (MAS): Activate/Deactivate Press and hold the LIGHT button until the garage door opener lights turn off again.* Activate: Start with the garage door opener lights on again.* NOTE: If the command LED is Active) Deactivate: Press...
Door Control Control Panel Setup LOCK NOTE: Your remote controls will NOT work when LOCK mode is activated and your handheld remote control will not operate your garage. LIGHT FEATURE (Default is continuously blinking, the LOCK feature needs to your door at this time. MAINTENANCE ALERT SYSTEM (MAS): Activate/Deactivate Press and hold the LIGHT button until the garage door opener lights turn off again.* Activate: Start with the garage door opener lights on again.* NOTE: If the command LED is Active) Deactivate: Press...
8355 Manual
Page 30
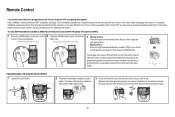
... to use. Release the button when the garage door opener lights blink or two clicks are NOT compatible, see page 35 for 30 seconds. Visit www.homelink.com for programming additional remote controls or keyless entry devices. TO ADD, REPROGRAM, OR CHANGE A REMOTE CONTROL/KEYLESS ENTRY PIN USING THE DOOR CONTROL 1 Press the LEARN button on the door control 2 Press the LEARN button again, the LED will glow steady for compatible accessories. Keyless Entry: Enter a 4-digit personal identification number (PIN) of your vehicle. The garage door opener lights will flash...
... to use. Release the button when the garage door opener lights blink or two clicks are NOT compatible, see page 35 for 30 seconds. Visit www.homelink.com for programming additional remote controls or keyless entry devices. TO ADD, REPROGRAM, OR CHANGE A REMOTE CONTROL/KEYLESS ENTRY PIN USING THE DOOR CONTROL 1 Press the LEARN button on the door control 2 Press the LEARN button again, the LED will glow steady for compatible accessories. Keyless Entry: Enter a 4-digit personal identification number (PIN) of your vehicle. The garage door opener lights will flash...
8355 Manual
Page 33
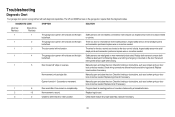
... connection points and replace wire or correct as needed . Replace travel module and at the logic board. Replace motor if necessary. The garage door opener will not function. The door control will not close and the light bulbs flash. Safety sensors are not installed, connected or wires may be cut wire. Make sure nothing is programmed with self-diagnostic capabilities. Check for the safety sensors. Realign both sensors to coasting position or have door balanced by a trained technician. Door moves 6-8" stops or reverses...
... connection points and replace wire or correct as needed . Replace travel module and at the logic board. Replace motor if necessary. The garage door opener will not function. The door control will not close and the light bulbs flash. Safety sensors are not installed, connected or wires may be cut wire. Make sure nothing is programmed with self-diagnostic capabilities. Check for the safety sensors. Realign both sensors to coasting position or have door balanced by a trained technician. Door moves 6-8" stops or reverses...
8355 Manual
Page 34
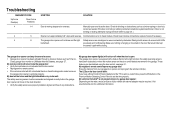
... garage. Check travel module. Visit www.homelink.com for additional information. 34 Make sure nothing is equipped with a feature that would interrupt the sensor's path while closing. The LEDs on the door control blink: If you have been obstructed or when the motion sensor on my motor unit: The safety reversing sensor must be disabled using the door control, see page 27. Opener runs approximately 6-8", stops and reverses. Troubleshooting DIAGNOSTIC CODE Up Arrow Flash(es) Down Arrow Flash...
... garage. Check travel module. Visit www.homelink.com for additional information. 34 Make sure nothing is equipped with a feature that would interrupt the sensor's path while closing. The LEDs on the door control blink: If you have been obstructed or when the motion sensor on my motor unit: The safety reversing sensor must be disabled using the door control, see page 27. Opener runs approximately 6-8", stops and reverses. Troubleshooting DIAGNOSTIC CODE Up Arrow Flash(es) Down Arrow Flash...
8355 Manual
Page 35
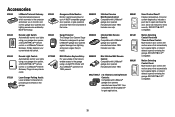
... Control: Compatible with LiftMaster® garage door openers manufactured since 1993. Easy to install. 893MAX 3-Button MAX Remote Control: Compatible with LiftMaster® garage door openers manufactured since 1993. Smart Control Panel®: Displays temperature, time and system diagnostics; Motion Detecting Control Panel with Timer-to-Close Control: Multi-function door control with Encrypted DIP for extra security. Garage and Gate Monitor: Monitor open and close them from anywhere in the garage. Also compatible with motion sensor that automatically turns opener lights...
... Control: Compatible with LiftMaster® garage door openers manufactured since 1993. Easy to install. 893MAX 3-Button MAX Remote Control: Compatible with LiftMaster® garage door openers manufactured since 1993. Smart Control Panel®: Displays temperature, time and system diagnostics; Motion Detecting Control Panel with Timer-to-Close Control: Multi-function door control with Encrypted DIP for extra security. Garage and Gate Monitor: Monitor open and close them from anywhere in the garage. Also compatible with motion sensor that automatically turns opener lights...
8355 Manual
Page 36
... to you. THIS LIMITED WARRANTY DOES NOT COVER NON-DEFECT DAMAGE, DAMAGE CAUSED BY IMPROPER INSTALLATION, OPERATION OR CARE (INCLUDING, BUT NOT LIMITED TO ABUSE, MISUSE, FAILURE TO PROVIDE REASONABLE AND NECESSARY MAINTENANCE, UNAUTHORIZED REPAIRS OR ANY ALTERATIONS TO THIS PRODUCT), LABOR CHARGES FOR REINSTALLING A REPAIRED OR REPLACED UNIT, REPLACEMENT OF CONSUMABLE ITEMS (E.G., BATTERIES IN REMOTE CONTROL TRANSMITTERS AND LIGHT BULBS), OR UNITS INSTALLED FOR NON-RESIDENTIAL USE. NO PERSON...
... to you. THIS LIMITED WARRANTY DOES NOT COVER NON-DEFECT DAMAGE, DAMAGE CAUSED BY IMPROPER INSTALLATION, OPERATION OR CARE (INCLUDING, BUT NOT LIMITED TO ABUSE, MISUSE, FAILURE TO PROVIDE REASONABLE AND NECESSARY MAINTENANCE, UNAUTHORIZED REPAIRS OR ANY ALTERATIONS TO THIS PRODUCT), LABOR CHARGES FOR REINSTALLING A REPAIRED OR REPLACED UNIT, REPLACEMENT OF CONSUMABLE ITEMS (E.G., BATTERIES IN REMOTE CONTROL TRANSMITTERS AND LIGHT BULBS), OR UNITS INSTALLED FOR NON-RESIDENTIAL USE. NO PERSON...
8355 Manual
Page 38
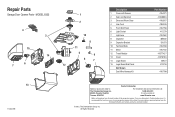
... Description 1 Cover with Screws 2 Gear and Sprocket 3 Drive and Worm Gear 4 Line Cord 5 Front End Panel 6 Light Socket 7 Light Lens 8 Capacitor 9 Capacitor Bracket 10 Terminal Block 11 Motor 12 Travel Module 13 Cover 14 Logic Board 15 Logic Board End Panel Not Shown Dual Wire Harness Kit Part Number 41A4371 41A4885-5 41A2817 41B4245 41A7756 41C279 41A7562 30B532 12A373 41A3150 41A7442 41D7742-7 41A7619-5 45ACT 41D216 41A7790 Contact Information Address repair parts order to your garage door opener while calling...
... Description 1 Cover with Screws 2 Gear and Sprocket 3 Drive and Worm Gear 4 Line Cord 5 Front End Panel 6 Light Socket 7 Light Lens 8 Capacitor 9 Capacitor Bracket 10 Terminal Block 11 Motor 12 Travel Module 13 Cover 14 Logic Board 15 Logic Board End Panel Not Shown Dual Wire Harness Kit Part Number 41A4371 41A4885-5 41A2817 41B4245 41A7756 41C279 41A7562 30B532 12A373 41A3150 41A7442 41D7742-7 41A7619-5 45ACT 41D216 41A7790 Contact Information Address repair parts order to your garage door opener while calling...


