
8355 Manual
Page 1
... Troubleshooting 33-34 Accessories 35 Warranty 36 Repair Parts 37-38 www.liftmaster.com The Chamberlain Group, Inc. 845 Larch Avenue Elmhurst, Illinois 60126-1196 Write down the following information for installation instructions. PREMIUM Series Belt Drive Garage Door Opener Model 8355 - 1/2 hp FOR RESIDENTIAL USE ONLY ■ Please read this manual and the...
... Troubleshooting 33-34 Accessories 35 Warranty 36 Repair Parts 37-38 www.liftmaster.com The Chamberlain Group, Inc. 845 Larch Avenue Elmhurst, Illinois 60126-1196 Write down the following information for installation instructions. PREMIUM Series Belt Drive Garage Door Opener Model 8355 - 1/2 hp FOR RESIDENTIAL USE ONLY ■ Please read this manual and the...
8355 Manual
Page 2
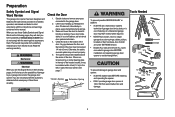
Read them . Check the Door 1. If balanced, it is installed, operated, maintained and tested in strict accordance with the instructions and warnings contained in this Signal Word on the following pages, they will alert you to the possibility of damage to your ... page 7. Preparation Safety Symbol and Signal Word Review This garage door opener has been designed and tested to offer safe service provided it should be installed within 4 feet (1.2 m) to avoid malfunction and damage. 1/2 5/8 1/4 7/16 9/16 7/16 2 The hazard may not work properly. 5. Raise and lower the ...
Read them . Check the Door 1. If balanced, it is installed, operated, maintained and tested in strict accordance with the instructions and warnings contained in this Signal Word on the following pages, they will alert you to the possibility of damage to your ... page 7. Preparation Safety Symbol and Signal Word Review This garage door opener has been designed and tested to offer safe service provided it should be installed within 4 feet (1.2 m) to avoid malfunction and damage. 1/2 5/8 1/4 7/16 9/16 7/16 2 The hazard may not work properly. 5. Raise and lower the ...
8355 Manual
Page 3
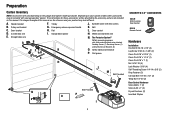
... and red/white wire N. Depending on the garage door opener model purchased. The instructions for reference and your garage door opener. Door bracket D. Trolley G. Rail I SECURITY✚ 2.0TM ACCESSORIES 882LM Multi-Function Door Control 893LM Remote Control Hardware Installation Hex Bolt 5/16"-18 x 7/8" (4) Lag Screw 5/16"-9 x 1-5/8" (2) Clevis Pin 5/16" x 2-3/4" (1) Clevis Pin 5/16...
... and red/white wire N. Depending on the garage door opener model purchased. The instructions for reference and your garage door opener. Door bracket D. Trolley G. Rail I SECURITY✚ 2.0TM ACCESSORIES 882LM Multi-Function Door Control 893LM Remote Control Hardware Installation Hex Bolt 5/16"-18 x 7/8" (4) Lag Screw 5/16"-9 x 1-5/8" (2) Clevis Pin 5/16" x 2-3/4" (1) Clevis Pin 5/16...
8355 Manual
Page 6
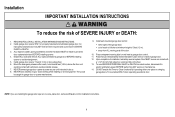
...Door MUST reverse on contact with vehicles to -Close functionality if operating either one -piece door, visit www.liftmaster.com for installation instructions. 6 To avoid SERIOUS PERSONAL INJURY or DEATH from ALL moving parts of the door. 10. Mount the... floor. 6. NEVER wear watches, rings or loose clothing while installing or servicing opener. An improperly balanced door may NOT reverse when required and could be enabled ONLY when operating a sectional door. Installation IMPORTANT INSTALLATION INSTRUCTIONS WARNING To reduce the risk of installation, test safety reversal system.
...Door MUST reverse on contact with vehicles to -Close functionality if operating either one -piece door, visit www.liftmaster.com for installation instructions. 6 To avoid SERIOUS PERSONAL INJURY or DEATH from ALL moving parts of the door. 10. Mount the... floor. 6. NEVER wear watches, rings or loose clothing while installing or servicing opener. An improperly balanced door may NOT reverse when required and could be enabled ONLY when operating a sectional door. Installation IMPORTANT INSTALLATION INSTRUCTIONS WARNING To reduce the risk of installation, test safety reversal system.
8355 Manual
Page 7
... a sectional door. You can attach it to the ceiling when clearance is in your door to the highest point of travel clearance for ceiling installation. NOTE: If you are under EXTREME tension. • ALWAYS call a trained door systems technician if garage door binds, sticks, or is ...might NOT reverse when required. • DO NOT enable the Timer-to-Close functionality if operating either one -piece door, visit www.liftmaster.com for installation instructions. 1.1 Close the door and mark the inside vertical centerline of the garage door. 1.2 Extend the line onto the header wall above the...
... a sectional door. You can attach it to the ceiling when clearance is in your door to the highest point of travel clearance for ceiling installation. NOTE: If you are under EXTREME tension. • ALWAYS call a trained door systems technician if garage door binds, sticks, or is ...might NOT reverse when required. • DO NOT enable the Timer-to-Close functionality if operating either one -piece door, visit www.liftmaster.com for installation instructions. 1.1 Close the door and mark the inside vertical centerline of the garage door. 1.2 Extend the line onto the header wall above the...
8355 Manual
Page 8
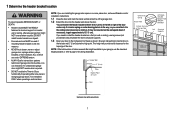
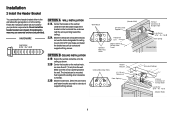
Follow the instructions which will work best for ceiling mount). The bracket can attach the header bracket either to the wall above the garage door, or to the ceiling. Do not install the header bracket over drywall. OPTION B CEILING INSTALLATION 2.1B Extend the vertical centerline onto the ceiling as... line as shown. 2.2B Center the bracket on the vertical centerline with lag screws. HARDWARE Lag Screw 5/16" - 9 x 1-5/8" OPTION A WALL INSTALLATION 2.1A Center the bracket on the vertical mark, no more than 6" (15 cm) from the wall. Drill 3/16" pilot holes and fasten the ...
Follow the instructions which will work best for ceiling mount). The bracket can attach the header bracket either to the wall above the garage door, or to the ceiling. Do not install the header bracket over drywall. OPTION B CEILING INSTALLATION 2.1B Extend the vertical centerline onto the ceiling as... line as shown. 2.2B Center the bracket on the vertical centerline with lag screws. HARDWARE Lag Screw 5/16" - 9 x 1-5/8" OPTION A WALL INSTALLATION 2.1A Center the bracket on the vertical mark, no more than 6" (15 cm) from the wall. Drill 3/16" pilot holes and fasten the ...
8355 Manual
Page 10
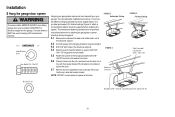
...centered over the door (or in line with the header bracket if the bracket is not centered above the door). 5.7 Remove the 2x4. Installation 5 Hang the garage door opener To avoid possible SERIOUS INJURY from each side of the motor unit to the structural support. 5.2 Cut ...to required lengths. 5.3 Drill 3/16" pilot holes in the structural supports. 5.4 Attach one end of the garage. Concrete anchors MUST be different. Instructions below are for attaching the garage door opener directly to structural supports. 5.1 Measure the distance from a falling garage door opener, fasten it SECURELY ...
...centered over the door (or in line with the header bracket if the bracket is not centered above the door). 5.7 Remove the 2x4. Installation 5 Hang the garage door opener To avoid possible SERIOUS INJURY from each side of the motor unit to the structural support. 5.2 Cut ...to required lengths. 5.3 Drill 3/16" pilot holes in the structural supports. 5.4 Attach one end of the garage. Concrete anchors MUST be different. Instructions below are for attaching the garage door opener directly to structural supports. 5.1 Measure the distance from a falling garage door opener, fasten it SECURELY ...
8355 Manual
Page 23
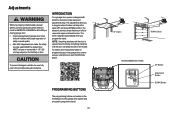
... with electronic controls to vehicles, be tested. Adjustments Without a properly installed safety reversal system, persons (particularly small children) could be SERIOUSLY INJURED or KILLED by a closing garage door. • Incorrect adjustment of garage door travel limits will stop . To watch a short instructional video on programming your new garage door opener use your...
... with electronic controls to vehicles, be tested. Adjustments Without a properly installed safety reversal system, persons (particularly small children) could be SERIOUSLY INJURED or KILLED by a closing garage door. • Incorrect adjustment of garage door travel limits will stop . To watch a short instructional video on programming your new garage door opener use your...
8355 Manual
Page 36
..., which vary from defects in materials and/or workmanship for the lifetime of the product while you own your compliance with the instructions regarding installation, operation, and maintenance and testing. The proper operation of this product is free from defects in materials and/or workmanship for.... [You are responsible for any costs incurred in removing and/or reinstalling the product or any product returned for warranty repair. Warranty LIFTMASTER® ONE YEAR LIMITED WARRANTY LIFETIME MOTOR AND BELT LIMITED WARRANTY The Chamberlain Group, Inc. ("Seller") warrants to the first...
..., which vary from defects in materials and/or workmanship for the lifetime of the product while you own your compliance with the instructions regarding installation, operation, and maintenance and testing. The proper operation of this product is free from defects in materials and/or workmanship for.... [You are responsible for any costs incurred in removing and/or reinstalling the product or any product returned for warranty repair. Warranty LIFTMASTER® ONE YEAR LIMITED WARRANTY LIFETIME MOTOR AND BELT LIMITED WARRANTY The Chamberlain Group, Inc. ("Seller") warrants to the first...


