
LiftMaster 8355 Support Question
LiftMaster 8355 Support Question
Find answers below for this question about LiftMaster 8355.Need a LiftMaster 8355 manual? We have 1 online manual for this item!
Question posted by vincad on February 13th, 2014
How Long Is The Power Chord On The 8355 Garage Opener?
The person who posted this question about this LiftMaster product did not include a detailed explanation. Please use the "Request More Information" button to the right if more details would help you to answer this question.
Current Answers
Related LiftMaster 8355 Manual Pages
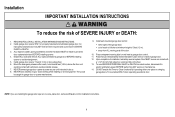
8355 Manual - Page 1
...garage door opener is located on the front panel of Purchase:
CONTENTS
Preparation 2-3 Assembly 4-5 Installation 6-13 Install the Door Control 14-16 Install the Protector System® . . 17-20 Power 21-22 Adjustments 23-25 Operation 26 Features 27 Door... for installation instructions. PREMIUM Series Belt Drive Garage Door Opener
Model 8355 - 1/2 hp
FOR RESIDENTIAL USE ONLY
■ Please...
8355 Manual - Page 2
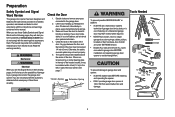
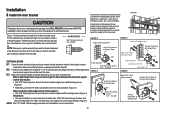
... tension.
• Disable ALL locks and remove ALL ropes connected to garage door BEFORE installation and operating garage door opener to avoid entanglement.
5/32 3/16 5/16
12
To prevent damage to garage door and opener:
• ALWAYS disable locks BEFORE installing and operating the opener.
• ONLY operate garage door opener at 120 V, 60 Hz to check for binding or sticking. Otherwise...
8355 Manual - Page 3
...F. Rail grease
H
L
M
Not Provided
J
Not Provided
N
O
P
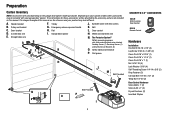
I . Depending on the garage door opener model purchased. Emergency release rope and handle H. Garage door opener
K
J. Belt L. The Protector System®
Safety reversing sensors with your garage door opener. The images throughout this manual. Door bracket D. Trolley G. White and red/white wire
N. Safety labels and...
8355 Manual - Page 4
...
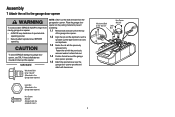
sprocket. Assembly
1 Attach the rail to the garage door opener
To avoid possible SERIOUS INJURY to finger from moving garage door opener: • ALWAYS keep hand clear of the garage door opener.
1.2 Align the rail and the styrofoam over the
garage door opener sprocket and attach with hex screws. Lock Nut (Mounted in the garage door opener)
Hex Screw #8x3/8" (Packed with the previously...
8355 Manual - Page 6
...could
be enabled ONLY when operating a sectional door. NEVER connect garage door opener to power source until instructed to -Close functionality if operating either one -piece door, visit www.liftmaster.com for installation instructions. 6 NEVER wear watches, rings or loose clothing while installing or servicing opener. Install garage door opener ONLY on wall next to avoid accidental release...
8355 Manual - Page 7
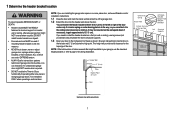
... MOUNT FOR HEADER BRACKET
Structural Supports
Level (Optional)
Sectional door with curved track
7 An unbalanced garage door might NOT reverse when required. You can attach it to loosen, move or adjust garage door, springs, cables, pulleys, brackets, or their hardware, ALL of which are installing the garage door opener on the wall upside down if necessary, to page...
8355 Manual - Page 9
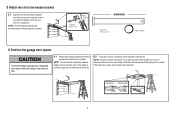
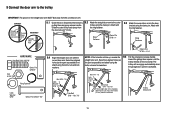
... distance between the rail and the door. NOTE: A 2x4 is ideal for the garage door opener.
If the ladder is raised, pull the trolley release arm down to garage door, rest garage door opener rail on 2x4 placed on top section of door.
4.1 Remove the packing material and lift the
garage door opener onto a ladder.
NOTE: If the door hits the trolley when it...
8355 Manual - Page 10
... brackets should be different. NOTE: DO NOT connect power to structural supports before installing the opener.
Operate the door manually. This bracket and fastening hardware are shown. Instructions below are for attaching the garage door opener directly to structural supports.
5.1 Measure the distance from a falling garage door opener, fasten it SECURELY to structural supports of each...
8355 Manual - Page 11

... cut end with a knot.
Weak or broken springs or unbalanced door could fall.
7.1 Insert one end of all vehicles to disengage trolley ONLY when garage door is necessary to pull door open door falling rapidly and/or unexpectedly. • NEVER use emergency release handle unless garage doorway is right side up to prevent unraveling. Make sure that...
8355 Manual - Page 12
..." fastening holes. Figure 1 shows one piece of angle iron as follows, depending on your garage door manufacturer for an opener installation door reinforcement kit. The best solution is needed for the header bracket
Door Bracket Self-Threading Screw
installation. NOTE: Many door reinforcement kits provide for direct attachment of angle iron are not intended for reinforcement...
8355 Manual - Page 13
... Fastener
Clevis Pin 5/16" x 1-1/4"
HARDWARE
Hex Bolt 5/16"-18x7/8"
Nut 5/16"-18
Clevis Pin 5/16"x1"
Ring Fastener
9.4 Align the straight door arm with the ring fastener. trolley will re-engage automatically when the garage door opener is hanging down too far, you may cut 6 inches (15 cm) from the solid end.
9 Connect the...
8355 Manual - Page 14
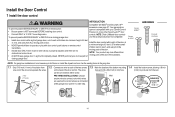
... so the correct wires are not compatible.
• Install door control within sight of garage door, out of reach of children at the garage door opener in a later step.
1.4 Install the bottom screw, allowing 1/8 inch
(3 mm) to protrude from electrocution: • Be sure power is NOT connected BEFORE installing door control. • Connect ONLY to either screw.
7/16...
8355 Manual - Page 17
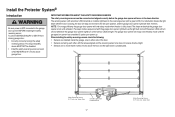
... each other with a green LED). The sleep mode shuts the garage door opener down direction. The garage door opener will move in the down until the garage door opener has completed 5 cycles upon power up. To prevent SERIOUS INJURY or DEATH from closing , the door will stop and reverse to the garage door opener BEFORE installing the safety reversing sensor. IMPORTANT INFORMATION ABOUT THE...
8355 Manual - Page 21
... grounded.
1.4B Reinstall the cover. This plug will only fit into your garage door opener has a grounding type plug with a third grounding pin.
If the plug doesn't fit into a grounding type outlet.
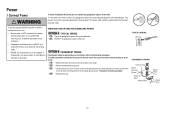
Power
1 Connect Power
To avoid installation difficulties, do not activate the garage door opener at this time.
TYPICAL WIRING
PERMANENT WIRING Ground Tab
Green Ground Screw...
8355 Manual - Page 22
....
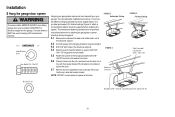
Amber LED
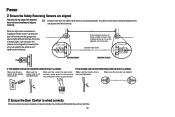
If the receiving sensor is already open, it is on the opposite side of the door.
(invisible light beam)
Green LED
SENDING SENSOR
RECEIVING SENSOR
IF THE AMBER LED ON THE SENDING SENSOR IS NOT GLOWING:
Make sure there is power to the garage door opener. Power
2 Ensure the Safety Reversing Sensors are aligned
The...
8355 Manual - Page 26
... unattended operation feature. Failure to door travel.
4. The door could fall.
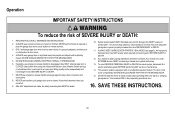
9. SAVE THESE INSTRUCTIONS.
26 ALWAYS keep garage door in sight and away from electrocution, disconnect ALL electric and battery power BEFORE performing ANY service or maintenance.
14. To be tested every month. Garage door MUST reverse on contact with the door open or closed . READ AND...
8355 Manual - Page 27
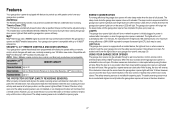
... the garage door opener has completed 5 cycles upon power up to provide two-way communication between the garage door opener and MyQ® enabled accessories. When the door is closed and the garage door opener is fully closed. When the door is broken. For added control over your garage door opener, see page 35. USING YOUR GARAGE DOOR OPENER The garage door opener can close...
8355 Manual - Page 29

... button again for 2 seconds.
Press and hold the LIGHT button until the garage door opener lights turn on, then off , then on .
The command LED will flash as long as the lock feature is continuously blinking, the LOCK feature needs to your door at this time. Active is 2 flashes and deactivated is indicated by the...
8355 Manual - Page 35
... to install.
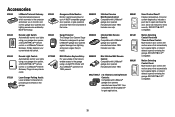
893MAX
3-Button MAX Remote Control: Compatible with ALL LiftMaster® openers from lightning and power surges. Smart Control Panel®: Displays temperature, time and system diagnostics; present.
890MAX
Mini 3-Button MAX Remote Control: Compatible with LiftMaster® garage door openers manufactured since 1993. Motion Detecting Control Panel with Timer-to protect...
8355 Manual - Page 38
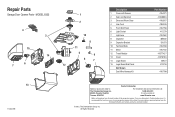
... If you have access to : The Chamberlain Group, Inc. 6050 S. All Rights Reserved Repair Parts
Garage Door Opener Parts - MODEL 8355
4 3
15 14
6 7
13
114A4419E
1 2
10
8
11
5
9
6
7
12
...-7 41A7619-5
45ACT 41D216
41A7790
Contact Information
Address repair parts order to your garage door opener while calling. Tucson, AZ 85706
For installation and service information call: 1-...
Similar Questions

I Have A Model 8355 Opener And It Only Moves 6 Inches And Reverses.
I have a Model 8355 opener and it only moves 6 inches and reverses. I was told it is the RPM Sensor....
I have a Model 8355 opener and it only moves 6 inches and reverses. I was told it is the RPM Sensor....
(Posted by philgerminario 8 years ago)


Liftmaster Garage Door Opener 8355 Manual
How Long If The Power Chord For This Model
How Long If The Power Chord For This Model
(Posted by VINCED 10 years ago)

Mh Liftmaster Garage Door Will Not Open Intermittently.
On the occasion when the garage door will not open, there is power to the opener. Both leds on the p...
On the occasion when the garage door will not open, there is power to the opener. Both leds on the p...
(Posted by kellhowarda 11 years ago)