
LiftMaster 8355 Support Question
LiftMaster 8355 Support Question
Find answers below for this question about LiftMaster 8355.Need a LiftMaster 8355 manual? We have 1 online manual for this item!
Question posted by alatifyama on June 18th, 2022
Connecting Model 8355 Liftmaster To Wifi
Hi,I have two questions;1- Is the model 8355 from 2014 able to connect to wifi?2- This model has 11 digit serial number, I believe foe myQ connection 10 digit serial number is asked. Which digit from 11 digit serial number can be skipped?Thanks
Current Answers
Answer #1: Posted by SonuKumar on June 18th, 2022 9:59 PM
SonuKumar

Member since:
May 9th, 2021 Points: 16,617,810

Member since:
May 9th, 2021 Points: 16,617,810
https://www.youtube.com/watch?v=GjGNch_3mE4
https://www.manualslib.com/products/Chamberlain-Liftmaster-Premium-8355-2923707.html
Please respond to my effort to provide you with the best possible solution by using the "Acceptable Solution" and/or the "Helpful" buttons when the answer has proven to be helpful.
Regards,
Sonu
Your search handyman for all e-support needs!!
Related LiftMaster 8355 Manual Pages
8355 Manual - Page 1
...-piece door, visit www.liftmaster.com for future reference: Serial Number:
.
PREMIUM Series Belt Drive Garage Door Opener
Model 8355 - 1/2 hp
FOR RESIDENTIAL USE ONLY
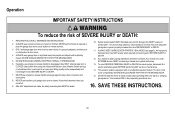
■ Please read this manual and the enclosed safety materials carefully! ■ Fasten the manual near the garage door after installation. ■ The door WILL NOT CLOSE unless the Protector System® is connected and...
8355 Manual - Page 2
... are under EXTREME tension.
• Disable ALL locks and remove ALL ropes connected to garage door BEFORE installation and operating garage door opener to avoid entanglement.
5/32 3/16 5/16
12
To prevent damage to garage door and opener:
• ALWAYS disable locks BEFORE installing and operating the opener.
• ONLY operate garage door opener at 120 V, 60 Hz to the possibility of the...
8355 Manual - Page 3
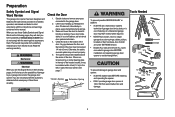
... Lock Washer 5/16" (4) Self-Threading Screw 1/4"-14 x 5/8" (2) Ring Fastener (3) Carriage Bolt 1/4"-20 x 1/2" (2) Wing Nut 1/4"-20 (2) Door Control Hardware Screw 6AB x 1" (2) Screw 6-32 x 1" (2) Drywall Anchors (2) Insulated Staples
3 Depending on the garage door opener model purchased. Sprocket cover with white and white/black wire attached: Sending Sensor (1) Receiving Sensor (1) and...
8355 Manual - Page 6
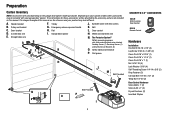
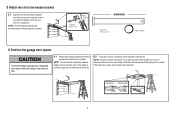
... one -piece door, visit www.liftmaster.com for installation instructions. 6 NOTE: If you are installing the garage door opener on wall next to cables, spring assemblies and other hardware MUST be enabled ONLY when operating a sectional door. ALL repairs to garage door control. 11. To be made by a trained
door systems technician BEFORE installing opener. 4.
Mount the...
8355 Manual - Page 7
... hardware, ALL of which are installing the garage door opener on a one -piece or swinging garage doors.
NOTE: If you are under EXTREME tension.
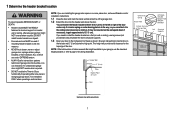
• ALWAYS call a trained door systems technician if garage door binds, sticks, or is out of inches exceeds the height available in the way; NOTE: If the total number of balance.
Header Wall
2" (5 cm)
Track...
8355 Manual - Page 9
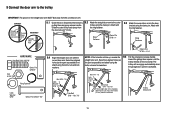
... between the rail and the door. 3 Attach the rail to the header bracket
3.1 Align the rail with the ring fastener. Connected Disconnected
9
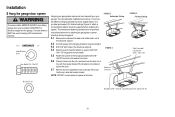
If the ladder is raised, pull the trolley release arm down to garage door, rest garage door opener rail on 2x4 placed on top section of door.
4.1 Remove the packing material and lift the
garage door opener onto a ladder.
8355 Manual - Page 10
... connect power to provide rigid support. FIGURE 1 Unfinished Ceiling
FIGURE 3
Measure Distance
Nut 5/16"-18
FIGURE 2 Finished Ceiling Not Provided
(Not Provided) Lag Screws 5/16"- 18x1-7/8"
Hex Bolt 5/16"- 18x7/8", Lock Washer 5/16", Nut 5/16"-18
10 HARDWARE
Lock Washer 5/16"
Hex Bolt 5/16"- 18x7/8"
Hanging your garage door opener will vary depending on your garage...
8355 Manual - Page 13
..." x 1"
9.3 Attach the curved door arm to the door
bracket using the clevis pin. Attach with the
curved door arm.
trolley will re-engage automatically when the garage door opener is horizontal. Disconnect the trolley by 9.2 Attach the straight door arm to the outer
pulling the emergency release handle.
Trolley release arm
13 9 Connect the door arm to the trolley...
8355 Manual - Page 14
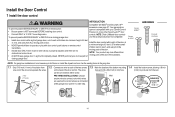
... it can be seen clearly, is compatible with MyQ® and Security+ 2.0™
To prevent possible SERIOUS INJURY or DEATH from the wall. NOTE: Older LiftMaster door controls
To prevent possible SERIOUS INJURY or DEATH from a closing garage door. closing garage door:
and third party products are no obstructions to connect, note which wires
are used so the...
8355 Manual - Page 15
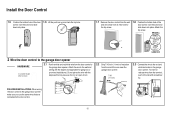
... from the terminal, push in the tab with the staples (not applicable for the top screw.
1.8 Position the bottom hole of the wire near the garage door opener.
7/16" (11 mm)
2.3 Connect the wire to
the garage door opener.
Do not pierce the wire with the staple as this may cause a short or an...
8355 Manual - Page 17
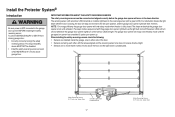
... reverse to the full open position, and the garage door opener lights will light. When installing the safety reversing sensors check the following: • Sensors are installed inside the garage, one on the sensor LEDs will flash 10 times. If an obstruction breaks the light beam while the door is closing garage door: • Correctly connect and align the safety...
8355 Manual - Page 19

... floor
using concrete anchors (not provided).
(not provided)
IGWnsaairdlalege
1.3C Slide the carriage bolt into the slot on
the garage door opener. Separate the wires.
RED WHITE WHITE GREY
Insulated Staple (Not shown)
7/16" (11 mm)
19 Install the Protector System®
1 Install the Safety Reversing Sensors OPTION C FLOOR INSTALLATION
Use an extension bracket...
8355 Manual - Page 20
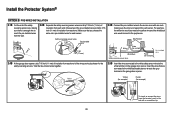
... the white/black safety sensor wires to the grey terminal on the garage door opener.
Insert the wires that you choose the same color pre-installed wires for each sensor. Safety reversing sensor wires 7/16" (11 mm)
Pre-installed wires
7/16" (11 mm)
2.3B Connect the pre-installed wires to reach the pre-installed wires from...
8355 Manual - Page 21
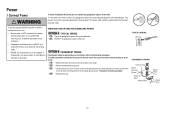
... shock, your outlet, contact a qualified electrician to make a permanent connection through the 7/8 inch hole in the garage door opener into a grounded outlet. 1.2A DO NOT run garage door opener at this time. To make it fit outlet. the white (neutral) wire to establish permanent wiring connection.
• Garage door installation and wiring MUST be grounded.
1.4B Reinstall the cover...
8355 Manual - Page 26
...OF THE MOVING DOOR.
5. This operator system is CLOSED. ONLY activate garage door when it can be tested.
10. NO ONE SHOULD GO UNDER A STOPPED, PARTIALLY OPENED DOOR.
6. NEVER ...
11. Failure to pull garage door open . ALWAYS KEEP GARAGE DOOR PROPERLY BALANCED (see page 2). NEVER use emergency release handle unless garage doorway is properly adjusted, and there are made by a trained door...
8355 Manual - Page 27
...MyQ® technology uses a 900MHz signal to and during the door closing , the door will blink 10 times.
SECURITY+ 2.0™ REMOTE CONTROLS AND DOOR CONTROLS Your garage door opener has already been programmed at the factory to operate with your
garage door operation. However, you can be adjusted using a TTC enabled door control (Models 881LM or 880LM). LIGHTS The garage door opener...
8355 Manual - Page 30
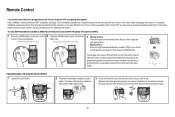
... keypad. Keyless Entry: Enter a 4-digit personal identification number (PIN) of your vehicle. Then press the ENTER button. PIN
PROGRAM USING THE GARAGE DOOR OPENER
1 Locate the Learn Button.
2 Press and immediately release the Learn
button. If programming to other products, press the button a second time to operate with your garage door.
The garage door opener lights will flash (or...
8355 Manual - Page 34
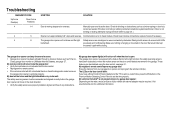
... door opener can be connected and aligned correctly before the garage door opener will not close and the light bulbs blink on the door control detects movement in the down direction.
• Verify the safety sensors are misaligned or were momentarily obstructed. Opener runs approximately 6-8", stops and reverses. Check for additional information.
34 The LEDs on the make, model...
8355 Manual - Page 35
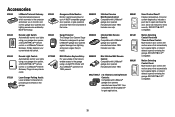
... home to enable access to the garage using your garage door opener, a SECURITY✚ 2.0™ remote control or a LiftMaster® Internet Gateway.
Accessories
828LM
LiftMaster® Internet Gateway: Internet enabled accessory which connects to the computer and allows you to monitor and control garage door openers and lighting accessories enabled by MyQ® technology.
829LM
823LM...
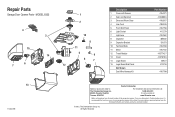
8355 Manual - Page 38
...
Garage Door Opener Parts - Tucson, AZ 85706
For installation and service information call: 1-800-528-9131
Or visit us online at: www.liftmaster.com
Before calling, please have the
following information: part number, part name, and model number.
© 2012, The Chamberlain Group, Inc. Country Club Rd. If you have access to : The Chamberlain Group, Inc. 6050 S. MODEL 8355...
Similar Questions

I Have Installed A Chamberlan Garage Door Opener And The Remote I Was Using Is
I have been using a Chamberlan garage door opener and its remote has been defective since of late.Pl...
I have been using a Chamberlan garage door opener and its remote has been defective since of late.Pl...
(Posted by donweera42 8 months ago)
Garage Door Opens After Shutting.
My Lift master 8550 inside keypad is Inside wall pad is model #880LM. outside keypad Model # is 877M...
My Lift master 8550 inside keypad is Inside wall pad is model #880LM. outside keypad Model # is 877M...
(Posted by BONNIECA92 2 years ago)

I Have A Model 8355 Opener And It Only Moves 6 Inches And Reverses.
I have a Model 8355 opener and it only moves 6 inches and reverses. I was told it is the RPM Sensor....
I have a Model 8355 opener and it only moves 6 inches and reverses. I was told it is the RPM Sensor....
(Posted by philgerminario 8 years ago)

Liftmaster Garage Door Opener 8355 Manual
How Long If The Power Chord For This Model
How Long If The Power Chord For This Model
(Posted by VINCED 10 years ago)