
GE 27956FE1 Support Question
GE 27956FE1 Support Question
Find answers below for this question about GE 27956FE1 - Photophone Cordless Phone.Need a GE 27956FE1 manual? We have 1 online manual for this item!
Question posted by Nancylespommes on March 22nd, 2015
I Would Buy This Phone. Or Buy It? How And How Much?
The person who posted this question about this GE product did not include a detailed explanation. Please use the "Request More Information" button to the right if more details would help you to answer this question.
Current Answers
Answer #1: Posted by Brainerd on March 23rd, 2015 1:10 AM
Brainerd

Member since:
May 24th, 2014 Points: 759,630

Member since:
May 24th, 2014 Points: 759,630
Hi, you can buy it here:
http://www.amazon.com/27956FE1-Dect-6-0-Photo-Phone/dp/B0016CFM6I
http://www.amazon.com/27956FE1-Dect-6-0-Photo-Phone/dp/B0016CFM6I
I hope this helps you!
Please press accept to reward my effort or post again with more details if not satisfied.
Regards, Brainerd
Related GE 27956FE1 Manual Pages
User Guide - Page 5

...Introduction 8
Before You Begin 8
Parts Checklist 8
Telephone Jack Requirements 9
Installation 9
Digital Security System 9
Important Installation Guidelines..........9
Handset Layout 10
Base Layout 11
Installing the Phone 12
Installing the Handset Battery 12
Installing the Base/Photo Frame........ 13
Changing the Photo Frame 14
Wall Mounting 14
Programming the Photo Frame...
User Guide - Page 6
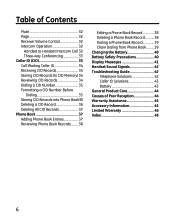
... 36 Deleting a CID Record 36 Deleting All CID Records 37 Phone Book 37 Adding Phone Book Entries 37 Reviewing Phone Book Records.......... 38
Editing a Phone Book Record 38 Deleting a Phone Book Record 38 Dialing a Phone Book Record 39 Chain Dialing from Phone Book.......... 39 Changing the Battery 40 Battery Safety Precautions 40 Display Messages 41 Handset Sound...
User Guide - Page 8
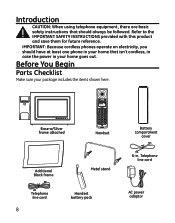
... shown here. Introduction
CAUTION: When using telephone equipment, there are basic safety instructions that isn't cordless, in case the power in your home goes out.
IMPORTANT: Because cordless phones operate on electricity, you should have at least one phone in . Refer to the IMPORTANT SAFETY INSTRUCTIONS provided with this product and save them for...
User Guide - Page 9
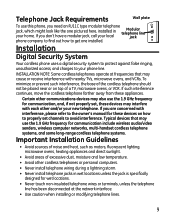
... when installing or modifying telephone lines.
To minimize or prevent such interference, the base of the cordless telephone should not be placed near or on how to your new telephone. Installation
Digital Security System
Your cordless phone uses a digital security system to protect against false ringing, unauthorized access, and charges to properly set...
User Guide - Page 12

... jack inside a plastic bag and is separate from the handset.
2. Locate the battery which is packaged inside the compartment. Insert the battery pack. 5. Installing the Phone
Installing the Handset Battery
NOTE: You must connect the handset battery before use only the Thomson Inc. Locate the battery compartment on the back of...
User Guide - Page 13
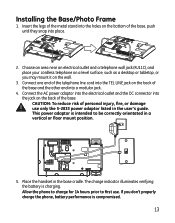
...Connect one end of the telephone line cord into a modular jack.
4. Allow the phone to charge for 14 hours prior to be correctly orientated in a vertical or floor ... and a telephone wall jack (RJ11C), and place your cordless telephone on a level surface, such as a desktop or tabletop, or you don't properly charge the phone, battery performance is charging. Connect the AC power adaptor ...
User Guide - Page 15
... may program the following items in the main menu: Add Photos to Internal Memory, PictureCaller ID Setup, Delete Photos from the memory card to the phone's memory. (refer to your camera instructions on how to internal memory can also add photos from Internal Memory, Frame Preferences and Reset All Settings. NOTE...
User Guide - Page 17
... Caller ID Records
From the Add new Picture-Caller ID Link menu: 1. Picture-Caller ID Setup
You can be edited or deleted. 1. Make sure your phone is full, the screen displays Internal Memory Full. Use the 5 or 6 button to scroll to Picture-Caller ID Setup. 4. File Copy Error. Press the menu...
User Guide - Page 18
... folder to cycle for the Caller ID instead of photos to CID links, then when user selects Picture-Caller ID Setup, an alert panel appears: Phone memory is full. Press the exit button repeatedly to return to free up some pictures or folders to the photo screen. Delete some space.
Press...
User Guide - Page 19
.../ok button to Edit existing Picture-Caller ID Link. 2. Use the 5 or 6 button to scroll to the PCIDL you wish to edit. 4.
Make sure your phone is OFF (not in internal memory. Press the navigational buttons to select a photo or folder to delete, use the
menu/ok button to Save & Exit...
User Guide - Page 20
... delete a photo or folder from Internal Memory is OFF (not in phone memory. for deleting a photo or folder from the phone's internal memory, it does NOT delete the associated name and number.... Slide Show Setup, Frame On/Off Time, Power Saver, Brightness and Language. Make sure your phone is highlighted. Press the menu/ok button to confirm and select from Internal Memory is Slide
Show...
User Guide - Page 23
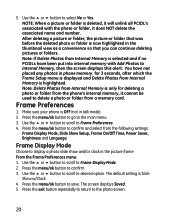
...the exit button repeatedly to return to standby screen. NOTE: During programming, you sure? Make sure your phone is out of the built-in talk mode). 2. Press the menu/ok button to go to the main ...menu. 3. No Yes. 5. Make sure your phone is pressed for 60 seconds, the handset will be additional menu items which includes an answering system.
...
User Guide - Page 26
... button to scroll to 99).
26 Press the menu button to enter your selection. Make sure your phone is received. Use the touch-tone pad to enter the last two digits of the current year (... button to display when a valid Caller ID record is OFF (not in talk mode). 2. Make sure your phone is also used for the Dialback feature. From the Setup BS Menu: 1.
Press the menu button to enter ...
User Guide - Page 27
...pm) and "a" (am). 9. The screen displays Saved. NOTE: If you receive your phone is successful, the handset screen displays Successful and emits a confirmation tone. 7. On the ... date/time is pressed, the screen displays Unavailable. 1. If the registration fails (i.e. A cordless handset will override manually set date/time.
Use the touch-tone pad to Registration. 3. Press...
User Guide - Page 28
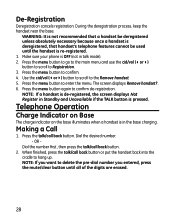
.../call back button or put the handset back into the
cradle to hang up. When finished, press the talk/call back button. 2. Make sure your phone is re-registered. 1. Press the menu button again to confirm. 4.
NOTE: If you want to the Remove handset. 5. Press the menu button to confirm de...
User Guide - Page 29
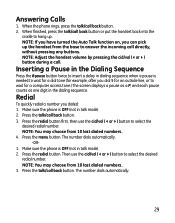
... #pause button twice to answer the incoming call directly, without pressing any buttons. Make sure the phone is OFF (not in talk mode). 2. When finished, press the talk/call back button or ... button. The number dials automatically.
29 Answering Calls
1. Make sure the phone is needed to select the
desired redial number.
Press the menu button. Press the talk/call back button. 3....
User Guide - Page 30
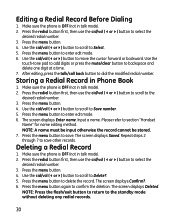
... records. Press the menu button again to select the
desired redial number. 3. Make sure the phone is OFF (not in talk mode). 2. Press the redial button first, then use the cid...7. Please refer to the standby mode without deleting any redial records.
30 Make sure the phone is OFF (not in Phone Book
1.
Editing a Redial Record Before Dialing
1. Storing a Redial Record in talk mode)....
User Guide - Page 31

...hook (during a call), the call is OFF (not in talk mode). 2.
During a phone call, you will hear a beep to indicate another call is waiting on the line and ...to activate a custom calling service, such as call waiting, or the call in talk mode). 2. Make sure the phone is automatically disconnected. Use the cid/vol (3or4) button to the standby mode without deleting any redial record. 3....
User Guide - Page 32

... the talk/call back button on the base. Press the page button on the originating handset.
32
Press the menu button to your phone conversation. Make sure the originating phone is OFF (not in talk mode) you may adjust the receiver volume by pressing the cid/vol (3or4) button. Number?. 4.
Otherwise the...
User Guide - Page 33
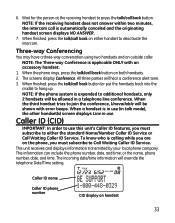
...telephone Date/Time setting. When finished, press the talk/call back button.
This information can include the phone number, date, and time; NOTE: The Three-way Conference is applicable ONLY with error beeps. When...handset does not answer within two minutes, the intercom call back on the phone, you must subscribe to either the standard Name/Number Caller ID Service or Call Waiting Caller ...
Similar Questions

Where Can I Get The Cordless Phone For 27958ge1-b
(Posted by akellman 9 years ago)

I Have A Ge 27956fe1 - Photophone Cordless And I Need The Diagram Because I Live
I Live in PERU, there are´nt who repair my phone. Thanks
I Live in PERU, there are´nt who repair my phone. Thanks
(Posted by faliagapea 10 years ago)

In India. Not Showing Caller Id, Other Phone Its Showing.
caller id not working. when i connent other phone, id is visible. tried everything including reset, ...
caller id not working. when i connent other phone, id is visible. tried everything including reset, ...
(Posted by vickskhanna 11 years ago)

Where Can I Buy This Phone Ge 28118be1 - Digital Cordless Phone
(Posted by michellesophielee 11 years ago)

Ge 27956fe1 Photo Phone
I have the GE PhotoPhone, Model 27956. Our electricity went out during a storm I cant find the manua...
I have the GE PhotoPhone, Model 27956. Our electricity went out during a storm I cant find the manua...
(Posted by carecvti 12 years ago)