Dynex DX-L32-10A Support Question
Dynex DX-L32-10A Support Question
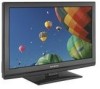
Find answers below for this question about Dynex DX-L32-10A - 32" LCD TV.Need a Dynex DX-L32-10A manual? We have 4 online manuals for this item!
Question posted by pabdfl on September 16th, 2021
Is This Tv Bluetooth?
is this tv Bluetooth or if not is there any wY to make this tv Bluetooth. Ty kindly
Current Answers
Answer #1: Posted by SonuKumar on September 17th, 2021 12:48 AM
SonuKumar

Member since:
May 9th, 2021 Points: 16,604,590

Member since:
May 9th, 2021 Points: 16,604,590
https://www.cnet.com/products/dynex-dx-l32-10a/
No -It has no Bluetooth !!
Please respond to my effort to provide you with the best possible solution by using the "Acceptable Solution" and/or the "Helpful" buttons when the answer has proven to be helpful.
Regards,
Sonu
Your search handyman for all e-support needs!!
Related Dynex DX-L32-10A Manual Pages
Warranty (English) - Page 1
...to the original purchaser of the product • Plasma display panel damaged by static (non-moving) images applied for a television with the product. This warranty also does not cover:
www....the web site. If service of the product ("Warranty Period").
WHERE IS THE WARRANTY VALID?
Make sure that provides the same amount of protection as lightning strikes • Accident • Misuse...
User Manual (English) - Page 2
...control 8 Programming a universal remote control to work with your TV 9
Making connections 9
Connecting the power 9 Connecting an antenna, cable TV, or satellite TV box 10 Connecting a VCR 10 Connecting a camcorder or ...settings 16 Displaying additional information 16
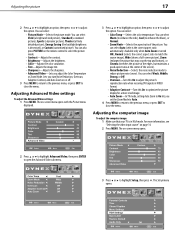
Adjusting the picture 16
Adjusting the TV picture 16 Adjusting Advanced Video settings 17 Adjusting the computer image 17...
User Manual (English) - Page 5
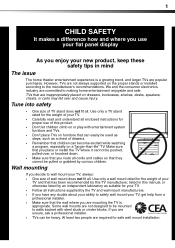
..., desks, speakers, chests, or carts may fall over , or knocked down.
• Make sure that you route all . Make sure that you decide to safely wall mount your TV.
• Carefully read and understand all enclosed instructions for proper use your flat panel display
As you enjoy your new product, keep these safety tips in...
User Manual (English) - Page 6

...Install in the vicinity of power supplied to qualified service technicians.
Handling the LCD panel • Your TV's screen is located on the marking label.
A polarized plug has two blades... extreme care should not be careful of broken glass. • If the LCD panel is broken, make sure that the service technician uses replacement parts specified by the manufacturer, or sold...
User Manual (English) - Page 7
...No. 70, provides information with your TV picture and sound, operating problems, or even damage, keep your TV, make sure that the room temperature rises gradually...require extensive work by a qualified technician to restore your TV to its new surroundings for correct grounding.
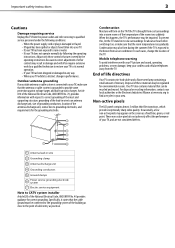
Non-active pixels
The LCD panel contains almost 3 million thin film transistors, which provide ...
User Manual (English) - Page 8
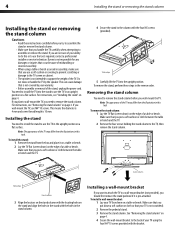
... are not sure of a table or bench. Note: The appearance of the TV. Make sure that you put down on a flat surface. To remove the stand, perform these instructions carefully before you want to attach the TV to remove the stand column. Make sure that you put a soft cushion or cloth between the table or...
User Manual (English) - Page 9
...mode. To disconnect power, unplug the power cord.
Lights blue when your TV is still flowing into the TV. TV components
5
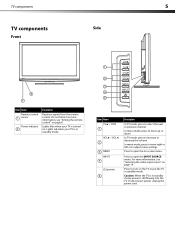
TV components
Side
Front
2 1
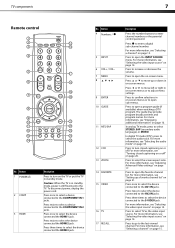
Item Name Remote control
1 sensor
Power indicator 2...signals from the remote control. For more information, see "Aiming the remote control" on . In TV mode, press to adjust menu settings. In menu mode, press to move up or down. For ...
User Manual (English) - Page 10
... see "Connecting headphones" on page 10. For more information, see "Connecting an antenna, cable TV, or satellite TV box" on page 12.
Do not use . AV1 IN with AUDIO R / L
Connect ...S-Video device" on page 10. For more information, see "Connecting the power" on page 11.
6
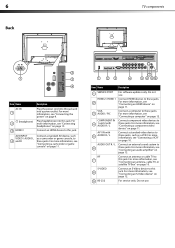
Back
TV components
2
1
3
4
Item Name
Description
AC IN 1
2
(headphone)
3 HDMI 3
Plug the power ...
User Manual (English) - Page 11
... on page 14.
Press to the COMPONENT IN 1 jacks. Press once to select a device connected to select TV as the video input source.
Button 4 Numbers /
5 INPUT 6 VOL+ / VOL- 7 MENU 8
9...the favorite channel list. Press to enter channel numbers or the parental control password.
In analog TV mode, press to select the screen aspect ratio.
Press to select STEREO, SAP (secondary audio...
User Manual (English) - Page 12
...
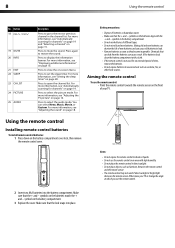
Installing remote control batteries
To install remote control batteries: 1 Press down on page 28. Make sure that the + and - For more information, see "Setting the sleep timer" on...to select the picture mode.
Either move your TV. Make sure that
can leak from the batteries can cause a rash. For more information, see "Adjusting the TV picture" on the front of new batteries and...
User Manual (English) - Page 13
... universal remote control, and the model number is often visible on the back.
• If your universal remote control isn't listed on the TV. • Make sure that all Dynex TVs manufactured after Jan. 1, 2007)
Universal remote control manufacturer and model
Philips PHDVD5, DirectTV
PH5DSS,
RC23
PMDVR8, PDVR8
RCA RCU807
One for All...
User Manual (English) - Page 14
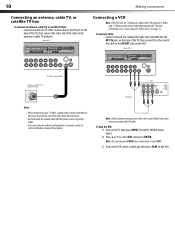
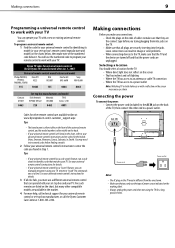
... times to adjust the antenna. The INPUT SOURCE menu opens. 2 Press or to the antenna or cable TV wall jack. To play the VCR: 1 Turn on the VCR.
To connect a VCR: • ... the colors when you are often color-coded. 10
Making connections
Connecting an antenna, cable TV, or satellite TV box
To connect an antenna, cable TV, or satellite TV box: • Connect one end of a 75-...
User Manual (English) - Page 15
Making connections
11
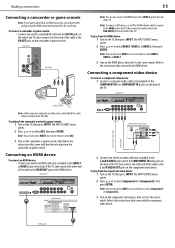
Connecting a camcorder or game console
Note: If your game console has an HDMI connection, you ... game console, then follow the instructions that came with the HDMI device. To play the game console: 1 Turn on the back of TV
Game console
Note: Cable connectors and jacks are often color-coded. Connecting a component video device
To connect a component video device: 1 ...
User Manual (English) - Page 16

... adjust the computer display properties as needed. To play from the computer: 1 Turn on the TV, then press INPUT.
Refer to the instructions that came with the S-Video device.
2 Connect one...an HDMI device" on the S-Video device, then set it to select S-Video, then press ENTER. 12
Making connections
Connecting an S-Video device
Note: The AV1 VIDEO and S-VIDEO jacks share the same L and R...
User Manual (English) - Page 17
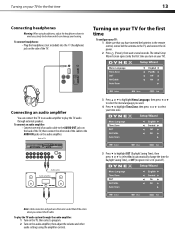
...cable to the AUDIO IN jacks on the audio amplifier.
Turning on your TV for Daylight Saving Time), or Off (to the TV, and connect the AC power.
2 Press (Power), then wait several ...seconds.
Turning on your hearing.
Match the colors when you turn on your TV for the first time
To configure your TV: 1 Make sure that you want.
4 Press to highlight Time Zone, then press or to ...
User Manual (English) - Page 18
.... On-screen menu overview
Picture menu
Understanding the basics
Turning your TV on or off
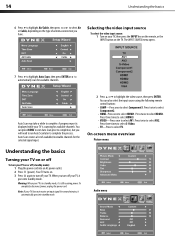
To turn your TV on or off your TV.
Press twice to select Component2.
• HDMI-Press once to...available channels.
Selecting the video input source
To select the video input source: 1 Turn on your TV does not receive an input signal for available channels. The INPUT SOURCE menu opens.
7 Press ...
User Manual (English) - Page 19
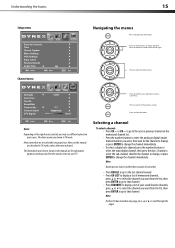
Notes:
Depending on your TV. Menu items that channel. Selecting a channel
To select a channel: • Press CH or CH to go to ... through the pages. The illustrations and screens shown in the manual are grayed out.
Menus in this manual are shown in TV mode, unless otherwise indicated.
Note:
If either list has more than one page, press or to the previous screen. The...
User Manual (English) - Page 20

...Press INFO to restore the sound. 16
Adjusting the picture
Digital sub-channels A digital TV signal transmits more data than an analog signal. to increase or decrease the volume. &#... mode information-Displays channel number, station name, channel label (if preset), broadcast program name, TV rating, signal type, audio information, resolution, CC mode, current time, and current program start...
User Manual (English) - Page 21
...14.
2 Press MENU.
The Setup menu opens. For more vivid image.
• Auto Zoom-In TV mode, setting Auto Zoom to On lets you turn Noise Reduction, Overscan, Adaptive Contrast, and Auto Zoom... the Advanced Video sub menu. Adjusting the computer image
To adjust the computer image: 1 Make sure that your TV is in VIDEO format.
• Adaptive Contrast-Turn this On to reduce picture noise (...
User Manual (English) - Page 36
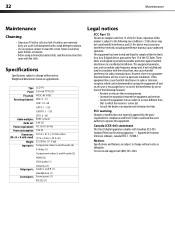
... Type Panel TV system Receiving channels
Audio multiples Audio out
Power requirement Power consumption
Dimensions (W × H × D with stand)
Weight Input ports
Output ports Control ports
LCD TV 32-inch TFT LCD NTSC-M, ...support call (800) 305-2204.
Standard Television Receiving Apparatus - 32
Maintenance
Maintenance
Cleaning
• Clean your TV with a weak detergent solution.
• ...
Similar Questions

What Receiver Can I Hook Up To My New 32 Lcd Tv For Surround Sound
(Posted by jmsmive 9 years ago)

Picture Is Out But There Is Sound. On A Dynex Tv Modle No. Dx32l200a12
(Posted by Anonymous-118342 10 years ago)


Where Can You Purchase The Main Boards For The Dx-lcd32-09- 32' Lcd Tv
(Posted by ricked30 12 years ago)

How Do I Hook Up My Dvd Player To My Dynex Lcd-tv Model# Dx-l32-10c
I have no manual with my TV and do not know which oulets to plug in my red white yellow plugs. There...
I have no manual with my TV and do not know which oulets to plug in my red white yellow plugs. There...
(Posted by sannymacneil 13 years ago)