Get support for Dell Precision T7400

Dell Precision T7400 Support Question

Dell Precision T7400 Support Question

Find answers below for this question about Dell Precision T7400.
Need a Dell Precision T7400 manual? We have 3 online manuals for this item!
Question posted by rjonoubei on July 28th, 2011

Memory Riser On Dell T7400

Hello,   I currently have 4x4GB Dimms on the system Total 16GB. I would like to upgrade to 64GB. Would you know which Dell Riser card I would need?    Thanks,   Rodney

Current Answers

Answer #1: Posted by kcmjr on July 28th, 2011 3:51 PM
This answer was accepted by the poster of the original question.
kcmjr

Member since:
May 5th, 2011

Points: 4,254,255
1,090
points
You won't like this....

Memory riser cards are integrated with the system chassis and must be ordered at time of system purchase only. This option will not be
available as an after point of sale customer kit or service kit.

This is taken from the spec sheet available here: http://www.dell.com/downloads/global/products/precn/en/precn_t7400_specsheet.pdf

You might try giving Dell support a phone call and discussing it but since this system has been available since before 2008 I suspect you will be unable to expand beyond 32 gig.


Licenses & Certifications: Microsoft, Cisco, VMware, Novell, FCC RF & Amateur Radio licensed.
Answer #2: Posted by mark39770 on August 31st, 2011 10:16 PM
mark39770

Member since:
August 31st, 2011

Points: 100
100
points
On the dell support forums there is a thread with the part numbers you need.  You can find them on ebay.  Some parts are shared with the 690; but some aren't.  Also, from what I can tell, the maximum speed of the memory with a riser card is 667 mhz instead of 800.  Not a huge slowdown but maybe you would be better off with 8x8GB fb-dimms instead of a riser card and 16x4GB

Related Dell Precision T7400 Manual Pages

User's Guide - Page 9

... (32-bit Operating Systems Only 174 Removing Memory Without Memory Riser Cards . 175 Memory Installation (With Optional Memory Riser Cards) 179 Installing Memory (With Optional Memory Riser Cards) 180 Removing Memory (With Optional Memory Riser Cards) 187 Cards 194 Expansion Card Support 194 Installing an Expansion Card 195 Removing an Expansion Card 202 Removing a PCI Express Graphics...
User's Guide - Page 26

its thumbscrews must be sufficiently tight in place; Inside View 1 2 3 4 5 6 7 1 power supply 2 hard drive bay 3 memory shroud NOTICE: The memory shroud holds the (optional) memory riser cards in order to secure the risers and to avoid damage. 4 5.25-inch drive bay 5 5.25-inch drive bay with 3.5-inch drive panel plate 26 About Your Computer
User's Guide - Page 29

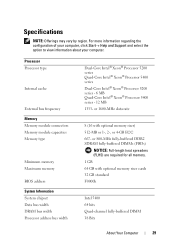
...-Core Intel® Xeon® Processor 5400 series - 12 MB 1333- or 1600-MHz data rate 8 (16 with optional memory riser cards 32 GB standard F0000h Intel 5400 64 bits Quad-channel fully-buffered DIMM 38 Bits About Your Computer 29 Specifications NOTE: Offerings may vary by region. For more information regarding the configuration...
User's Guide - Page 151

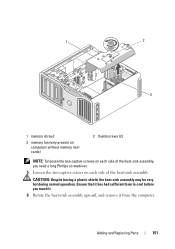
Ensure that it has had sufficient time to cool before you need a long Phillips screwdriver. 5 Loosen the two captive screws on each side of the heat-sink assembly. 1 2 3 1 memory shroud 3 memory fan (only present on computers without memory riser cards) 2 thumbscrews (2) NOTE: To loosen the two captive screws on each side of the heat-sink assembly, you...
User's Guide - Page 155

... extended. NOTICE: You must position the processor correctly in the socket to avoid permanent damage to touch the underside of the processor. 1 2 3 1 memory shroud 3 memory fan (only present on systems without memory riser cards) 2 thumbscrews (2) 4 If you are replacing a processor, remove the processor (see "Removing the Processor" on page 150). 5 Unpack the new processor, being...
User's Guide - Page 175

... in "Before You Begin" on page 141). 3 Loosen the captive thumbscrews that secure the memory shroud and lift it ; avoid bending over , potentially resulting in the Product Information Guide. ...Failure to maneuver. You can be installed at all times to avoid injury; Removing Memory Without Memory Riser Cards CAUTION: Before you touch any of the procedures in this computer requires a two-...
User's Guide - Page 179

... riser cards and to install memory on any other card. Each memory riser card is populated on them. The memory slots on each other slots (DIMM_5-8) must be populated on . Do not attempt to disconnect the memory riser cards from the computer in the upper left vacant. that they are connected together in place; These numbers indicate which DIMM slot on each riser card...
User's Guide - Page 180

... in order of the procedures in this computer requires a two-man lift. Installing Memory (With Optional Memory Riser Cards) CAUTION: Before you touch any of their labels on the system board; You can be difficult to ensure maximum system stability. Always lift correctly to ...
User's Guide - Page 182

... to remove, gently ease it back and forth to remove it from the DIMM_1 and DIMM_2 slots on the system board. 1 2 3 1 power connectors (4) 3 securing clips (2) 2 memory connectors (4) 4 Disconnect the power cable from memory riser card 1 and 2. 5 Grasp the memory riser card 1 at each corner and lift memory riser card 1 and attached card 2 from the connector. 182 Adding and Replacing Parts
User's Guide - Page 183

... back and forth to cool before you are required for any memory in a memory riser and for 667 MHz DIMMs. Adding and Replacing Parts 183 Ensure that memory modules have had sufficient time to remove it from the DIMM_3 and DIMM_4 memory module connectors on the memory riser card into which you touch them. 8 Press out the securing clip...
User's Guide - Page 184

... is facing the correct direction; NOTE: Align the memory module carefully to the memory module, press the module straight down into the connector while you insert the module correctly, the securing clips snap into position. FBDs on memory riser cards 1 and 2 face a different direction than those on riser cards 3 and 4. 9 Align the notch on the bottom of...
User's Guide - Page 185

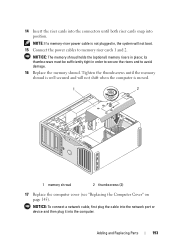
...system-board connector. 12 Insert the riser cards into the connectors until both riser cards snap into position. 1 2 1 memory riser cards 1 and 2 2 memory riser cards 3 and 4 NOTE: If a memory-riser power cable is not plugged in each system-board connector. 11 Ensure that memory riser card 1 is above system-board connector DIMM_1 and memory riser card 2 is above system-board connector DIMM_4...
User's Guide - Page 186

... Insert the riser cards into the connectors until the memory shroud is well secured and will not shift when the computer is not plugged in, the system will not boot. 16 Connect the power cables back into memory riser cards 1 and 2. 1 2 1 memory shroud 2 thumbscrews (2) NOTICE: The memory shroud holds the (optional) memory risers in order to secure the risers and to...
User's Guide - Page 187

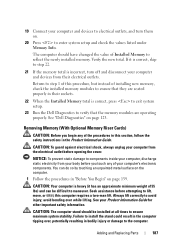
...metal surface on the computer. 1 Follow the procedures in their electrical outlets. Removing Memory (With Optional Memory Riser Cards) CAUTION: Before you touch any of the procedures in this section, follow the... devices from their sockets. 22 When the Installed Memory total is correct, press to exit system setup. 23 Run the Dell Diagnostics to verify that they are operating properly. Always ...
User's Guide - Page 188

Ensure that secure the memory shroud and lift it away from memory riser cards 1 and 2. 188 Adding and Replacing Parts CAUTION: Fully-buffered memory modules may become very hot during normal operation. 2 Remove the computer cover (see "Removing the Computer Cover" on page 141). 1 2 1 memory shroud 2 thumbscrews (2) 3 Loosen the captive thumbscrews that memory modules have had ...
User's Guide - Page 189

If a card is difficult to remove, gently ease it back and forth to remove it from the DIMM_1 and DIMM_2 memory module connectors on the system board. Adding and Replacing Parts 189 1 2 3 1 power connectors (4) 3 securing clips (2) 2 memory module connectors (4) 5 Grasp the memory riser card 1 at each corner and lift memory riser card 1 and attached card 2 from the connector.
User's Guide - Page 190

1 2 1 memory riser cards 1 and 2 2 memory riser cards 3 and 4 6 Disconnect the power cables from memory riser cards 3 and 4. 190 Adding and Replacing Parts
User's Guide - Page 191

.... 9 Grasp the module and pull up to lift the memory module from the memory riser card. 1 2 3 1 power connectors (4) 3 securing clips (2) 2 memory module connectors (4) 7 Grasp the memory riser card 3 at each corner and lift memory riser card 3 and attached card 4 from the DIMM_3 and DIMM_4 memory module connectors on the memory riser card from which you touch them. 8 Press out the securing...
User's Guide - Page 192

... the crossbar in , the system will not boot. 1 2 3 1 power connectors 3 securing clips (2) 2 connector 12 Connect the power cables to memory riser cards 3 and 4. 13 Ensure that memory riser card 3 is above system-board connector DIMM_3 and memory riser card 4 is above system-board connector DIMM_4. Align the notch on the bottom of each system-board connector. 192 Adding and...
User's Guide - Page 193

...Connect the power cables to avoid damage. 16 Replace the memory shroud. NOTICE: The memory shroud holds the (optional) memory risers in order to secure the risers and to memory riser cards 1 and 2. Tighten the thumbscrews until both riser cards snap into the computer. NOTE: If a memory-riser power cable is moved. 1 2 1 memory shroud 2 thumbscrews (2) 17 Replace the computer cover (see...

Similar Questions

What Is The Part Number For The Memory Riser Board Retention Bracket?
I am updating the memory of Dell Precision 530 up to 4 GB and I need the memory riser board retentio...
(Posted by metalmariachi2000 10 years ago)
Dell Precision T7400 Enters Power Save Mode At Startup
The monitor attached to my Dell Precision T7400 enters power save mode right at startup...no startup...
(Posted by luc6269 10 years ago)
Memory Riser Boards
What are the prat numbers of the memory riser boards
(Posted by peteraucott 11 years ago)
Ask a New Question
Use the box below to post a new question about this Dell product .
Points & Prizes
  • You can earn points for nearly everything you do on HelpOwl.com
  • You can trade in those points for gift cards at leading retailers such as Amazon.com and Walmart
  • It's that simple!
See How it Works
Create a Free Account

Dell Manuals

Find free Dell Precision T7400 manuals and user guides available at ManualOwl.com. Try out our unique manual viewer allowing you to interact with manuals from directly within your browser!

Dell Reviews

View thousands of Dell user reviews and customer ratings available at ReviewOwl.com.

Contact Information

Complete Dell customer service contact information including steps to reach representatives, hours of operation, customer support links and more from ContactHelp.com.

Scoreboard Ratings

See detailed Dell customer service rankings, employee comments and much more from our sister site.

Dell Recalls

Find comprehensive Dell recall information updated hourly on RecallOwl.com.