
Dell PowerEdge 1900 Support Question
Dell PowerEdge 1900 Support Question
Find answers below for this question about Dell PowerEdge 1900.Need a Dell PowerEdge 1900 manual? We have 7 online manuals for this item!
Question posted by sttc on January 26th, 2014
How To Install Dell Poweredge 1900 Drive Caddy
The person who posted this question about this Dell product did not include a detailed explanation. Please use the "Request More Information" button to the right if more details would help you to answer this question.
Current Answers
Related Dell PowerEdge 1900 Manual Pages
Getting Started Guide - Page 5
...If you decide to six 3.5-inch, internal Serial-Attached SCSI (SAS) hard drives or six 3.5-inch, internal SATA hard drives.
• Peripheral bay provides support for symmetric multiprocessing (SMP), which is ... hardware and software features of your system by installing a second processor, you must order the processor upgrade kits from Dell contains the correct version of the processor and ...
Hardware Owner's Manual (PDF) - Page 25
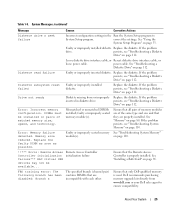
... Replace the diskette. Remote Access Controller initialization failure
Ensure that only Dell-qualified memory is properly installed.
If the problem
drive.
Mismatched or unmatched DIMMs installed;
See "Troubleshooting a
Diskette Drive" on page 33. Drive not ready
Diskette missing from www.dell.com or your Dell sales agent to
System Setup program. If the problem persists...
Hardware Owner's Manual (PDF) - Page 29
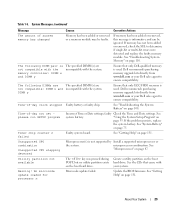
...removed or a memory module may be ignored. Dell recommends purchasing memory upgrade kits directly from www.dell.com or your system.
Unsupported CPU combination
...Install a supported microprocessor or
the system. See "Troubleshooting the System Battery" on page 75.
Utility partition not available
The key was pressed during POST, but no utility partition exists on the boot hard drive...
Hardware Owner's Manual (PDF) - Page 36

...bus, and any installed expansion cards that have keyboards attached.
CPU Information
Displays information related to each of the Logical Processor option.
See support.dell.com for more ... IRQ. Embedded Server Management
Displays a screen to configure the front-panel LCD options and to 84-key keyboards). Hard disk allows the USB flash drive to the keyboard...
Hardware Owner's Manual (PDF) - Page 136
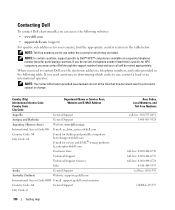
... print and is specific for participating countries. If you need assistance in the following websites: • www.dell.com • support.dell.com (support) For specific web addresses for servers and EMC® storage products: la_enterprise@dell.com
Customer Care
Technical Support
Technical Support Services
Sales
Aruba
General Support
Australia (Sydney)
Website: support.ap...
Hardware Owner's Manual (PDF) - Page 160
...system used most of all the space and all drive letters on the devices or by its 9-pin...When such devices are connected in memory that allows you call Dell for the devices.
160
Glossary
SMP - system.ini file ...prevent reflections and spurious signals in an array. VGA and SVGA are installed for the Windows operating environment. rpm - See RAM.
Small computer system...
Hardware Owner's Manual (PDF) - Page 161
...graphics-mode application programs and operating systems to the host server. video resolution - Watt-hour(s). When you must install the appropriate video drivers and your system in combination with... failure. utility - A program used to connect to manage system resources- memory, disk drives, or printers, for multiple USB-compliant devices, such as the number of pixels across ...
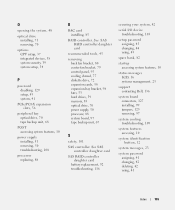
Hardware Owner's Manual (PDF) - Page 163
..., 48 opening, 48 CPU setup options, 37
D
damaged systems troubleshooting, 107
Dell contacting, 136
diagnostics checklist, 135 testing options, 122 when to use, 121
DIMM installing, 83 removing, 85 sockets, 80
diskette drive drive carrier, 74 installing, 74 removing, 72 troubleshooting, 112
drive carrier diskette drive, 74
E
error messages, 33 LCD, 16 systems management, 23
expansion cards...
Hardware Owner's Manual (PDF) - Page 164
F
fan bracket back, 80 center, 79 cooling shroud, 54
fans, 52 installing and removing, 53 numbered, 53
features back-panel, 14 front-panel, 11
G
guidelines for memory installation, 82
H
hard drive troubleshooting, 115
hard drives, 59 installing, 61 removing, 59
hot-plug fans, 53 power supplies, 50
I
indicators back-panel, 14 front-panel, 11 LCD, 16...
Hardware Owner's Manual (PDF) - Page 165
... features, 10
status messages LCD, 16 systems management, 23
support contacting Dell, 136
system board connectors, 127 installing, 99 jumpers, 125 removing, 97
system cooling troubleshooting, 109
system features...control panel, 95 cooling shroud, 77 diskette drive, 72 expansion cards, 58 expansion-bay bracket, 98 fans, 53 hard drives, 59 memory, 85 optical drive, 70 power supply, 50 processor, 88...
Information Update - Page 1
Dell™ PowerEdge™ 1900 Systems
Information Update
www.dell.com | support.dell.com
Installing a SATA Optical Drive - Page 1
Dell™ PowerEdge™ 19x0 and 29x0 Systems
Installing a SATA Optical Drive
Installing a SATA Optical Drive - Page 3

... System" in your Hardware Owner's Manual for specific step instructions. See "Removing a SAS Controller Daughter Card" in your Hardware Owner's Manual.
3 Remove the system cover.
Installing a SATA Optical Drive
These instructions apply to Dell™ PowerEdge™ systems to remove the system cover and access any of the peripheral bay and remove the optical...
Installing a SATA Optical Drive - Page 4

Preparing the Optical Drive Tray - The PowerEdge 2900 and 1900 systems do not reuse the interposer board attached to separate the drive from the drive carrier and install the new SATA drive in the side of the drive tray to release the interposer board connected to lock it into the tray and press the drive down to the optical drive. The...
Installing a SATA Optical Drive - Page 5

... rails to attach the drive to the old drive. See Figure 1-2. Installing a SATA Optical Drive
5 Replacing the Optical Drive in a PowerEdge 2950 or 2970 System
2 1
3
4
5
6
7
1 optical drive 3 interposer 5 SATA power cable 7 optical drive carrier
2 interposer release latch 4 SATA cable 6 carrier latch
Replacing a PowerEdge 1950 Optical Drive
NOTE: The replacement drive tray provided in the...
Installing a SATA Optical Drive - Page 6

... cable) to the SATA_A connector on the system board. a Route the cable through the power cable cutout in a PowerEdge 1950 Drive Tray 2 3
1 4
5
1 optical drive 3 SATA power cable 5 optical drive carrier
2 SATA cable 4 carrier latch
Installing the SATA Optical Drive -
c Connect the cable to the back of the chipset shroud. See Figure 1-3.
Figure 1-2. b Bend the cable toward...
Installing a SATA Optical Drive - Page 7

... 2
1
3
4
6
5
1 SATA data cable 3 chipset shroud 5 SATA power cable
2 SATA_A connector on the system and attached peripherals. Installing the SATA Optical Drive - PowerEdge 2970 or 2950
1 Insert the optical drive tray into the system until it is fully inserted and locked into position.
2 Connect the SATA cable (the end with the branching power cable) to...
Installing a SATA Optical Drive - Page 8

...front of the system until the bracket detaches from the chassis slots.
6 Route the SATA cable in the cable channel in the PowerEdge 2950 and 2970
1
2
3 4 5
1 SATA_B connector on the system board. SATA Cable Routing in the right wall of... connector on system board 2 cable retention bracket
3 SATA data cable
4 SATA power cable
5 optical drive
8
Installing a SATA Optical Drive Figure 1-4.
Installing a SATA Optical Drive - Page 9

... the center fan bracket.
7 Route the SATA cable to the CD/TBU connector on the system and attached peripherals. For a PowerEdge 2900, use the SATA_D connector.
Installing the SATA Optical Drive - See Figure 1-5.
- For a PowerEdge 1900 system, connect to the power supply as follows:
- See "Replacing the Center Fan Bracket" in your Hardware Owner's Manual...
Installing a SATA Optical Drive - Page 10

... power and turn on system board
8 Reconnect the cables to the SAS controller daughter card.
9 Close the system. Figure 1-5. See "Closing the System" in a PowerEdge 2900 or 1900
3
2
4
5 1
1 optical drive 3 SATA data cable 5 SATA power connector on SAS
backplane (PowerEdge 2900 only)
2 SATA power cable 4 SATA connector on the system and attached peripherals.
10...


